Summary of Automatic Water Dispenser using Arduino
Automatic Water Dispenser using Arduino summary: An Arduino-controlled water dispenser uses an HC-SR04 ultrasonic sensor to detect a glass within 10 cm and a 12V solenoid valve driven by an IRF540 MOSFET to open/close water flow. The MOSFET gate is driven from Arduino D12 (through 1k) with a 10k pull-down; the ultrasonic Echo and Trigger use D8 and D9. Onboard LED on D13 mirrors solenoid state. The system runs on a 12V adapter powering the solenoid and Arduino Vin.
Parts used in the Automatic Water Dispenser using Arduino:
- Solenoid Valve (12V, max 1.5A, continuous ~700mA)
- Arduino Uno (any version)
- HC-SR04 Ultrasonic Sensor
- IRF540N N-Channel MOSFET
- 1k Resistor
- 10k Resistor
- Breadboard
- Connecting Wires
- 12V Adapter (for powering Arduino Vin and solenoid)
Automatic Water Dispenser using Arduino
Approximately 71% of the Earth’s surface is water, yet only a meager 2.5% of it is potable. Due to increased population, pollution, and climate change, it is anticipated that we will face year-round water scarcity as early as 2025. On one side, there are already small disagreements between countries and states over dividing river water, while on the other hand, we humans squander a significant amount of drinking water because of our carelessness.
Although it may seem insignificant initially, if your faucet dripped one drop of water per second, it would only take about five hours to waste one gallon of water, which is sufficient for an average person to live on for two days. What measures can be taken to prevent this? The solution, as usual, can be found in advancements in technology. By replacing manual taps with a smart one that opens and closes automatically, we can conserve water and improve our hygiene by avoiding touching the tap with dirty hands. In this endeavor, we’ll create an Automated Water Dispenser with an Arduino and a Solenoid valve that dispenses water automatically when a glass is brought close to it. Doesn’t that sound awesome! Therefore, let’s construct one…
Materials Required
- Solenoid Valve
- Arduino Uno (any version)
- HCSR04 – Ultrasonic Sensor
- IRF540 MOSFET
- 1k and 10k Resistor
- Breadboard
- Connecting Wires
Working Concept
The idea behind the Automatic Water Dispenser is quite straightforward. We will utilize an HCSR04 Ultrasonic Sensor to verify if there is any object positioned in front of the dispenser, like the glass. A solenoid valve will regulate water flow by allowing water to pass through when active and stopping the flow when inactive. We will create an Arduino code that constantly monitors for any objects close to the faucet. If an object is detected, the solenoid will activate and remain on until the object is no longer present, at which point the solenoid will deactivate, stopping the water supply. Discover more information on how to utilize an Ultrasonic sensor with an Arduino by clicking this link.
Circuit Diagram
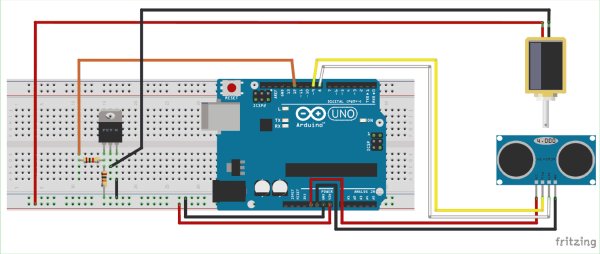
The complete circuit diagram for Arduino based water Dispenser is shown below

The project utilizes a 12V solenoid valve that has a maximum current rating of 1.2A and a continuous current rating of 700mA. When the Valve is switched on, it will use approximately 700mA of power to remain open. An Arduino is a Development board that runs on 5V, so a switching driver circuit is required for the Solenoid to be controlled.
The IRF540N N-Channel MOSFET is the switching device utilized in this project. The first pin has the three pins Gate, Source, and Drain in that order. The solenoid’s positive terminal is connected to the Vin pin of the Arduino, as illustrated in the circuit diagram. The Vin pin on the Arduino will produce 12V when powered by a 12V adapter, allowing it to control the Solenoid. The ground is connected to the negative terminal of the solenoid through the Source and Drain pins of the MOSFET. Therefore, the solenoid will receive power only when the MOSFET is activated.
The MOSFET’s gate pin is used for controlling its on-off state. If the gate pin is grounded, it will stay off; if a gate voltage is applied, it will turn on. In order to ensure the MOSFET remains in the off state with no voltage at the gate pin, a 10k resistor is used to ground the gate pin. Pin 12 of the Arduino controls the MOSFET, with the gate pin connected to D12 through a 1K resistor for switching on and off. This 1K resistor is employed for the purpose of limiting current.
The Ultrasonic Sensor is connected to the Arduino’s +5V and ground pins for power. The Echo and Trigger pins are linked to pin 8 and pin 9, respectively. Next, we can instruct the Arduino to utilize the Ultrasonic sensor for distance measurement and activate the MOSFET upon detecting an object. The entire circuit is uncomplicated, allowing for easy assembly on a breadboard. After connecting everything, mine appeared similar to the one shown below.
Programming the Arduino Board
We need to develop a program for this assignment that utilizes the HCSR-04 Ultrasonic sensor to calculate the distance of an object positioned in front of it. If the distance is under 10cm, we need to activate the MOSFET; if not, we need to deactivate it. We will also utilize the built-in LED connected to pin 13 and switch it on and off along with the MOSFET to verify its current state. The full set of instructions for achieving the same outcome is provided towards the conclusion of this page. Right under, I have detailed the program by dividing it into concise, meaningful sections.
The program begins by defining macros. The Ultrasonic sensor is connected to the trigger and echo pin while the MOSFET gate pin and LED are used as input/output for the Arduino. We have determined the specific pin to which these will be attached. In our hardware setup, we have linked the Echo and Trigger pins to digital pins 8 and 9, respectively. Next, the pin 12 is connected with the MOSFET pin and the onboard LED is initially connected to pin 13. We describe the identical by using the subsequent sentences
#define trigger 9
#define echo 8
#define LED 13
#define MOSFET 12
Inside the setup function we declare which pins are input and which are output. In our hardware only the Echo pin of Ultrasonic(US) sensor is the input pin and rest all are output pins. So we use the pinMode function of Arduino to specify the same as shown below
pinMode(trigger,OUTPUT);
pinMode(echo,INPUT);
pinMode(LED,OUTPUT);
pinMode(MOSFET,OUTPUT);
In the main loop function, we invoke the function measure_distance(). This function utilizes the US sensor to calculate the distance of the object ahead and then assigns this value to the variable ‘distance’. In order to calculate distance with a US sensor, you need to keep the trigger pin low for two microseconds, then high for ten microseconds, and finally low again for two microseconds. Ultrasonic signals will be emitted into the air and reflected by the object ahead, with the echo pin detecting the reflected signals. Next, we utilize the time measurement to determine the distance of the object in front of the sensor. To learn how to connect the HC-SR04 Ultrasonic sensor to Arduino, check out the provided link. Below is the provided program for determining distance.
digitalWrite(trigger,LOW);
delayMicroseconds(2);
digitalWrite(trigger,HIGH);
delayMicroseconds(10);
digitalWrite(trigger,LOW);
delayMicroseconds(2);
time=pulseIn(echo,HIGH);
distance=time*340/20000;
Once the distance is calculated, we have to compare the value of distance using a simple if statement and if the value is less than 10cm we make the MOSFET and LED to go high, in the following else statement we make the MOSFET and LED to go low. The program to do the same is shown below.
if(distance<10)
{
digitalWrite(LED,HIGH);digitalWrite(MOSFET,HIGH);
}
else
{
digitalWrite(LED,LOW);digitalWrite(MOSFET,LOW);
}
Working of Automatic Water Dispenser
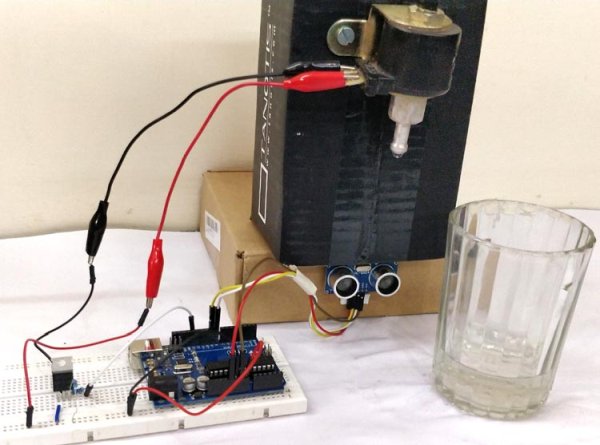
Connect the components as illustrated in the circuit and transfer the provided program to your Arduino board. Set up a basic connection for the solenoid valve to the water inlet and use a 12V adapter to power the circuit through the DC jack of the Arduino board. Ensure that the onboard LED is switched off in order to guarantee that the Solenoid is also not active. The arrangement I have created to illustrate the project is displayed underneath.

I positioned the Ultrasonic sensor right beneath the solenoid valve so that when the glass or tumbler is placed under the solenoid, it aligns directly with the ultrasonic sensor. The ultrasonic sensor will detect the object, causing the MOSFET and LED to activate, resulting in the solenoid opening and allowing the water to flow out.
Likewise, once the glass is taken away, the ultrasonic sensor notifies the Arduino that there is no glass present, prompting the Arduino to shut the valve. The video below contains a detailed explanation of the project’s entire operation. If you are uncertain about how to make this function, feel free to ask in the comments or seek assistance in the forum for technical support.
Caution: Make sure to use a solenoid that operates at 12V and does not consume more than 1.5A maximum, as different solenoid valves have varying operating voltage and current ratings.
Code
#define trigger 9
#define echo 8
#define LED 13
#define MOSFET 12
float time=0,distance=0;
void setup()
{
Serial.begin(9600);
pinMode(trigger,OUTPUT);
pinMode(echo,INPUT);
pinMode(LED,OUTPUT);
pinMode(MOSFET,OUTPUT);
delay(2000);
}
void loop()
{
measure_distance();
if(distance<10)
{
digitalWrite(LED,HIGH);digitalWrite(MOSFET,HIGH);
}
else
{
digitalWrite(LED,LOW);digitalWrite(MOSFET,LOW);
}
delay(500);
}
void measure_distance()
{
digitalWrite(trigger,LOW);
delayMicroseconds(2);
digitalWrite(trigger,HIGH);
delayMicroseconds(10);
digitalWrite(trigger,LOW);
delayMicroseconds(2);
time=pulseIn(echo,HIGH);
distance=time*340/20000;
}
Video
Read More Information…
Automatic Water Dispenser using Arduino!
- What triggers the solenoid valve to open?
The HC-SR04 ultrasonic sensor detecting an object within 10 cm triggers the Arduino to activate the MOSFET and open the solenoid. - How is the solenoid powered and switched?
The solenoid is powered from the 12V adapter connected to Arduino Vin and switched to ground through the IRF540 MOSFET controlled by Arduino D12. - What protects the MOSFET gate from floating?
A 10k resistor pulls the MOSFET gate to ground to ensure it stays off when no gate voltage is present. - Which Arduino pins connect to the ultrasonic sensor?
Trigger is connected to pin 9 and Echo is connected to pin 8. - How does the code measure distance with the HC-SR04?
It pulses Trigger low-high-low, measures pulse duration on Echo with pulseIn, then calculates distance using distance = time*340/20000. - What happens when the object is no longer detected?
The Arduino sets the MOSFET and onboard LED low, deactivating the solenoid and stopping water flow. - Which pin mirrors the solenoid state for debugging?
The onboard LED on pin 13 is switched on and off along with the MOSFET to indicate state. - What current rating should the solenoid have?
Use a 12V solenoid that does not draw more than 1.5A maximum; the example solenoid uses about 700mA continuous.