Connect the Arduino and relay shield to your PC via a USB cable. Download the PC software and use it to switch anything on and off that is attached to the relays.
The shield is based on the Tiny Stripboard Shield for Arduino project.
This video shows the Arduino shield project and software.
Arduino Tiny Relay Shield Project
In this Arduino project, you will build a small relay shield from stripboard. The shield can have one or two relays fitted to it.
Connect the Arduino and relay shield to your PC via a USB cable. Download the PC software and use it to switch anything on and off that is attached to the relays.
The shield is based on the Tiny Stripboard Shield for Arduino project.
This video shows the Arduino shield project and software.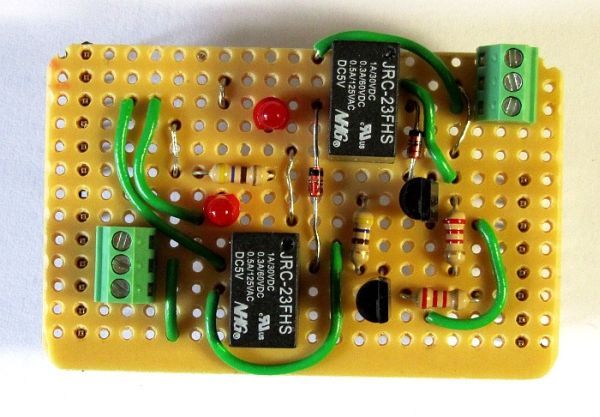
Circuit Diagram
The relay used in the circuit is a 5V relay with part number JRC-23F (JRC-23FHS1DC5V). The bottom view of the wiring diagram for this relay is shown here:
Components
You will need an Arduino board such as the Arduino Uno, as well as a Tiny Stripboard Shield and the components listed in the table below.
| Qty | Part | Designator | Notes | Type |
|---|---|---|---|---|
| 2 | 2k2 resistor | R1, R2 | 1/4W, 5% | Resistors |
| 2 | 470 ohm resistor | R3, R4 | ||
| 2 | 3mm LED | D1, D2 | For indicating which relay is on | Semiconductors |
| 2 | 1N4148 | D2, D3 | Diodes | |
| 2 | PN2222, KSP2222 or similar | Q1, Q2 | PNP transistors | |
| 2 | 5V relays | RLA1, RLA2 | E.g. JRC-23F 5V miniature PCB relay or similar | Relays |
| 2 | 3 pole screw terminals | J1, J2 | 2.54mm pin spacing | Connectors |
If you can’t get hold of the same relay or a pin compatible part, then you will need to modify the stripboard circuit layout to suit your relay. Make sure that it is a 5V relay.
The relay is a miniature relay that can switch 1A of current at 30V d.c. Don’t try to switch anything that is mains powered with this relay.
This photo shows the parts used in the Arduino relay shield project:
Arduino Tiny Relay Shield Project
Created on: 31 October 2012
In this Arduino project, you will build a small relay shield from stripboard. The shield can have one or two relays fitted to it.
Connect the Arduino and relay shield to your PC via a USB cable. Download the PC software and use it to switch anything on and off that is attached to the relays.
The shield is based on the Tiny Stripboard Shield for Arduino project.
This video shows the Arduino shield project and software.
Can’t see the video? View on YouTube →
Circuit Diagram
Arduino Tiny Stripboard Relay Shield Circuit Diagram – click for a bigger image
The relay used in the circuit is a 5V relay with part number JRC-23F (JRC-23FHS1DC5V). The bottom view of the wiring diagram for this relay is shown here:
Bottom View of the JRC-23F Relay
Components
You will need an Arduino board such as the Arduino Uno, as well as a Tiny Stripboard Shield and the components listed in the table below.
| Qty | Part | Designator | Notes | Type |
|---|---|---|---|---|
| 2 | 2k2 resistor | R1, R2 | 1/4W, 5% | Resistors |
| 2 | 470 ohm resistor | R3, R4 | ||
| 2 | 3mm LED | D1, D2 | For indicating which relay is on | Semiconductors |
| 2 | 1N4148 | D2, D3 | Diodes | |
| 2 | PN2222, KSP2222 or similar | Q1, Q2 | PNP transistors | |
| 2 | 5V relays | RLA1, RLA2 | E.g. JRC-23F 5V miniature PCB relay or similar | Relays |
| 2 | 3 pole screw terminals | J1, J2 | 2.54mm pin spacing | Connectors |

The relay is a miniature relay that can switch 1A of current at 30V d.c. Don’t try to switch anything that is mains powered with this relay.
This photo shows the parts used in the Arduino relay shield project:
Components Used in the Arduino Tiny Relay Stripboard Shield Project
Construction
A number of wire links will be needed to connect all of the relay contacts to the screw terminal connectors. This is the most tricky part of building the circuit. Beginners should rather stick to connecting a single relay. To simplify the wiring further, use only the normally-open contacts and a two pole screw terminal.
These images show the top and bottom views of the completed stripboard relay shield.
For more detail: Arduino Tiny Relay Shield Project