Summary of Arduino Based Auto Timer
This article details an Arduino-based actuator timer project designed to measure the time interval between two micro-switches triggered by a moving arm. The system uses an LCD display to show elapsed time in minutes, seconds, and frames, utilizing the Stopwatch library and millis() function for precise timing calculations while handling data type limitations with unsigned long integers.
Parts used in the Actuator Timer:
- LCD Display (16x2)
- Arduino Duemelanove
- Micro Switches
- Bread Board
- LED
- Resistors 330 ohm
- Resistors 2K
- Potentiometer 4k
- Hook-up wires
The Need:
Last week around at work I had another usual un-usual problem to face with. Having to make lots of mechanisms n components to work with-in seconds or fracs at times I kind-of knew this was always coming.
And invariably so my poor mind couldn’t think of anything but Arduino for a handy solution that should be compact, flexible, highly customizable, rugged and most importantly easier to work around.
And invariably so my poor mind couldn’t think of anything but Arduino for a handy solution that should be compact, flexible, highly customizable, rugged and most importantly easier to work around.
Step 1: The Problem:

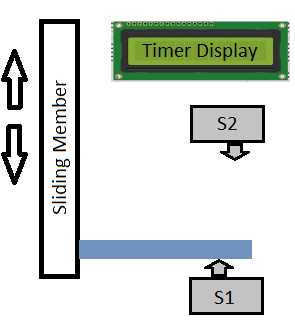
What we had is an arm moving around from an actuator which we would like to tap with some contact type micro switches (limit switches) to give a feed-back signal as the awkward figure suggests.
Step 2: Components:
I franatically searched for the components from the Junks I always treasured with the hobby kit coming-in handy..
LCD Display (16×2) – 1
Arduino – 1 (Duemelanove is what I had)
Micro Switches – 2
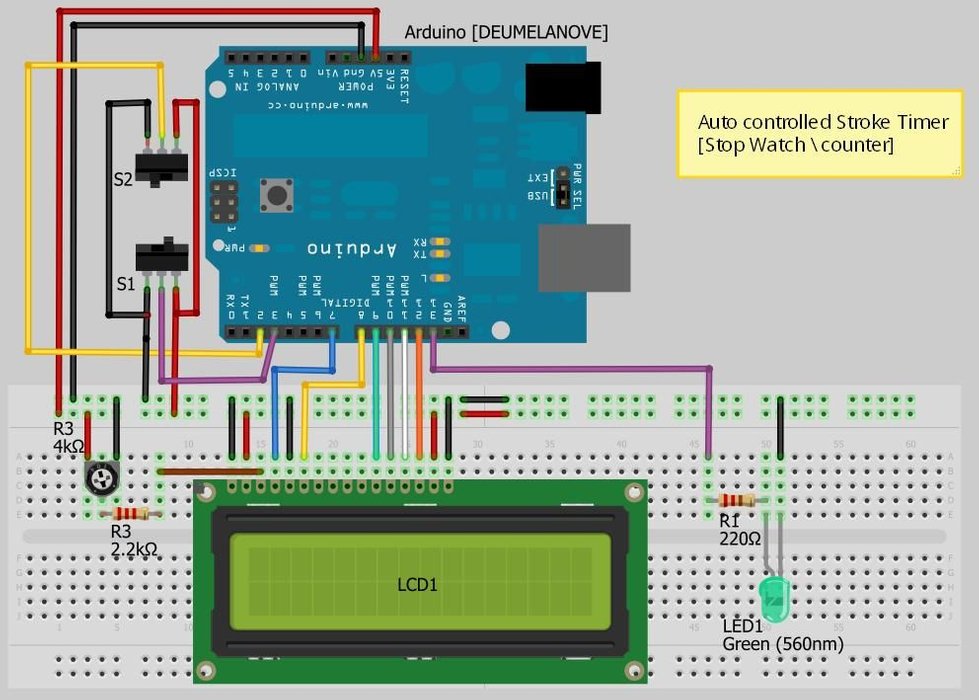
Hook-up wires for (bread board) – Plenty (see Fritizing schematic for actuals)
Bread Board – 1 (for Prototyping)
LED – 1 (fok blinking indication)
Resistors 330 & 2K – 1 each
potentiometer 4k – 1 ( I had used one 2k Resistor and a 4K POT in comb. instead of a 6k pot to control the display as it came so handy from the junk parts)
Step 3: The Methodology
Now that all I/O’s are wired in order as per the schematic, it pretty much works-out itself and it all boils down to the programming now..
I had used the Stopwatch library to evoke the timer and initiated the millis() function to record time step value as soon as Arduino is started.
But what I need is just a differential timer with the simple math which gives us the time on air or otherwise.
All that I did is declared some run-time variables and do some math to display the difference value to show only the time between micro-switches getting energised. Otherwise to display the time correctly in the format is similar to Dan Thompson’s method as it only records the time values in millis and we have to convert the values to sec, min, hr and microsecs.
The other problem I encounter is the sign reversal as Arduino cannot handle large buffer. I finally managed to overcome this error by using the unsigned longint as integer data type.
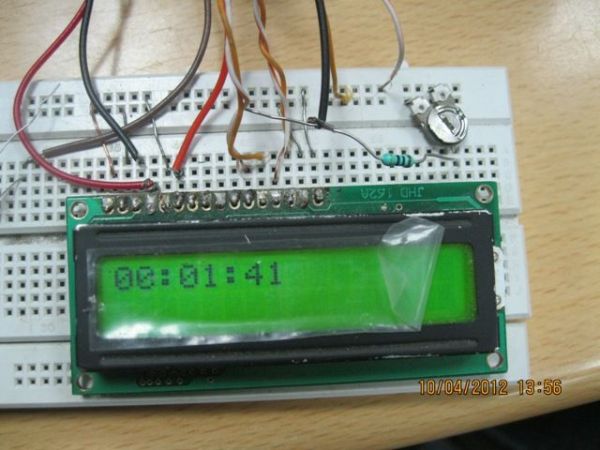
Step 4: Display Shield
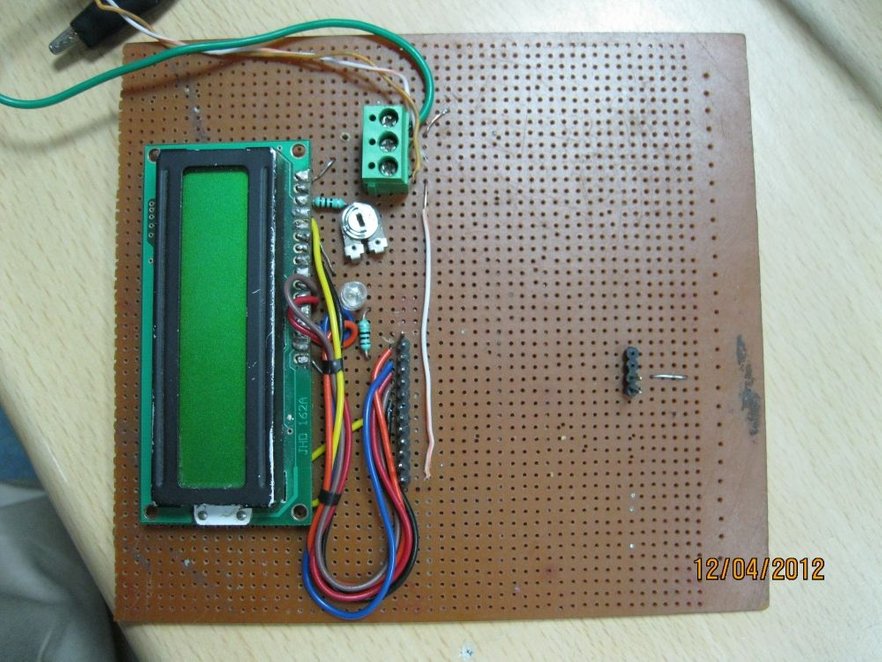
The display shield is constructed of pretty much the same components over a matrix board with pin rails for piggy-backing Arduino.
Had used some old components from an electronic choke for compacting
Major Components in Project
LCD Display (16×2) – 1
Arduino – 1 (Duemelanove is what I had)
Micro Switches – 2
Hook-up wires for (bread board) – Plenty (see Fritizing schematic for actuals)
Bread Board – 1 (for Prototyping)
LED – 1 (fok blinking indication)
Resistors 330 & 2K – 1 each
potentiometer 4k – 1 ( I had used one 2k Resistor and a 4K POT in comb. instead of a 6k pot to control the display as it came so handy from the junk parts)[/su_box]
Step 5: Arduino Sketch – Programming
Final sketch\code for Arduino below:
/*
Sketch \ Code by Chuppandi aka Subu
[email protected]
www.chuppandee.blgospot.com
*/
#include <StopWatch.h>
#include <LiquidCrystal.h>
LiquidCrystal lcd(7, 8, 9, 10, 11, 12); // LCD pins decleration
int switchPin1 = 3;// switch1 is connected to pin 3
int switchPin2 = 2;// switch2 is connected to pin 2
int ledPin = 13; // LED is connected to pin 13 in arduino
int val1;
int val2;
int frameRate = 500;                // the frame rate (frames per second) at which the stopwatch runs - Change to suit
long interval = (1000/frameRate);   // blink interval
char buf[15f00];                       // string buffer for itoa function
unsigned long starttime = 0;
unsigned long endtime = 0;
unsigned long lasttime = 0;
unsigned long currenttime = 0;
StopWatch sw_millis;    // MILLIS (default)
StopWatch sw_micros(StopWatch::MICROS);
StopWatch sw_secs(StopWatch::SECONDS);
void setup() {
lcd.begin(16,2);
pinMode(switchPin1, INPUT);
pinMode(switchPin2, INPUT);
pinMode(ledPin, OUTPUT);
Serial.begin(9600);
sw_millis.start();
sw_micros.start();
sw_secs.start();
}
void loop() {
val1 = digitalRead(switchPin1);   // read input value and store it in val
val2 = digitalRead(switchPin2);   // read input value and store it in val
if (val1 == LOW && val2 == LOW)
{
digitalWrite(ledPin, HIGH);   // turn LED on
currenttime = (sw_millis.elapsed() - lasttime) ;
Serial.print("sw_millis=");
Serial.println(sw_millis.elapsed());
Serial.print("sw_micros=");
Serial.println(sw_micros.elapsed());
Serial.print("sw_secs=");
Serial.println(sw_secs.elapsed());
lcd.clear();
lcd.print("SECS:");
float sec = sw_millis.elapsed()/10;
lcd.print(sec);
int elapsedMinutes = (currenttime / 60000L);
int elapsedSeconds = (currenttime / 1000L);
int elapsedFrames = (currenttime / interval);
int fractionalSecs = (int)(elapsedSeconds % 60L);
int fractional = (int)(elapsedFrames % frameRate);       // use modulo operator to get fractional part of 100 Seconds
fractionalSecs = (int)(elapsedSeconds % 60L);        // use modulo operator to get fractional part of 60 Seconds
int fractionalMins = (int)(elapsedMinutes % 60L);        // use modulo operator to get fractional part of 60 Minutes
lcd.clear();                                         // clear the LCD
lcd.print("TIME:");

if (fractionalMins < 10){                            // pad in leading zeros
lcd.print("0");                                 // add a zero
}
lcd.print(itoa(fractionalMins, buf, 10));       // convert the int to a string and print a fractional part of 60 Minutes to the LCD
lcd.print(":");                                 //print a colan.
if (fractionalSecs < 10){                            // pad in leading zeros
lcd.print("0");                                 // add a zero
}
lcd.print(itoa(fractionalSecs, buf, 10));          // convert the int to a string and print a fractional part of 60 Seconds to the LCD
lcd.print(":");                                    //print a colan.
if (fractional < 10){                                // pad in leading zeros
lcd.print("0");                                 // add a zero
}
lcd.print(itoa(fractional, buf, 10));              // convert the int to a string and print a fractional part of 25 Frames to the LCD

lcd.setCursor(0, 1);
lcd.print("ACTUATOR TIMER");

endtime = currenttime;
/*  lcd.print(" ms=");
lcd.print(sw_millis.elapsed());
lcd.setCursor(0, 1);

lcd.print("us=");
lcd.print(sw_micros.elapsed());
*/
delay(10);
}
// if (val1 == LOW){
//       digitalWrite(ledPin, LOW);}
else{
lasttime = sw_millis.elapsed();
//  endtime = (sw_millis.elapsed() - starttime);
//  endtime = (currenttime - starttime);
digitalWrite(ledPin, LOW);
int elapsedMinutes = (endtime / 60000L);
int elapsedSeconds = (endtime / 1000L);
int elapsedFrames = (endtime / interval);
int fractionalSecs = (int)(elapsedSeconds % 60L);

int fractional = (int)(elapsedFrames % frameRate);       // use modulo operator to get fractional part of 100 Seconds
fractionalSecs = (int)(elapsedSeconds % 60L);        // use modulo operator to get fractional part of 60 Seconds
int fractionalMins = (int)(elapsedMinutes % 60L);        // use modulo operator to get fractional part of 60 Minutes
lcd.clear();                                         // clear the LCD
lcd.print("TIME:");

if (fractionalMins < 10){                            // pad in leading zeros
lcd.print("0");                                 // add a zero
}
lcd.print(itoa(fractionalMins, buf, 10));       // convert the int to a string and print a fractional part of 60 Minutes to the LCD
lcd.print(":");                                 //print a colan.
if (fractionalSecs < 10){                            // pad in leading zeros
lcd.print("0");                                 // add a zero
}
lcd.print(itoa(fractionalSecs, buf, 10));          // convert the int to a string and print a fractional part of 60 Seconds to the LCD
lcd.print(":");                                    //print a colan.
if (fractional < 10){                                // pad in leading zeros
lcd.print("0");                                 // add a zero
}
lcd.print(itoa(fractional, buf, 10));              // convert the int to a string and print a fractional part of 25 Frames to the LCD
lcd.setCursor(0, 1);
lcd.print("ACTUATOR TIMER");
}
}
// End of the program
Step 6: Packaging
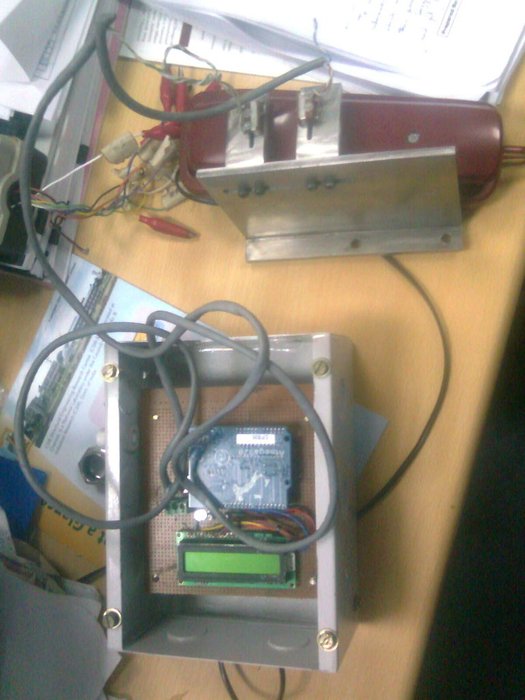
Packaging is always fun.. Just pick-up whatever you could come up with from the mighty treasure junks… you can make wonders…
Do visit my space for more updates on my Arduino erector kit.
Source : Arduino Based Auto Timer
- What components are required for this project?
The project requires an LCD Display, Arduino Duemelanove, Micro Switches, Bread Board, LED, Resistors 330 and 2K, a Potentiometer 4k, and hook-up wires. - How is the time measurement calculated?
The code uses the Stopwatch library and the millis() function to record time steps and calculates the difference between when micro-switches are energized. - Why was the unsigned longint data type used?
The unsigned longint data type was used to overcome sign reversal errors caused by large buffer limitations in the Arduino. - Can I use different resistors instead of the specified ones?
The author combined a 2k Resistor and a 4K POT to replace a 6k pot for controlling the display, suggesting flexibility based on available junk parts. - Which libraries are included in the sketch?
The sketch includes the StopWatch library and the LiquidCrystal library to handle timing and display functions respectively. - How does the system indicate activity?
An LED connected to pin 13 turns on when both switches read LOW and blinks to indicate the timer is active. - What format does the LCD display use for time?
The display shows time in a format of Minutes:Seconds:Frames using modulo operators to convert milliseconds into readable units. - Is the project dependent on specific hardware versions?
The author specifically mentions using an Arduino Duemelanove but implies the design is flexible for other compact Arduino boards.