Summary of Building a semi Smart, DIY boat with Arduino and some other sensors
This article details a DIY Arduino-controlled boat built from two water bottles. The vessel features obstacle avoidance using an ultrasonic sensor and light-guided steering via photocells. Users can build this raft-like boat by attaching motors to bottle caps, securing the bottles together with tape, and wiring the components to an Arduino for logic control, power management, and sensor input.
Parts used in the DIY Arduino Water Bottle Boat:
- Tape
- Hot glue + glue gun
- Two small DC motors
- Two water bottles
- Wires
- Two small propellers
- Arduino + USB cable + computer
- Wire strippers
- A plastic box
- A 9V battery + connector
- A power diode (like 1n4004)
- Some resistors
- Scissors
- A soldering iron + solder
- A MOSFET transistor or TIP 120
- Two switches
- Two photocells
I based this off of this really nice instructables.com post for building a water bottle boat, with some additions for obstacle avoidance and light-guided control. I used Arduino as a microcontroller, an ultrasonic sensor in the front, a few simple switches on the side of the boat, and a few light sensors on either side. See here for a few more photos or here for a pdf step by step.
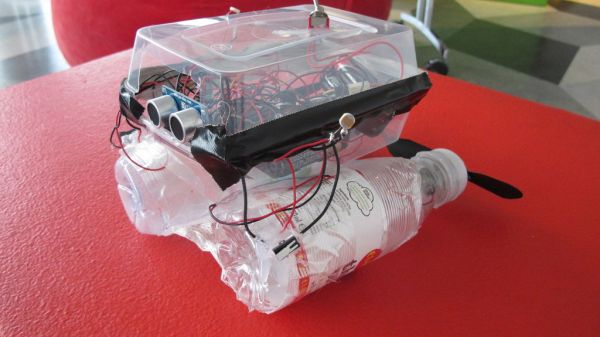
This simple little floating boat bounces off walls, can be steered with a flashlight, and won’t hit something head-on.
Step 1: MATERIALS
Tape
hot glue + glue gun (silicon optional)
two small DC motors
two water bottles
wires
two small propellors
arduino + USB cable + computer
wire strippers
a plastic box
a 9V battery + a connector
a power diode (like 1n4004)
some resistors
scissors
a soldering iron + solder
a MOSFET transistor or TIP 120
2 few switches + 2 photocells
Step 2: Put the motor in the cap
1. Take off the top of both water bottles
2. Poke a hole in each cap
3. Apply hot glue to the inside of the cap, but not on the hole. Slip the motor shaft through the hole. When dry, the shaft should spin freely.
Do this with both bottle caps and motors.
Step 3: Tape the water bottles together
Use two or three strips of tape to tape the water bottles together, sort of like a raft.
Step 4: Solder leads to the dc motors if there are none
The motors are now attached to the bottle caps.
Solder on long (about 10″) leads to the motors, if there aren’t any.
Step 5: Cut a slit in the water bottle
Cut a small slit in each water bottle.
This is the hole through which the wires from the motors will poke through.
Step 6: Put on the cap and feed through the wires
Put the cap on the bottle and feed the wires into the bottle opening, then out the slit that you just made. If you have trouble screwing on the cap, use some hot glue to secure it.
hot glue + glue gun (silicon optional)
two small DC motors
two water bottles
wires
two small propellors
arduino + USB cable + computer
wire strippers
a plastic box
a 9V battery + a connector
a power diode (like 1n4004)
some resistors
scissors
a soldering iron + solder
a MOSFET transistor or TIP 120
2 few switches + 2 photocells
For more detail: Building a semi Smart, DIY boat with Arduino and some other sensors
- How do I attach the motors to the boat?
Poke a hole in each bottle cap, apply hot glue inside the cap without covering the hole, and slip the motor shaft through the hole so it spins freely. - Can the boat steer itself using light?
Yes, the boat can be steered with a flashlight using light sensors placed on either side. - What prevents the boat from hitting obstacles head-on?
An ultrasonic sensor is mounted in the front to detect obstacles and prevent head-on collisions. - How are the two water bottles secured together?
The bottles are taped together using two or three strips of tape to form a raft structure. - What controls the movement of the motors?
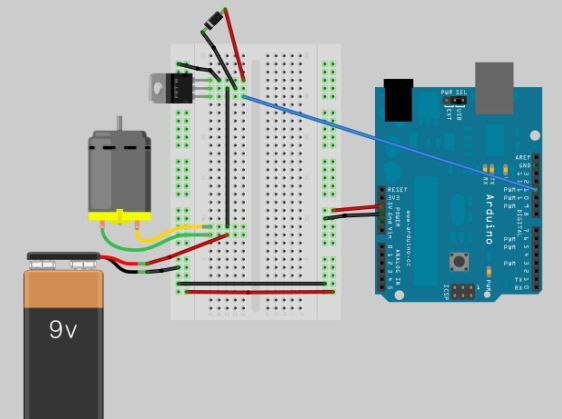
An Arduino microcontroller controls the motors based on input from the ultrasonic sensor, switches, and photocells. - How do I connect the motor wires to the electronics?
Cut a small slit in each water bottle to feed the motor wires from the inside out after soldering long leads if necessary. - Which transistors can be used to drive the motors?
You can use a MOSFET transistor or a TIP 120 to control the motor power. - What type of battery powers this project?
A 9V battery with a connector is used to supply power to the system.