This circuit is designed for tracking the location of vehicles. Most oftracking systems are made by using GPS. This is very simple and cheap. Tracking systems are mostly used by fleet operators for tracking a vehicle location, routing and others. This is a very good method for preventing our vehicles from stolen. ![]() This tracking system sends us the geographical coordinates and by using these coordinates we can track our vehicle position on electronic maps using internet. By using these tacking systems we can share real time information about transportations. And also can be share real time information or position of trains and buses with passengers. Means passengers can see the real time of arriving busses or trains at the platforms on LCD or on Mobiles.
This tracking system sends us the geographical coordinates and by using these coordinates we can track our vehicle position on electronic maps using internet. By using these tacking systems we can share real time information about transportations. And also can be share real time information or position of trains and buses with passengers. Means passengers can see the real time of arriving busses or trains at the platforms on LCD or on Mobiles.![]() Here in this system we are using the GSM module for sending the coordinates of vehicle on mobile phone via message. GPS is sends the coordinates continuously in form of string. After reading this string using Arduino extract the required data from string and then sends it to mobile phone using GSM module via SMS. This information is called latitude and longitude. GPS used 3 or 4 satellite for tracking the location of any vehicle.
Here in this system we are using the GSM module for sending the coordinates of vehicle on mobile phone via message. GPS is sends the coordinates continuously in form of string. After reading this string using Arduino extract the required data from string and then sends it to mobile phone using GSM module via SMS. This information is called latitude and longitude. GPS used 3 or 4 satellite for tracking the location of any vehicle.
![]()
Fig. 3: Image of Arduino based Vehicle Tracking System in action
![]()
Fig. 4: Image of Arduino based Vehicle Tracking System showing current GPS location of the vehicle
In circuit diagram three main Components used. These are Global Positioning System(GPS), GSM Module and Arduino. GSM module’s Rx pin is directly connected to Tx pin of Arduino and Tx pin of GPS is directly connected Rx pin of Arduino. And a 16X2 liquid Crystal display is also connected with Arduino for displaying coordinate. It is assumed that the reader gone through How to strat with arduino and How to interface LCD with arduino.

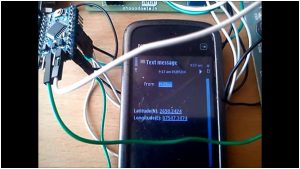
Fig. 5: Image of SMS received on Mobile phone showing current GPS location of vehicle
![]()
Fig. 6: Image of display panel of vehicle tracking system showing current GPS location
Programming
Programming part of this project is also simple. GPS continuously sends coordinates to Arduino and Arduino read these coordinate and extract required character of coordinates. GPS sends many string to Arduino but we required only one of them. First we match required string which is
$GPGGA
The above given string is required string. In this string,
after first comma: this is the coordinates reading time.
After second comma: this is the Latitude
After third comma: this is longitude

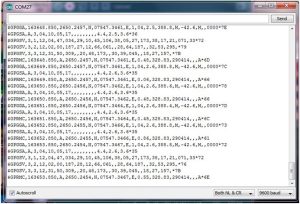
Fig. 7: Screenshot of Arduino Serial Port showing logged GPS data
If this string matches then we start to store this string in a temporary array and then extract required coordinates from it and stores in another two arrays. And then send these array to Display and also sends these to user’s mobile phone via SMS. For sending SMS here we used GSM module which sends SMS to mobile phone. AT commands for sending SMS:
AT+CMGF=1
AT+CMGS=”9610126059”
>COORDINATES
Ctrl+z
In programming we used these commands for sending SMS using GSM:
Serial.println(“AT+CMGF=1”); // for selecting text mode
Serial.println(“AT+CMGS=”9610126059””); // Add user mobile number
Serial.println(“Latitude: ”); // write Latitude in message
Serial.println(latitude); // write Latitude array in SMS
Serial.println(“Longitude: ”);
Serial.println(longitude);
And then
Serial.write(26); // send SMS
After this configuration GSM Module sends GPS or Vehicle location to mobile phone.
Here Serial.write command is used for sending message. if you will use Serial.print of serial.prinln GSM module will not send any message. so we have to used Serial.write for sending message.
Here 26 decimal number is also used. 26 is the equivalent decimal number of ctrl+z.
Instead of these we can also use hexadecimal number 0x1A.
Note:This program or Systemdoes not work with FTDI burner. So when you run this system or programremove FTDI burner first and then connect external power supply with Arduino Pro Mini.’
Components Used:
2. GSM Module
3. Global Positioning System (GPS)
4. 16X2 Liquid Crystal Display
5. Connecting wires
Project Source Code
###


#include<LiquidCrystal.h>
LiquidCrystal lcd(12, 11, 5, 4, 3, 2);
char str[70];
char *test="$GPGGA";
char logitude[10];
char latitude[10];
int i,j,k;
int temp;
int Ctrl+z=26;    //for sending msg
void setup()
{
  lcd.begin(16,2);
  Serial.begin(9600);
  lcd.setCursor(0,0);
  lcd.print("GPS Besed Vehicle ");
  lcd.setCursor(0,1);
  lcd.print("Tracking System");
  delay(10000);
}
void loop()
{
  if (temp==1)
  {
    for(i=18;i<27;i++)          //extract latitude from string
    {
     latitude[j]=str[i];
     j++;
    }
    for(i=30;i<40;i++)          //extract longitude from string
    {
    logitude[k]=str[i];
     k++;
    }
    lcd.setCursor(0,0);        //display latitude and longitude on 16X2 lcd display
    lcd.print("Lat(N)");
    lcd.print(latitude);
    lcd.setCursor(0,1);
    lcd.print("Lon(E)");
    lcd.print(logitude);
    delay(100);
    Serial.println("AT+CMGF=1");    //select text mode
    delay(10);
    Serial.println("AT+CMGS="9610126059"");  // enter receipent number
    Serial.println();
    Serial.print("Latitude(N): ");             //enter latitude in msg
    Serial.println(latitude);                  //enter latitude value in msg
    Serial.print("Longitude(E): ");            //enter Longitude in Msg
    Serial.println(logitude);                  //enter longitude value in msg
    Serial.write(Ctrl+z);                      //send msg  Ctrl+z=26
    temp=0;
    i=0;
    j=0;
    k=0;
    delay(20000);                        // next reading within 20 seconds
  }
}
void serialEvent()
{
  while (Serial.available())            //Serial incomming data from GPS
  {
    char inChar = (char)Serial.read();
    str[i]= inChar;                  //store incomming data from GPS to temparary string str[]
     i++;
     if (i < 7)
     {
      if(str[i-1] != test[i-1])         //check for right string
      {
        i=0;
      }
     }
    if(i >=60)
    {
     temp=1;
    }
  }
}


###
Project Video
For more detail: GPS and GSM based Vehicle Tracking System Using Arduino
