Summary of Real Time GPS Tracker with Integrated Google Maps
This article details building a real-time GPS tracker using an Arduino Duemilanove, GSM/GPRS module, and GPS receiver. Data is sent via GPRS to a Python TCP server, stored in MySQL, and displayed on Google Maps via Zope/Plone. The project uses open-source software and costs approximately $200.
Parts used in the Real Time GPS Tracker:
- Arduino Duemilanove or Arduino Uno
- SpreadTrum SM5100B GSM/GPRS Module
- USGlobalSat EM-406A GPS Module
- GPS Interface Board
- Arduino Stackable Headers
- GPS Shield
- GSM Shield
This project describes how you can build a mobile real time GPS tracker with integrated Google Maps. I began this project mainly to see if I can integrate all the different pieces of hardware and software to make a workable solution, and it took some time, but finally when everything was said and done, it looked pretty cool. I tore down everything and rebuilt it from scratch, making detailed notes and documenting the process.
When I started building this, I didn’t have any particular application in mind, but now that I have built it, I can see myself using it different applications, particularly if I can get to lower the cost. Even if you didn’t have any application in mind, it would be a fun weekend project, you never know, you might find the knowledge gathered during the process useful one day in some form or other.
How it works?
In a nutshell, this is how the GPS Tracker works. The GPS chip outputs the positioning information which is transferred over a GPRS link to the mobile operator’s GGSN (Gateway GPRS Support Node) and then to a remote server over a TCP connection. The TCP server stores the incoming positional data in a mySQL database. When a user clicks on the tracking page, Zope, which is an open source web application server, serves up an HTML page with an embedded javascript code. The javascript would run in the user’s browser and has instructions to retrieve the positional information from the mySQL database every second. It then integrates this information into Google Maps through Google Maps API which displays the position on a map. Since the positional information is retrieved every second and the maps updated at the same frequency, a real time GPS tracking effect is achieved.![]()
How much does it cost?
The costs are all associated with the hardware components. There is no software costs involved, since everything is open source. The code is licensed under Creative Commons, so you’re free to use the code in this project in whatever applications you wish.
The total estimated cost is around $200. All the components can be purchased from Sparkfun.
Step 1:
HARDWARE
The hardware consists of three main components.
Microcontroller
The micro-controller is the central controller for the whole unit. I chose the Arduino Duemilanove, which is an open source electronics prototyping board based on the Atmel ATMega328 8 bit micro-controller running at 16 hz. This newer version of this board can be purchased from here and costs around $30. It’s called Arduino Uno and works just as well.
GSM/GPRS Module
The GSM/GPRS Module is based on SpreadTrum’s SM5100B. The SM5100B is a miniature, quad-band GSM 850/EGSM 900/DCS 1800/PCS 1900 module. This module features two UARTS, an SPI interface, and two 10-bit ADC’s. This board can be purchased from here and costs about $100.
GPS Module
The GPS Module is USGlobalSat EM-406A which is based on the spectacular SiRF Star III chipset. It outputs positioning and timing date in NMEA 0183 and SiRF binary protocol and has a positioning accuracy of 10 meters without and 5 meters with WAAS. You have to buy a separate interface board and the GPS unit and connect the two. The interface board can be purchased from here and costs $16. The GPS receiver can be purchased from here and costs $ This unit can be purchased from here and costs $60.
Step 2:
HARDWARE ASSEMBLY
If you are using the hardware components I used, the assembly is pretty staightforward. Solder the Arduino stackable headers (can be bought from here) on the GPS shield and the GSM shield. Connect the GPS module to the GPS shield and stack it on top of the GSM board. Stack the two boards on top of the Arduino board.
Step 3:
SOFTWARE
ARDUINO CODE
This is the code for the ATMega328P microcontroller on the Arduino board. Follow the directions at http://www.arduino.cc/ on how to compile and load the code onto the Arduino board. The code uses additional libraries. They are:
- NewSoftSerial
- TinyGPS
- PString
All 3 libraries can be downloaded from http://arduiniana.org/libraries/. Follow the instructions to install them.
The following should be noted:
The line: cell.println(“AT+CGDCONT=1,\”IP\”,\”isp.cingular\””);establishes a PDP (Packet Data Protocol) context with AT&T’s APN (Access Point Name). If your cellular provider is not AT&T, replace the string “isp.cingular” with the appropriate APN for your cellular provider. In the line: cell.println(“AT+SDATACONF=1,\”TCP\”,\”your_ip_address\”,32000″); Change this to the IP Address for your TCP Server.
Step 4:
TCP SERVER
The TCP Server is coded in python. It’s very simple in operation, basically opens up a TCP port and waits for the connection from the GPS Tracker’s GSM module. Once it receives, the connection, it accepts it and as and when the GPS packets comes, in it parses it out and stores the Latitude and Longitude in a MySQL table (which we’ll be creating in the next section). The TCP server will run on any python 2.x, download it from http://www.python.org/. It’s worth noting that Python 3 has major syntax changes, therefore the code will not run until you tweak it to make it compatible with Python 3. It uses a python library called MySQLdb, which you can download from MySQLdb from http://www.zope.org/Members/adustman/Products/MySQLdb . Follow the instructions to install it onto your python installation.
Type the following code into a file called tcpServer.py and you can run it by typing python tcpServer.py on the command prompt. Replace ‘your_ip_address’ with the IP Address of the machine you’re running the TCP Server on. Note that if your machine in on the LAN and you have a router/firewall, you might have to port forward TCP port 32000 to the IP Address of the machine on which the TCP Server is running. Otherwise, packets coming in from outside your network will never reach the TCP Server machine. Don’t run the server code now, we still have lots of coding to do. Save the file and move on to the next section.
Also note that, you don’t have to use TCP. You can also use UDP or any other transport protocol. TCP packets have a 20 byte header whereas UDP has only 8 bytes. TCP also is a complex protocol and is an overkill for this application. I used it, but feel free to use UDP.
Step 5:
MYSQL
A MySQL database is used to store the GPS Co-ordinates received. If you are using Ubuntu, as I did, you can use the apt-get utility to download and install the MySQL server as follows. I used Version 5.1 of MySQL server.
sudo apt-get install mysql-server-5.1
The Installer will ask for a root password. Enter your root password. This will be needed to log on to the MySQL database later as root.
You also need the development (header) files of the MySQL client. You can install it by entering:
sudo apt-get install libmysqlclient-dev
Now, we’ll setup the MySQL database. First log on using the username and password you set earlier. Enter
mysql -p -u user
Enter the root password when prompted.
It’s usually not a good idea to work on a MySQL database as root, so we’ll make another user, grant all privileges and than we’ll use that to make further changes. The mysql prompt is shown below as mysql>. Replace user, host and password with your values. If the mySQL database is on the same machine, you can enter ‘localhost’ for ‘host’. ![]() For example, jayesh@’localhost’.
For example, jayesh@’localhost’.
msql>; GRANT ALL PRIVILEGES ON *.* TO user@’host’ IDENTIFIED BY ‘password’;
Let’s now create a database. We’ll call it gmap. Enter:
mysql>; CREATE DATABASE gmap;
Now, we can see if the database has been created, by entering:
mysql>; show databases;
You should see something like this:
| Database |
| information_schema |
| gmap |
| mysql |
The table shows the current databases in MySQL. The other entries might be different in your system, but as long as you have the gmap database, you’re doing fine so far.
Next change to the gmap database by entering:
mysql>; use gmap;
Let’s now create a table to hold our lat/long in the gmap database we created.
mysql>; CREATE TABLE gmaptracker (
->; id int(8) NOT NULL auto_increment,
->; lat double(13,10) NOT NULL default 0.0000000000,
->; lon double(13,10) NOT NULL default 0.0000000000,
->; PRIMARY KEY (id)
->; ) TYPE=InnoDB;
The table we created can be viewed by entering:
mysql>; show tables;
The output will show the table we just created.
| Tables_in_gmap |
| gmaptracker |
If you want to see the fields in the gmaptracker table, enter:
mysql>; desc gmaptracker;
The output will show the fields in the table gmaptracker which we created.
| Field | Type | Null | Key | Default | Extra |
| id | int(8) | NO | PRI | NULL | auto_increment |
| lat | double(13,10) | NO | 0.0000000000 | ||
| lon | double(13,10) | NO | 0.0000000000 |
Finally, since the table is now empty, when we issue:
mysql>; select * from gmaptracker;
it should show:
Empty set
Congratulations! You have a working MySQL database and a table in it ready to accept the GPS co-ordinates.
Step 6: PLONE

The next piece of software we need to install is Plone. Plone is a CMS (Content Management System) built on top of Zope, which is a popular web application server. We’ll be using only the Zope functionality of Plone and not it’s CMS features. In fact, using Plone for this application is an overkill since you can just download Zope and use that. I already had Plone installed on my computer and I’ll show you how to use Plone, but if you want to try Zope, you’re welcome to do that. The steps are very similar.
- Download Plone 3.3.5 from http://launchpad.net/plone/3.3/3.3.5/+download/Plone-3.3.5-UnifiedInstaller.tgz into /usr/local/src. ( I used Plone 3.3.5, Plone4 has a radically new interface and the steps below might not work. You’ll have to dig around, if you are using Plone4.)
- Install Plone
cd /usr/local/src sudo tar -xvf Plone-3.3.5-UnifiedInstaller.tgz cd Plone-3.3.5-UnifiedInstaller/ sudo ./install.sh standalone
- Note down the Username and Password displayed at the end of the installation process. You’ll need it to access the Plone GUI. Plone will be installed in /usr/local/Plone
Go to the Zope Directory in Plone, in this case it’s /usr/local/Plone/Zope-2.10.11-final-py2.4.
Download ZmySQLDA from http://www.zope.org/Members/adustman/Products/ZMySQLDA into that directory and extract the tar file with the command:
sudo tar -xvxf ZMySQLDA-2.0.8.tar.gz
If everything goes ok, a ZMySQLDA directory will be created under /usr/local/Plone/Zope-2.10.11-final-py2.4/lib/python/Products.
ZMySQLDA is a SQL Database Adaptor that Zope will be using to talk to the database. ZMySQLDA using another piece of software called MySQLdb to perform it’s tasks. Let’s download and install MySQLdb now.
cd /usr/local/Plone/Zope-2.10.11-final-py2.4/lib/python/Products
Download MySQLdb from http://www.zope.org/Members/adustman/Products/MySQLdb into that directory
Extract the tarball and install MySQLdb with the following commands:
sudo tar -xvf MySQL-python-1.2.0.tar.gz
cd MySQL-python-1.2.0
sudo /usr/local/Plone/Python-2.4/bin/python setup.py build sudo /usr/local/Plone/Python-2.4/bin/python setup.py install
One very important thing to note when building and installing MySQLdb is to use the same python binary that was shipped with Plone. If you don’t use the same exact python binary that was shipped with Plone, Plone won’t be able to find it. In this case the python binary that was shipped with Plone resides in /usr/local/Plone/Python-2.4/bin.
Start Plone
cd /usr/local/Plone/zinstance/bin sudo ./plonectl start
Wait for a few moments for Plone to start up and then open a browser and point it to: http://localhost:8080/manage_main. This is assuming everything is on the same computer. If you are accessing from a different computer, change localhost to the IP Address of the computer running Plone.
You should see a dialog box for entering the username and password. Enter the username and password you noted down after the Plone installation process. You should see the root folder view as shown below:
1. Create a SQL Database Connection
Select the ‘Z SQL Database Connecton’ from the drop down list on the right. In the database connection string text box, enter gmap@host:port. Replace host and port with your hostname and port respecively. If the SQL database is running on the same machine as Plone, enter
gmap <username> <password>
Click the Browse tab of the Z MySQL Database Connection. You should be able to see your table (gmaptracker). Click the + sign and you should be able to see the elements of the table.
2. Add a Z SQL Method to retrieve the last row from the SQL table.
Select the ‘Z SQL Method’ from the drop down list on the right. Enter “GmaplocsPkSelectLastAdded” for id and “SQL Method to select Data” for tile.
Enter the code:
select * from gmaptracker order by id desc limit 1
Click Add.
From the root folder view, Click the GmaplocsPkSelectLastAdded method from the root folder view and click the Advanced Tab. Change the value of “Maximum rows to retrieve” to 0 (zero). Save the changes.
On why this should be done, read this. http://www.zope.org/Members/adustman/Tips/no_limits
3. Add a DTML Method
Go to the root folder view. Select the ‘DTML Method’ from the drop down list on the right. Enter “data.xml” for id and an descriptive title (can by anything you want). Click Add and Edit.
Enter the code
<?xml version="1.0" encoding="UTF-8"?>
<markers>
<dtml-in GmaplocsPkSelectLastAdded>
<marker lat="&lt;dtml-var lat>" lng="<dtml-var lon>"/>
</dtml-in>
</markers>
Save the changes.
4. Add a DTML Document
Go to the root folder view. Select the ‘DTML Document’ from the drop down list on the right’. Enter “gpstrack.html” for id and a descriptive name. Click Add and Edit.
Enter the code:
<!DOCTYPE html PUBLIC "-//W3C//DTD XHTML 1.0 Strict//EN"
"http://www.w3.org/TR/xhtml1/DTD/xhtml1-strict.dtd">
<html xmlns="http://www.w3.org/1999/xhtml">
<head>
<title>Real Time GPRS based GPS Tracker</title>
<script src="https://maps.google.com/maps?
file=api&v=1" type="text/javascript"></script>
<!-- Make the document body take up the full screen -->
<style type="text/css">
v\:* {behavior:url(#default#VML);}
html, body {width: 100%; height: 100%}
body {margin-top: 0px; margin-right: 0px; margin-left: 0px; margin-bottom: 0px}
</style>
<script type="text/javascript">
//<![CDATA[
function load(){
var map = new GMap(document.getElementById("map"));
var point = new GPoint(0,0);
map.addControl(new GLargeMapControl());
map.addControl(new GMapTypeControl());
map.centerAndZoom(point, 1);
window.setTimeout(function(){reloadMap(map)},1000);
}
function reloadMap(map) {
var request = GXmlHttp.create();
request.open("GET", "data.xml", true);
request.onreadystatechange = function() {
if (request.readyState == 4) {
var xmlDoc = request.responseXML;
var markers = xmlDoc.documentElement.getElementsByTagName("marker");
for (var i = 0; i < markers.length; i++) {
var point = new
GPoint(parseFloat(markers[i].getAttribute("lng")),
parseFloat(markers[i].getAttribute("lat")));
var marker = new GMarker(point);
map.clearOverlays();
map.addOverlay(marker);
map.centerAtLatLng(point);
}
}
}
request.send(null);
window.setTimeout(function(){reloadMap(map)},1000);
}
// Monitor the window resize event and let the map know when it occurs
if (window.attachEvent) {
window.attachEvent("onresize", function() {this.map.onResize()} );
} else {
window.addEventListener("resize", function() {this.map.onResize()} , false);
}
//]]>
</script>
</head>
<body onload="load()">
<div id="map" style="width: 100%; height:100%;"></div>
</body>
</html>
Save the changes.
Step 7:
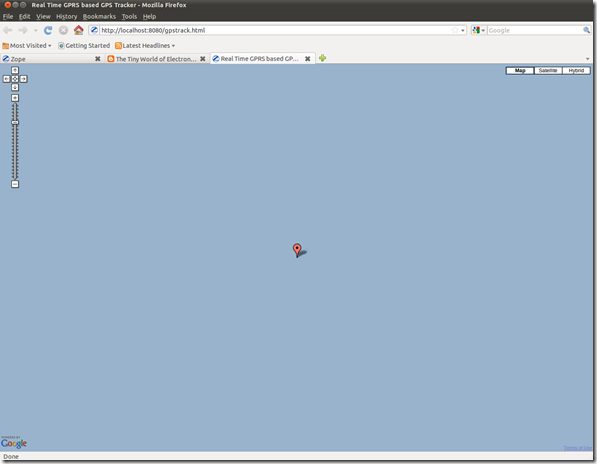
Open a browser to http://localhost:8080/gpstrack.html. You should see a plain blue Google Map Screen.
That’s because the initialization co-ordinates are 0.0000000000 Lat and 0.0000000000 Long. That’s in the Atlantic Ocean off the coast of Africa. Zoom back the map using the slider, if you don’t’ believe me.
Once you power on the device, you should see the marker move to the correct GPS co-ordinates and it should update every second. Move around the GPS tracker around the house and see if it tracks properly.
- How does the GPS tracker work?
The GPS chip sends positioning data over GPRS to a remote server where it is stored in a database and retrieved by JavaScript to display on Google Maps. - Can I use a different cellular provider than AT&T?
Yes, you must replace the string isp.cingular with the appropriate APN for your specific cellular provider. - What is the estimated cost of this project?
The total estimated cost is around $200, covering all hardware components available from Sparkfun. - Does the code require any paid software?
No, there are no software costs as everything used is open source and licensed under Creative Commons. - Can I use UDP instead of TCP for the server?
Yes, while the article uses TCP, you can also use UDP or any other transport protocol. - Which version of Python should I use for the server?
The provided code is designed for Python 2.x, though it requires tweaking to run on Python 3 due to syntax changes. - What database system is used to store coordinates?
A MySQL database named gmap is created to store latitude and longitude coordinates in a table called gmaptracker. - How often is the map updated?
The javascript retrieves positional information every second, updating the map at the same frequency for real-time tracking.