*Check back for more updates on this build 🙂
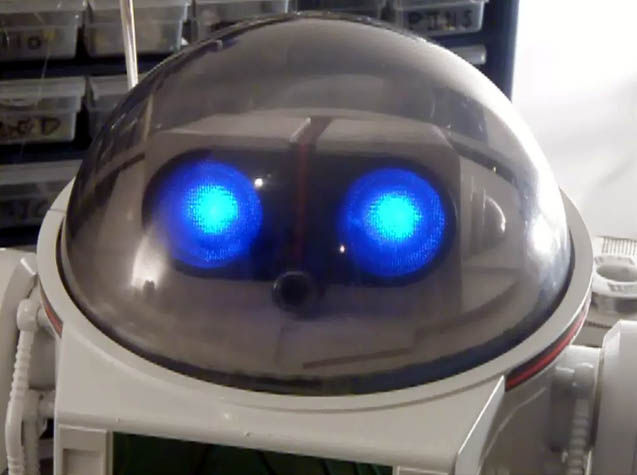
So, have you heard of the Omnibot? Well! Any kid from the 80’s will remember how amazing this robot was. For you young kids, this robot was released in the early 80’s by Tomy. The robot was “programmable”, in the sense that the actions were recorded to a casette tape. As you operated the robot over its remote control, the casette would record tones for each action. When the tape was played back, the tones would control the robot.
It also had a microphone and speaker in the remote and robot, so you could spy on your family. Man, I really wanted one as a kid! But now that I have made this robot even better, anyone would want one 🙂
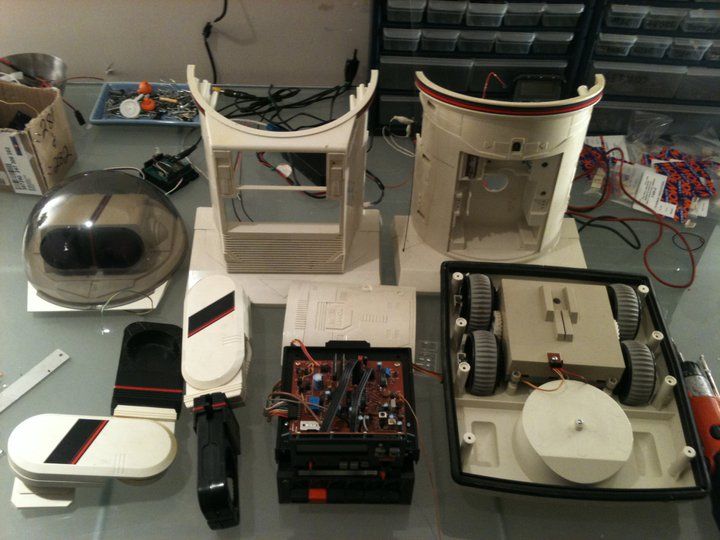
So, I found this fully operational Omnibot on Ebay for $105 USD. Came with the tray and remote too! And, you know me! I couldn’t wait to hack into this toy and make it come alive! The shell of this toy made an awesome home for my servos and the robot controller.
So here is what I did, and you can too. Hopefully this instructable will give you the ideas and confidence to begin hacking your own robots. If not, check out my other instructables and you’ll certainly get an overdose of robot hacking!
The robot is currently using EZ-Builder and the EZ-SDK (available at http://www.ez-robot.com ). I have added voice recognition, camera recognition and autonomous exploring to the robot. The camera recognition detects faces, skin tone, motion and objects by color. The voice recognition allows remote control commands to be verbally spoken.
Goal
To make a robot pet! So currently I have this robot cruising around my house in autonomous mode. The personality I wrote for it does a bunch of different things, randomly. The robot will follow colors, follow motion, sit there and look around, bleep and make interesting noises, wander around on its own, or listen to voice commands. He never gets stuck with the new autonomous code and HC-SR04 Ultrasonic sensor.
What I Used:
- •1 x EZ-B Robot Controller http://www.ez-robot.com
- 1 x Servo for head http://www.hvwtech.com/products_view.asp?ProductID=878
- 2 x Servos for arms http://www.hvwtech.com/products_view.asp?ProductID=878
- 1 x Omnibot shell
- 1 x Wireless Camera http://www.ebay.com
- 1 x EZ-Builder Software http://www.ez-robot.com/EZ-Builder/
- 2 x Bright Blue LEDs
- 2 x QR111D Edge Detectors
- 1 x micro servo for Ping Sensor
- 1 x HC-SR04 Ultrasonic Ping Sensor
- 1 x x Sparkfun TB6612FNG HBridge Motor Controller
Source Codes
There are two ways to control your robot. If you use the EZ-Builder, then you will not need to write any code because it is a graphical interface for controlling the components. If you use the EZ-SDK, then you can customize every action in your .Net application. I released both projects for you to use 🙂
- EZ-Builder Project: http://www.ez-robot.com/Projects/Files/108/omnibot.ezb
- C# Source Code: http://www.ez-robot.com/Projects/Files/108/robot%20-%20omnibot%20src.zip
Tools:
- Dremel
- Hot Glue Gun
- Soldering Iron
- Plyers, Screwdriver
Video #5 demonstrates his observing ability by tracking motion, colors and shape edges. His AI observes and really gives the impression that he is enjoying the road trip… We drove 2 hours north to visit a friend, and he really enjoyed himself. Can you tell? 🙂
Video #4 demonstrates the enhanced motion tracking algorythm I just finished. In this video he is watching TV. There are some colors and shapes that he learns to like and will take snapshots of them. After a day of autonomous living, my drive is full of some funny photos!!
Video #3 demonstrates the autonomous mode and how he navigates without getting stuck. This is one of the modes he can randomly choose. While in this mode, he also may follow colors (red green or blue)
In video #2, I disect the head and demonstrate the motion and color tracking.
This is video #1 where you may watch the assembly and modifications necessary to get Omnibot up and running 🙂
Step 1: Take Apart the Shell
Yes, sorry. You will need to take this cute little guy apart. And you’ll also need to throw out a few things, like his brain!! EAK!
Step 2: Wash The Parts
The robot is old, and therefore dirty. He’ll have dirt in places that you won’t get to with a cloth.
So throw him in the dishwasher! AKA the robot spa, as I call it…
When he returns from the Robot Spa, use a wet rag to wipe off any dirt that was not removed by the dishwasher. The dirt will be very loose and easy to remove after the dishwasher.
Step 3: Modify the Arms to Move
So your robot is back from the spa and feeling great. Now is the perfect time to begin operating!
The Omnibot doesn’t have motorized arms. That can be fixed with a little dremel action. Follow the pictures to view how the servo was installed. You will need some pretty powerful servos for the arms. Make sure you lubricate the joints with a little grease.
The servos I used for the arms are Eagle high torque servos. They can be a little expensive, but very strong.
Watch the Video #1 to see how the arms were modified and assembled. It was actually quite easy 😀
For more detail: DIY Mod an Omnibot 80’s Robot with Voice, Camera, Servos, Bluetooth