Scopeclock is an easy to use hardware to make your X-Y capable analog oscilloscope more useful .Using this simple to use hardware you can convert your analog oscilloscope into a scope clock.This project was me and my friend kshitij gupta at CEDT nsit under the guidance of Prof. Dhananjay V.Gadre.
Scope clock has two modes of operation
• Analog clock Mode – This is the default mode of operation . When the arduino is reset an analog clock appears on the oscilloscope screen .It keeps accurate time using clock hands.
• Temperature Mode – This mode of operation displays the current temperature of the surrounding .
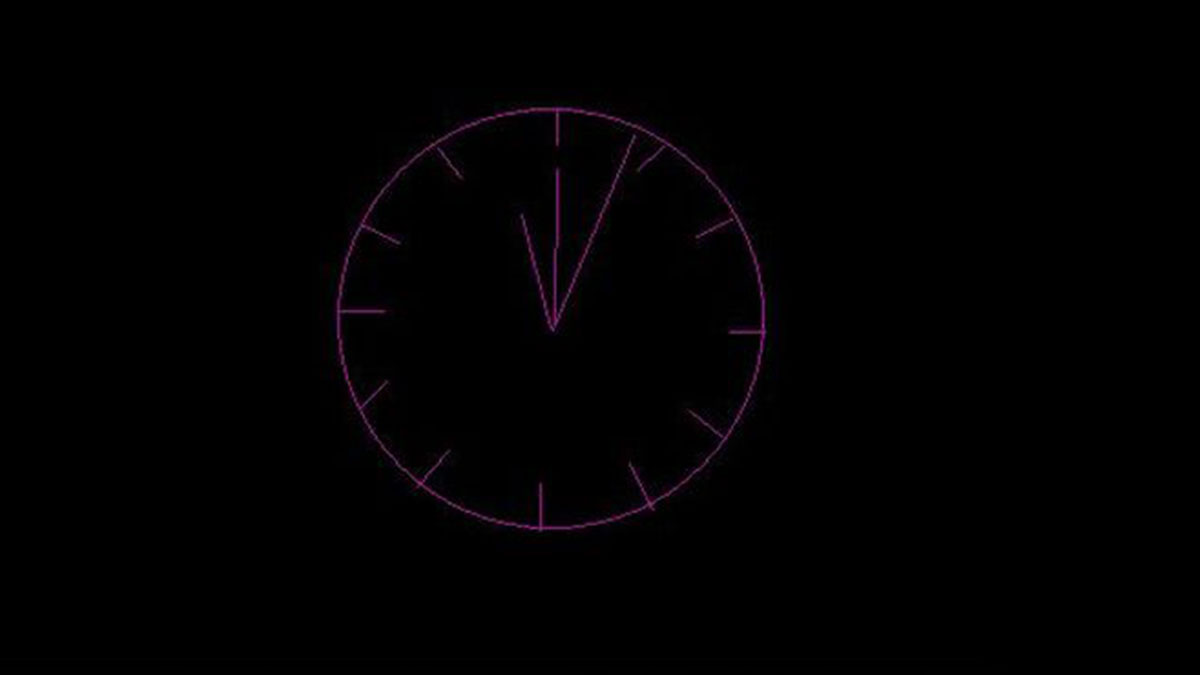
The mode is controlled by a push button . On pressing and releasing the pushbutton an interrupt is generated which changes the mode to Thermometer which displays the current temperature of the surrounding . After a few seconds the mode changes to analog clock
Step 1: The D.A.C
A Digital-to-Analog converter (DAC or D-to-A) is a device that converts a digital (usually binary) code to an analog signal. Digital-to-analog conversion can degrade a signal, so conversion details are normally chosen so that the errors are negligible.
Due to cost and the need for matched components, DACs are almost exclusively manufactured on integrated circuits (ICs). There are many DAC architectures which have different advantages and disadvantages. The suitability of a particular DAC for an application is determined by a variety of measurements including speed and resolution. Depending upon the requirement we can use a 2 or more bit resolution DAC .
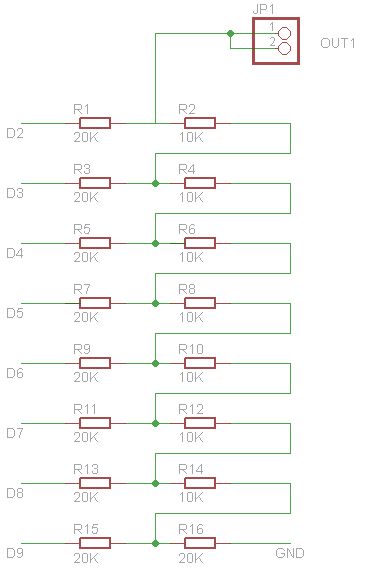
Although many types of DAC configuration are available ,an R-2R Ladder is the simple and inexpensive way to perform Digital-to-Analog conversion, using repetitive arrangements of precision resistor networks in a ladder-like configuration. In this project we have used two 8-bit R-2R ladder formations two convert the digital signal from the arduino into analog form and these are fed to the two channels of the Oscilloscope .
The DAC`s are soldered on the arduino protoshield along with temperature sensor circuit , connections of the two DAC with pins of arduino are shown in schematic
In our project digital pins D2-D9 are used in DAC1, digital pins D11-D13 and analog pins A1-A5 are used in DAC2 .
Step 2: Temperature sensor
First few important points while working with a thermistor.
A thermistor is a thermal resistor – a resistor that changes its resistance with temperature. Technically, all resistors are thermistors – their resistance changes slightly with temperature – but the change is usually very very small and difficult to measure. Thermistors are made so that the resistance changes drastically with temperature so that it can be 100 ohms or more of change per degree!
There are two kinds of of thermistors, NTC (negative temperature coefficient) and PTC (positive temperature coefficient). In general, you will see NTC sensors used for temperature measurement. PTC’s are often used as resettable fuses – an increase in temperature increases the resistance which means that as more current passes through them, they heat up and ‘choke back’ the current, quite handy for protecting circuits!
Thermistors have some benefits over other kinds of temperature sensors such as analog output chips (LM35/TMP36 ) or digital temperature sensor chips (DS18B20) or thermocouples .
For more detail: Analog Clock And Temperature sensor On An Oscilloscope using Arduino