Summary of Wearable Wireless Gesture Control With PHIRO Pro + Arduino + Pocket Code Smartphone App (JEDI MODE)
Summary: This tutorial shows how to control a PHIRO Pro robot using flex sensors mounted on a glove, an Arduino running Standard Firmata, an HC-05 Bluetooth module, and the Pocket Code Android app. Gestures and arm tilts map to seven conditions that command PHIRO movements, LED colors, and phone background indicators for actions like forward, left, right, and stop.
Parts used in the Wearable Wireless Gesture Control With PHIRO Pro + Arduino + Pocket Code Smartphone App (JEDI MODE):
- PHIRO Pro
- Flex Sensors
- Arduino UNO (or any Arduino board)
- HC-05 Bluetooth module
- Glove
- Jumper wires
- 9V Battery
- Android smartphone with Pocket Code app
Once again, here we are with another tutorial to “Awaken the Force” within you! With the new Star Wars movie just around the corner, we thought it would be fun to use the force to control PHIRO. In this tutorial, we will be using PHIRO Pro with Arduino along with some awesome Flex sensors.
“To the tutorial go, we shall. Yes, hmmm!”
Step 1: What You Will Need
1) PHIRO Pro – currently available for pre-order on Kickstarter
2) Flex Sensors – http://www.amazon.com/SPECTRA-SYMBOL-SYMBOLFLEX-SE…
3) Arduino UNO – http://www.amazon.com/arduino-org-A000066-Arduino…
4) HC-05 Bluetooth module – http://www.amazon.com/JBtek-Wireless-Bluetooth-Tra…
5) Glove – http://www.amazon.com/Radio-Shack-Whole-Screen-Glo…
6) Jumper wires – http://www.amazon.com/Gikfun-Dupont-Male-Male-Fem…
7) 9V Battery – http://www.amazon.com/Duracell-Alkaline-Batteries…
8) Pocket Code on an Android smartphone
Step 2: Uploading Standard Firmata to Arduino

Similar to our previous instructables, we will need to upload standard firmata to the Arduino board in order to connect to Pocket Code. Here we have used an Arduino UNO, however any Arduino board can be used it it’s place.
In Arduino IDE,
Select the COM Port.
Tools -> Serial Port -> Corresponding COM Port
Next select your Arduino Board.
Tools -> Board -> Your Arduino Board (We have used an Arduino Uno, but you can use ANY Arduino board)
Next we are going to select the Standard Firmata.
Click on Examples -> Firmata -> Standard Firmata
Click on Upload.
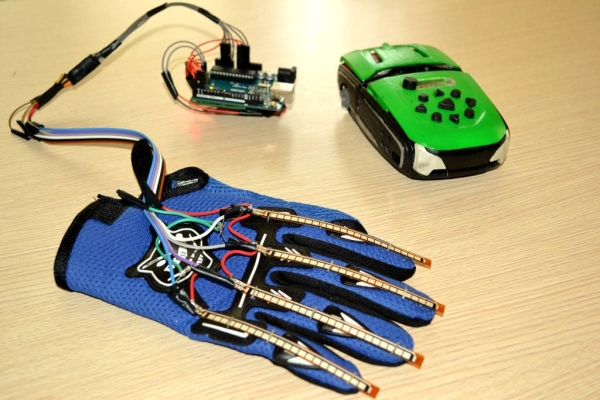
Step 3: Connecting Flex Sensors to Arduino and Fixing It to the Glove
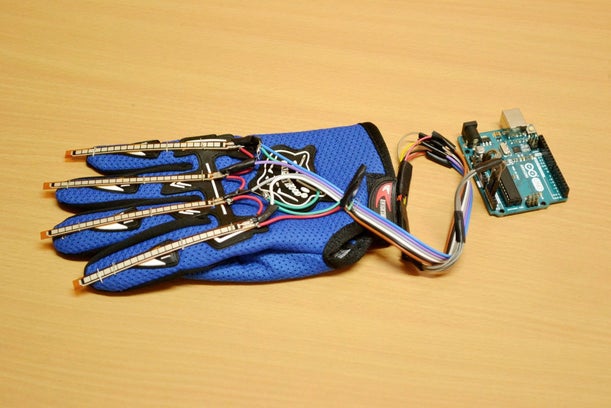
Flex sensors are resistive devices that can be used to detect bending or flexing. The connection diagram for connecting Flex sensors to the Arduino is shown above. We have also shown how we have mounted our flex sensors to the Glove. We secured the sensors by using some bent resisitors, however you could ziptie them as well.
Step 4: Connecting HC-05 Bluetooth Module to Arduino
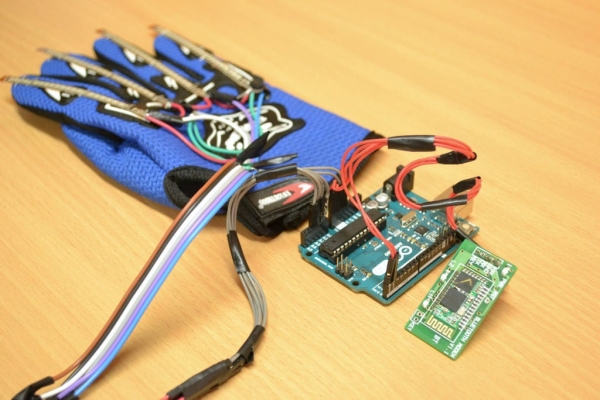
Next we connect the bluetooth module to the Arduino board.
Connections are as follows:
HC05 Tx – Arduino Rx
HC05 Rx – Arduino Tx
Vcc – 5V
GND – GND
Step 5: Complete the Arduino Setup With Battery Connections
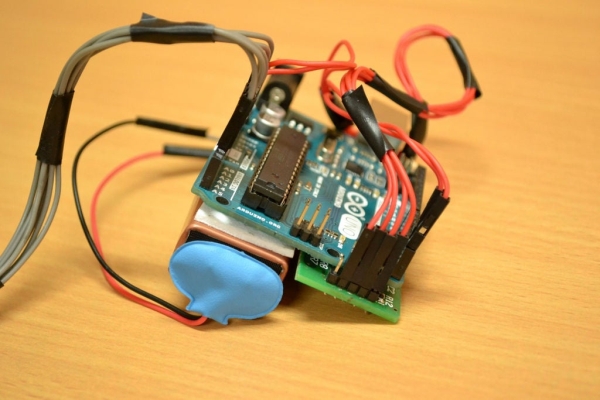
We have used a 9V battery to power up the Arduino board with Bluetooth module. You can see the arrangement in the picture. We do this so that it is easy to mount on your wrist. The more compact it is, the better.
Step 6: Program With Pocket Code
If you haven’t got the Pocket Code app, you can go get it here.
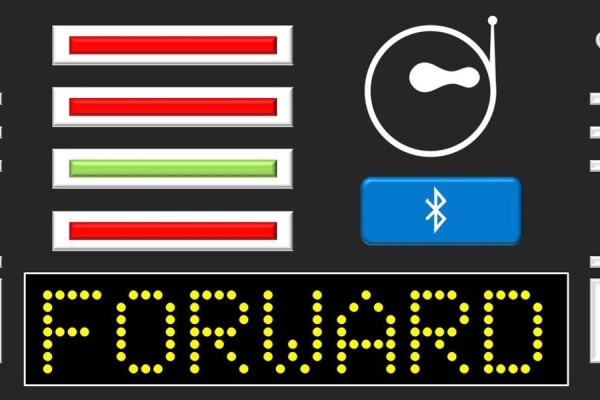
You can have a look at the pictures we used for our program. They were inspired by Darth Vader’s chest panel (sort of). Make sure PHIRO Pro is on Mode 3 (Bluetooth Mode – press the Mode button on PHIRO till BLUE LED near the display on top turns ON.)
For the program, we had 7 conditions in total.
Following are the conditions we used and the outputs associated with them.
1) When Index Finger is OPEN
Glow headlamps’ LEDs RED,
Background on phone changes to show STOP
2) When Index Finger and Middle Finger are OPEN
Glow headlamps’ LEDs GREEN,
Background on phone changes to show STOP
3) When Index Finger, Middle Finger and Ring Finger are OPEN
Glow headlamps’ LEDs BLUE,
Background on phone changes to show STOP
4) When full palm is OPEN
PHIRO moves forward,
Glow headlamps’ LEDs WHITE,
Background on phone changes to show FORWARD
5) When fist is closed
PHIRO stops,
Turn headlamps’ LEDs OFF,
Background on phone changes to show STOP
6) When fist is closed and arm is tilted to the left, the phone tilts left
PHIRO turns Left,
Glow Left LED YELLOW,
Background on phone changes to show LEFT
7) When fist is closed and arm is tilted to the right, the phone tilts right
PHIRO turns Right,
Glow Right LED YELLOW,
Background on phone changes to show RIGHT
Read more: Wearable Wireless Gesture Control With PHIRO Pro + Arduino + Pocket Code Smartphone App (JEDI MODE)
- What components are required to build the wearable gesture controller?
The article lists PHIRO Pro, flex sensors, an Arduino board, HC-05 Bluetooth module, a glove, jumper wires, a 9V battery, and an Android smartphone with Pocket Code. - How is the Arduino prepared to communicate with Pocket Code?
Upload Standard Firmata to the Arduino via the Arduino IDE using Examples → Firmata → Standard Firmata, then upload. - How are flex sensors connected and mounted?
Flex sensors are wired to the Arduino as shown in the diagram and mounted to the glove; the tutorial secured them with bent resistors or zip ties. - How is the HC-05 Bluetooth module connected to the Arduino?
Connect HC-05 Tx to Arduino Rx, HC-05 Rx to Arduino Tx, Vcc to 5V, and GND to GND. - How is the system powered for wearable use?
The Arduino and Bluetooth module are powered by a 9V battery to make the setup compact for mounting on the wrist. - What mode must PHIRO Pro be in to use Bluetooth?
PHIRO Pro should be set to Mode 3 (Bluetooth Mode) indicated by the blue LED near the top display. - How many gesture conditions are used in the Pocket Code program?
The program uses seven conditions mapping finger/hand gestures and arm tilt to PHIRO actions, LEDs, and phone background changes. - What action corresponds to a full open palm?
When the full palm is open, PHIRO moves forward, headlamps glow white, and the phone background shows FORWARD. - What happens when the fist is closed and the arm tilts left or right?
With a closed fist and tilt left, PHIRO turns left and the left LED glows yellow with phone background LEFT; tilt right similarly turns PHIRO right with right LED yellow and phone background RIGHT. - What does a closed fist without tilt do?
A closed fist stops PHIRO, turns headlamps off, and sets the phone background to STOP.