In this Instructable, I will step through controlling the temperature of most kitchen appliances. As an example, I will use an old Westbend Poppery popcorn maker (aka. coffee roaster), but these same techniques will be applicable to most hot plates, coffee makers, and waffle irons.
This instructable puts you at risk of electrocuting or burning yourself. I will do my best to point out potential pitfalls, but you must use common sense. If you are comfortable with household AC electricity, this poses similar dangers plus potential burnination.
This probably isn’t a good first Arduino project, but it might work as a second once you are comfortable with the general principles. You will need either a soldering iron or a breadboard. The total cost can be as little as $30, but probably will run between $60 and $90 after shipping.

Step 1: Parts
There are just a few parts to add, but for each has options.
1. Arduino or any other *duino.
There are a number of choices for Arduino these days. I will use a standard USB version, but any should work.
1a. USB Cable
1b. (optional) power supply for Arduino if you want this to run untethered from your computer. What? You don’t want to have a computer permanently attached to your kitchen appliance?
You can buy a lone Arduino or a nice starter kit from adafruit.
2. Temperature Sensor
There are many options for sensing temperature with your arduino. I’ll describe two different techniques, both providing a voltage that correlates to temperature. This voltage is easily read by the analog inputs of the Arduino.
Quick answer
For this tutorial, I’m going with the pricier but a slightly easier solution of a thermocouple and amplifier. This is because there is no soldering required as most thermocouple come with leads already attached. In practice, I’ve used the LM34 option the most (see below), as it’s cheaper and a more accurate.
To follow along exactly, order:
1x AD595CQ Datasheet
1x T-29
See below for more Temperature sensing options.
3. Solid State Relay
This part will allow the Arduino’s 5v DC output to control the AC power that used in the heaters of your appliance. The world of solid state relays (SSRs) can be pretty overwhelming, and there are many places to go astray. The good news is that digikey just started carrying a line of affordable SSRs. These particular SSRs have a few key features we need. As you can read on their datasheet they take 5V DC input, provide 50 to 250 Volts AC output, have built in heat sinks, screw terminals, and provide an LED light that shows when they are switched on (super helpful). These are also very affordable for SSRs at $12 – $16.
The only question you need to ask is about the wattage of our appliance, and your household voltage. In the US, most heaters and appliances are 1500 watts and under, and use 110 volts. From Ohm’s Law we know that
Watts / Volts = Amperes thus
1500 watts / 110 volts = 13.6 Amps
A 1500 watt appliance using USA household 110 volt AC power, uses about 13.6 amps.
what you need to make sure is that the current used by your appliance is under the rated current of your SSR. From the above calculation, a 15 Amp SSR will suffice.
This 15 Amp Optek SSR will do nicely and can be ordered with your temperature sensing parts. If you are in Europe, or anywhere with 220 ac power, you require only half the current as in the US, so 10 or 15 amps will cover all but the beefiest heaters.
Here are a couple more amperage options in case you need.
10 Amp
25 Amp
40 Amp
4. Wires and possibly some crimp connectors and breadboard
Except for the wires connecting the relay to the appliance, standard 20 or 22 AWG hookup wire is fine. For the higher voltage, you might be able to just use wires from inside the appliance, from an extension cord, or household wire from the hardware store. Probably you don’t want to use the tiny map wire on any substantial heating element. Look at what’s in the appliance already, and don’t go smaller than that. Also, feel the wire (where its insulated!) with our hand and if its getting warm, think about getting a lower gauge wire with more girth.
Depending on the types connectors used inside your appliance, some crimp-on connectors can be very helpful, such as eyes or spades. Also, there are simple crimp tubes that splice two wires together. You want to get the right size crimp piece for the wire gauge you have so it makes good contact to the wire when you squeeze it. While soldering heavy wire is possibly, depending on your soldering iron, it can be between frustrating and impossibly. Crimp ends are often total sweetness.
If you are using the AD595, you’ll need a breadboard to hook it up.
More Temperature Sensing Options – (you can safely ignore this if you choose)
Option a) LM34 or LM35
This is a single 3 wire part with from National. The LM34 correlates best to Fahrenheit, the LM35 to Celsius. Since we are attaching this to an Arduino, it doesn’t really matter as you can do the conversion in software. The LM35 is more expensive for some reason. For either of these, you have yet another choice (there are actually more choices, but probably not worth considering) of the package, metal or plastic. This part will require soldering 3 insulated wires that can handle whatever temperatures they might be exposed to. Not that this sensor cant be submerged, and shouldn’t be in direct contact with your food as some thermocouples allow. I’ve stuck it in boiling water, and it throws off the sensor pretty good. If you were to dip the whole thing or the exposed wires in epoxy or similar, it could possibly get wet. As with any option, if its going to be actually touching something you eat, make sure it’s not poisoning you (ie. lots of wire still has lead in it).
The parts ending in AH are the metal version, a TO-46 little metal can package. These cost more and provide a larger temperature range.
LM34AH – $13.86 from Digikey
-50F ~ 300F
LM35AH $16.90 from Digikey
-55C ~ 150C
The parts ending in CAZ are in the plastic TO-92 package. They are cheaper (even can be sampled for free!), but they have a smaller temperature range. They are fine as long the temperature range is okay for your use case, for example the perfect temperature for brewing coffee, or any kind of water bath up to and including boiling point.
LM34CAZ $7.14 from Digikey
-40 to +230F
LM35CAZ $5.50 from Digikey
-40 to +110C
I will use the LM34AH in this example as I have one already. Other than
option b) Thermocouple
Thermocouples are a common way to measure temperature. They come in many shapes and types. We will use type K because they are common and have a monster range of 200 C to +1350C.
You can buy your thermocouple from Sparkfun ($13.95) or a nice bolt-on variety from Omega (~$8.00) if that works for your application. Thermocouples are nice because they come prewired in a variety of lengths. If you are buying the amplifier (below) from digikey, they have a couple of K -types in stock, including this T-29 bead type.
The trick with these thermocouples is that you need a thermocouple amplifier to translate their output into a voltage that is linearly correlated to temperature. This makes it very easy to interface to the Arduino. Enter the AD595. The AD595AQ has a +-3 degree accuracy and is available at Sparkfun ($17.95). The AD494CQ has +- 1 degree accuracy and is available from Digikey. Digikey also has both versions in ROHS (lead free package) versions for 10 – 20 bucks more each if you would like. These are 14 pin DIP (will fit in a breadboard) packages. Even though they are 14 pins, you can breadboard one without a lot of effort.
There are many many more types of thermocouples, as well as numerous other techniques for sensing temperature you could use with the strategy presented here.
Step 2: Sensing Temperature
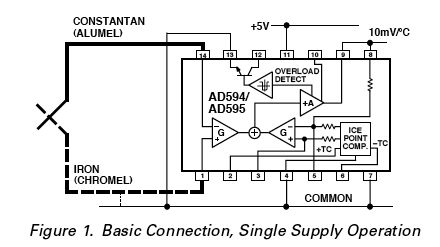
Now you want to hook up your breadboard and AD595 as shown in the picture. The attached schematic is from the datasheet for the AD595.
All the Sensors presented here translate temperature into voltage. In particular, 10 mV per degree, so 0 Volt = 0 degrees, and 2.5 V = 250 degrees (except for the LM34, degrees are in Celsius). We connect the output of the sensor to one the Arduino’s analog inputs. We’ll do this now, and write a temperature sensing program (aka: thermometer) that will send the current temperature back to your computer.
The code below goes with the wiring in the image to make a simple thermometer.
If you’ve never messed with an Arduino before, here is a great tutorial to get you started.
// Define which analog input pin we have connected to the temperature sensor
#define TEMP_SENSOR_PIN 0
// if you tie the Arduino’s vRef to the 3.3 volt supply, change this to 3.3
#define ANALOG_VOTLAGE_REFERENCE 5
void setup() {
Serial.begin(115200);
}
void loop() {
// prints the currrent temperature with 1 place after the decimal point
printFloat(getTemperature(), 1);
// print a carriage return
Serial.println();
// rest 100 milliseconds
delay(100);
}
float CtoF(float c) {
// optionally convert from Celsius to Farenheit if you are into that sorta thing
return c * 9.0 / 5.0 + 32.0;
}
2. Temperature Sensor
3. Solid State Relay
For more detail: Temperature Control For Kitchen Appliances using Arduino