Summary of Persistence of Vision (PoV) Display Using Arduino
Summary: This project builds an LED POV (persistence of vision) display using an Arduino Nano, a spinning holder driven by a DC motor, an IR sensor for sync, and an array of LEDs mounted on a 3D-printed rotating part. The IR sensor detects a white marker to synchronize frames; Arduino code drives 8 LEDs in timed rows to form characters as the assembly spins. The guide covers 3D printing, LED assembly with resistors, wiring to Nano pins, motor mounting, powering, and sample code for displaying letters and numbers.
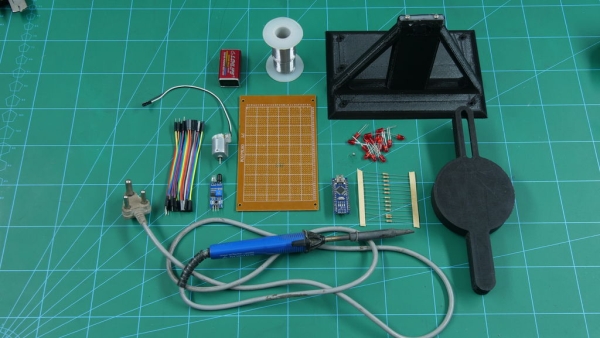
Parts used in the LED POV Display:
- evive
- Arduino Nano
- IR Sensor
- General Purpose Board (cut to fit)
- LEDs (8 red used in example)
- 220 ohm resistors
- DC Motor
- Battery
- Wires / Jumper cables
- Glue Gun
- Soldering Iron
- White Paper (small piece as marker)
- Some 3D printed parts (Rotating part and Stable part holder)
- Arduino IDE (software)
Time for a fun-filled, easy-peasy Japan-easy to make a project! Today, we’re going to show you how to make an LED POV Display. POV, an acronym for the persistence of vision, is a kind of optical illusion in which a visual image seems to persist even when the light from it ceases to enter our eyes and this makes it super cool! You can display any text or image that you want to in the display.
Sounds awesome, right? So, why are you still here?! Let’s begin right away!
Step 1: List of Components Needed
Hardware
- evive
- Arduino Nano
- IR Sensor
- General Purpose Board
- LEDs
- Resistors
- DC Motor
- Battery
- Wires
- Glue Gun
- Soldering Iron
- White Paper
- Some 3D Printed Parts
Software
- Arduino IDE
Step 2: Understanding Some Basic Concepts
What is Persistence of Vision?
Persistence of Vision, or POV, occurs when a visual image seems to persist continuously when a stream of light is repeatedly interrupted for very brief instances and does not enter our eyes during those durations.
How does the Persistence of Vision works?
The human eye cannot process more than 10-12 images per second. When a series of images more is presented in quick succession, it gives us the illusion that the images are in motion.
This is the basic principle behind the making of the animated movies.
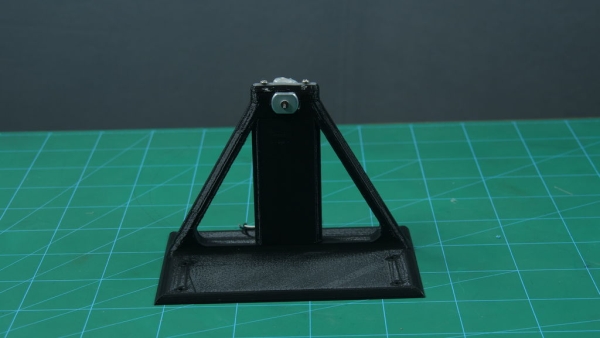
Step 3: Printing the 3D Printed Part
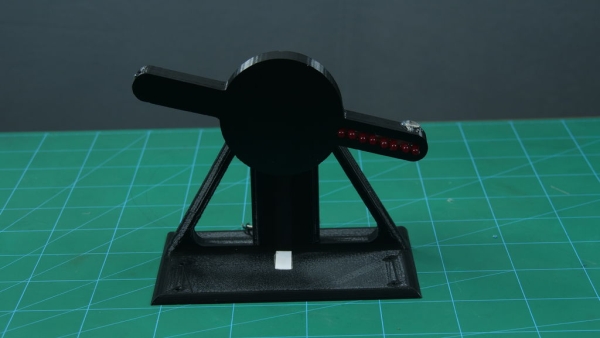
Here we are going to 3D Print the holder to which we will be fixing our complete assembly. Download the .STL given below.
The Holder consists of two parts.
- The Rotating Part
- The Stable Part
Step 4: Assembling the LEDs

Once you have the 3D Printed parts with you, its time to start the making.
Take the General Purpose Board and cut it in the size that fits the Rotating part.
Once done, its time to add the LEDs.
In this project, I have used 8 red LEDs, you can use as many and of any color you want.
Once done, short (common) the cathode terminal of all the LEDs by soldering them on the GPB.
Add resistors to protect the LEDs from blowing up due to high voltage supply (5V). I have used the 220ohm resistors. Solder one end of each resistor to the anode terminal or positive leg of each LED.
Solder jumper cables to the second leg of each resistor.
Step 5: Connection With Arduino Nano
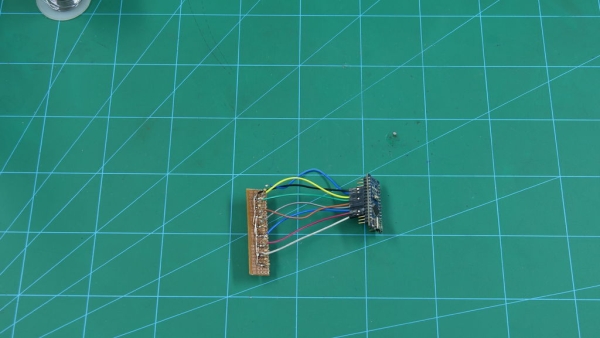
Connect all the LEDs to Arduino Nano as given below:
- LED0: D2 of nano
- LED1: D3 of nano
- LED2: D4 of nano
- LED3: D5 of nano
- LED4: D6 of nano
- LED5: D7 of nano
- LED6: D8 of nano
- LED7: D9 of nano
- Common cathode: Ground of nano
Step 6: Attaching the DC Motor
Attach the DC Motor to the given space in the holder.
Power the DC Motor using evive.
Step 7: Adding IR Sensor
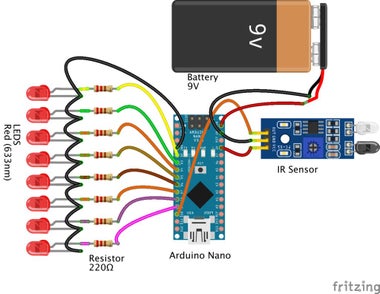
It’s time to add the IR Sensor.
As we need to indicate the beginning from where the text should be written. Attach a small piece of white paper to the steady assembly, which will be detected by the IR Sensor.
Varying the place of the paper leads to a change in the position of the text displayed.
Connect it to Nano:
- GND: GND of nano
- Vin: 5v of nano
- Out: D10 of nano
Step 8: Completing the Assembly.
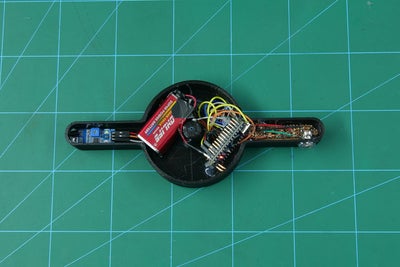
We need to power up the Nano. For that, connect the battery to it.
Once done, fix the Nano into the Rotating Part.
Fasten the Rotating Part to the holder.
Step 9: Arduino Code
Upload the following code to Arduino Nano:
/*
- This Code demonstrates
- LED POV DISPLAY
- Components used
- 1) Arduino Nano
- 2) DC motor
- 3) LEDs
- 4) IR sensor
- 5) Battery
- 6) Wire
- Connect leds to 2 to 9 digital pin of Nano
- Connect IR sensor out pin to 10 digital pin of Nano
- code written by Palak Mehta on March 29,2019
*/
////////////////////////design a pattern of display the number and alphabates////////////////////////////////
- code written by Palak Mehta on March 29,2019
int NUMBER9[]={1,1,1,1,0,0,0,1, 1,0,0,1,0,0,0,1, 1,0,0,1,0,0,0,1, 1,0,0,1,0,0,0,1, 1,1,1,1,1,1,1,1};
int NUMBER8[]={0,1,1,0,1,1,1,0, 1,0,0,1,0,0,0,1, 1,0,0,1,0,0,0,1, 1,0,0,1,0,0,0,1, 0,1,1,0,1,1,1,0};
int NUMBER7[]={1,0,0,0,0,0,0,0, 1,0,0,0,1,0,0,0, 1,0,0,0,1,0,0,0, 1,0,0,1,1,1,1,1, 1,1,1,0,1,0,0,0};
int NUMBER6[]={1,1,1,1,1,1,1,1, 1,0,0,0,1,0,0,1, 1,0,0,0,1,0,0,1, 1,0,0,0,1,0,0,1, 1,0,0,0,1,1,1,1};
int NUMBER5[]={1,1,1,1,1,0,0,1, 1,0,0,0,1,0,0,1, 1,0,0,0,1,0,0,1, 1,0,0,0,1,0,0,1, 1,0,0,0,1,1,1,1};
int NUMBER2[]= {1,0,0,0,0,0,1,1, 1,0,0,0,0,1,0,1, 1,0,0,0,1,0,0,1, 1,0,0,1,0,0,0,1, 0,1,1,0,0,0,0,1};
int NUMBER1[]= {0,0,1,0,0,0,0,0, 0,1,0,0,0,0,0,0, 1,1,1,1,1,1,1,1, 0,0,0,0,0,0,0,0, 0,0,0,0,0,0,0,0};
int NUMBER0[]= {1,1,1,1,1,1,1,1, 1,0,0,0,0,0,0,1, 1,0,0,0,0,0,0,1, 1,0,0,0,0,0,0,1, 1,1,1,1,1,1,1,1};
int _[] = {0,0,0,0,0,0,0,0, 0,0,0,0,0,0,0,0, 0,0,0,0,0,0,0,0, 0,0,0,0,0,0,0,0, 0,0,0,0,0,0,0,0};
int A[] = {1,1,1,1,1,1,1,1, 1,0,0,1,0,0,0,0, 1,0,0,1,0,0,0,0, 1,0,0,1,0,0,0,0, 1,1,1,1,1,1,1,1};
int B[] = {1,1,1,1,1,1,1,1, 1,0,0,1,0,0,0,1, 1,0,0,1,0,0,0,1, 1,0,0,1,0,0,0,1, 0,1,1,0,1,1,1,0};
int C[] = {0,0,1,1,1,1,0,0, 0,1,0,0,0,0,1,0, 1,0,0,0,0,0,0,1, 1,0,0,0,0,0,0,1, 1,0,0,0,0,0,0,1};
int D[] = {1,1,1,1,1,1,1,1, 1,0,0,0,0,0,0,1, 1,0,0,0,0,0,0,1, 0,1,0,0,0,0,1,0, 0,0,1,1,1,1,0,0};
int E[] = {1,1,1,1,1,1,1,1, 1,0,0,1,0,0,0,1, 1,0,0,1,0,0,0,1, 1,0,0,1,0,0,0,1, 1,0,0,1,0,0,0,1};
int F[] = {1,1,1,1,1,1,1,1, 1,0,0,1,0,0,0,0, 1,0,0,1,0,0,0,0, 1,0,0,1,0,0,0,0, 1,0,0,1,0,0,0,0};
int G[] = {0,1,1,1,1,1,1,1, 1,0,0,0,0,0,0,1, 1,0,0,0,1,0,0,1, 1,0,0,0,1,0,0,1, 1,0,0,0,1,1,1,0};
int H[] = {1,1,1,1,1,1,1,1, 0,0,0,0,1,0,0,0, 0,0,0,0,1,0,0,0, 0,0,0,0,1,0,0,0, 1,1,1,1,1,1,1,1};
int I[] = {1,0,0,0,0,0,0,1, 1,0,0,0,0,0,0,1, 1,1,1,1,1,1,1,1, 1,0,0,0,0,0,0,1, 1,0,0,0,0,0,0,1};
int J[] = {0,0,0,0,0,1,1,0, 0,0,0,0,1,0,0,1, 0,0,0,0,0,0,0,1, 0,0,0,0,0,0,0,1, 1,1,1,1,1,1,1,0};
int K[] = {1,1,1,1,1,1,1,1, 0,0,0,1,1,0,0,0, 0,0,1,0,0,1,0,0, 0,1,0,0,0,0,1,0, 1,0,0,0,0,0,0,1};
int L[] = {1,1,1,1,1,1,1,1, 0,0,0,0,0,0,0,1, 0,0,0,0,0,0,0,1, 0,0,0,0,0,0,0,1, 0,0,0,0,0,0,0,1};
int M[] = {1,1,1,1,1,1,1,1, 0,1,0,0,0,0,0,0, 0,0,1,0,0,0,0,0, 0,1,0,0,0,0,0,0, 1,1,1,1,1,1,1,1};
int N[] = {1,1,1,1,1,1,1,1, 0,0,1,0,0,0,0,0, 0,0,0,1,1,0,0,0, 0,0,0,0,0,1,0,0, 1,1,1,1,1,1,1,1};
int O[] = {0,1,1,1,1,1,1,0, 1,0,0,0,0,0,0,1, 1,0,0,0,0,0,0,1, 1,0,0,0,0,0,0,1, 0,1,1,1,1,1,1,0};
int P[] = {1,1,1,1,1,1,1,1, 1,0,0,1,0,0,0,0, 1,0,0,1,0,0,0,0, 1,0,0,1,0,0,0,0, 0,1,1,0,0,0,0,0};
int Q[] = {0,1,1,1,1,1,1,0, 1,0,0,0,0,0,0,1, 1,0,0,0,0,1,0,1, 0,1,1,1,1,1,1,0, 0,0,0,0,0,0,0,1};
int R[] = {1,1,1,1,1,1,1,1, 1,0,0,1,1,0,0,0, 1,0,0,1,0,1,0,0, 1,0,0,1,0,0,1,0, 0,1,1,0,0,0,0,1};
int S[] = {0,1,1,1,0,0,0,1, 1,0,0,0,1,0,0,1, 1,0,0,0,1,0,0,1, 1,0,0,0,1,0,0,1, 1,0,0,0,1,1,1,0};
int T[] = {1,0,0,0,0,0,0,0, 1,0,0,0,0,0,0,0, 1,1,1,1,1,1,1,1, 1,0,0,0,0,0,0,0, 1,0,0,0,0,0,0,0};
int U[] = {1,1,1,1,1,1,1,0, 0,0,0,0,0,0,0,1, 0,0,0,0,0,0,0,1, 0,0,0,0,0,0,0,1, 1,1,1,1,1,1,1,0};
int V[] = {1,1,1,1,1,1,0,0, 0,0,0,0,0,0,1,0, 0,0,0,0,0,0,0,1, 0,0,0,0,0,0,1,0, 1,1,1,1,1,1,0,0};
int W[] = {1,1,1,1,1,1,1,1, 0,0,0,0,0,0,1,0, 0,0,0,0,0,1,0,0, 0,0,0,0,0,0,1,0, 1,1,1,1,1,1,1,1};
int X[] = {1,1,0,0,0,0,1,1, 0,0,1,0,0,1,0,0, 0,0,0,1,1,0,0,0, 0,0,1,0,0,1,0,0, 1,1,0,0,0,0,1,1};
int Y[] = {1,1,0,0,0,0,0,0, 0,0,1,0,0,0,0,0, 0,0,0,1,1,1,1,1, 0,0,1,0,0,0,0,0, 1,1,0,0,0,0,0,0};
int Z[] = {1,0,0,0,0,1,1,1, 1,0,0,0,1,0,0,1, 1,0,0,1,0,0,0,1, 1,0,1,0,0,0,0,1, 1,1,0,0,0,0,0,1};
int* alpha[]= {A,B,C,D,E,F,G,H,I,J,K,L,M,N};//,T,U,V,W,X,Y,Z};
int letterSpace;
int delayTime;
#define IR_pin 10
void setup()
{
Serial.begin(9600);
pinMode(IR_pin,INPUT);
for( int i = 2; i<10 ;i++ ) // setting the ports of the leds to OUTPUT
{
pinMode(i, OUTPUT);
}
     letterSpace =4;// defining the space between the letters (ms)
     delayTime =1;// defining the time dots appear (ms)
}
void printLetter(int letter[])
{
int y;
// printing the first y row of the letter
for (y=0; y<8; y++)
{
digitalWrite(y+2, letter[y]);
}
delay(delayTime);
// printing the second y row of the letter
for (y=0; y<8; y++)
{
digitalWrite(y+2, letter[y+8]);
}
delay(delayTime);
// printing the third y row of the letter
for (y=0; y<8; y++)
{
digitalWrite(y+2, letter[y+16]);
}
delay(delayTime);
for(y = 0; y<8; y++) {
digitalWrite(y+2, letter[y+24]);
}
delay(delayTime);
for(y = 0; y<8; y++) {
digitalWrite(y+2, letter[y+32]);
}
delay(delayTime);
// printing the space between the letters
for (y=0; y<8; y++)
{
digitalWrite(y+2, 0);
}
delay(letterSpace);
}
void loop()
{
if(digitalRead(IR_pin)==LOW)
{
printLetter (P);
printLetter (O);
printLetter (V);
printLetter ();
printLetter ();
printLetter (D);
printLetter (I);
printLetter (S);
printLetter (P);
printLetter (L);
printLetter (A);
printLetter (Y);
printLetter (_);
}
}
Step 10: Working
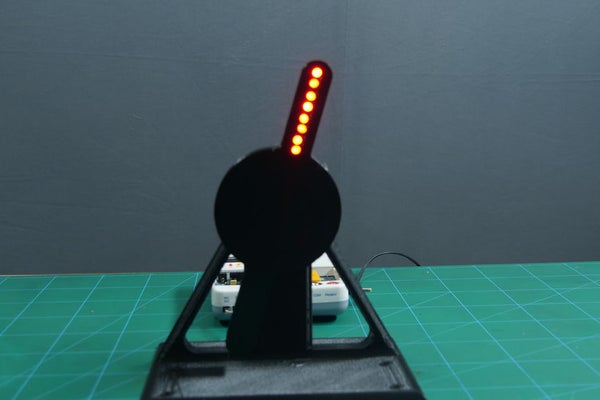
When the IR sensor detects the white paper, the LEDs start glowing and create the illusion that something is displayed by the LED. This is due to the persistence of vision, where the LEDs turn on and off in such a way that the different images overlap each other forming letters.
Step 11: Conclusion
With this, your very own LED POV Display is all set to display the message of your choice!
Source: Persistence of Vision (PoV) Display Using Arduino
- What is the basic principle behind the POV display?
Persistence of vision: rapidly interrupted light images appear continuous to the human eye, creating the illusion of motion or stable images. - How many LEDs are used in the example project?
The example uses 8 red LEDs mounted on the rotating part. - How are the LEDs connected to the Arduino Nano?
LEDs LED0 to LED7 are connected to Nano digital pins D2 through D9 respectively, with common cathode to Nano ground. - How is the starting position detected for writing text?
An IR sensor detects a small piece of white paper attached to the steady assembly to indicate the start position. - What resistors are used to protect the LEDs?
220 ohm resistors are used, one soldered to each LED anode. - How is the rotating assembly powered and driven?
The DC motor is attached to the holder and powered by evive; the battery powers the Arduino Nano. - What does the Arduino code do when the IR sensor detects the white paper?
The code prints a sequence of letters (for example P O V D I S P L A Y) by driving rows of LEDs timed as the assembly spins. - What are the key 3D printed parts required?
The holder consists of two 3D printed parts: the Rotating part and the Stable part. - Can the number and color of LEDs be changed?
Yes; the article states you can use as many LEDs and any color you want.