Sorry, but I hate cleaning windows, is one of my unfinished business as usual, but I had to do (at least) every time I wanted to etch a circuit board printed by traditional (and perhaps unorthodox) of stick it in cellophane and let natural light do the work.
Lo siento, pero no me gusta limpiar las ventanas, es una de mis asignaturas pendientes de siempre, pero tenia que hacerlo (al menos una) cada vez que quería insolar una placa de circuito impresa por el método tradicional (y quizá poco ortodoxo) de pegarla con celofán y dejar que la luz natural hiciera el trabajo.
I had recently been introduced in the field of microprocessors and their programming with arduino, so I thought to make a timed exposure unit was a good way to start as a first project.
Hacía poco que me había introducido en el tema de los microprocesadores y su programación con el arduino, así que me pareció que hacer una insoladora con temporizador era una buena forma de arrancar como primer proyecto.
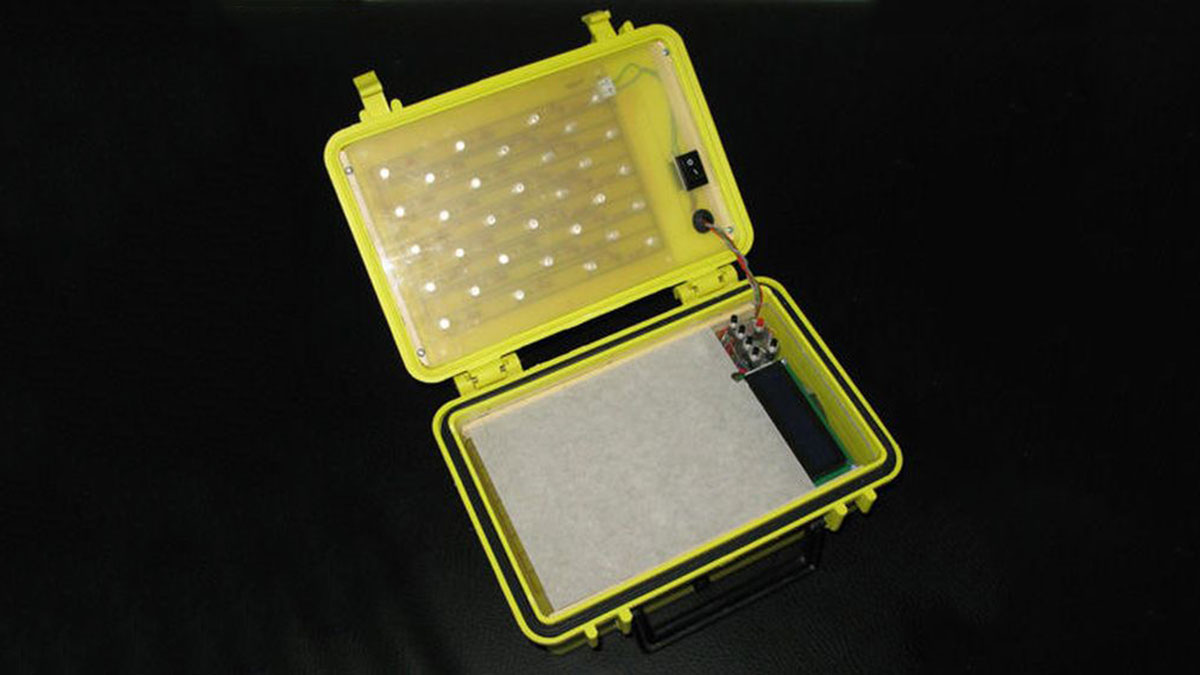
To make it I used a plastic watertight did nothing but wander around my desk and not know how to get it out of the way, so the idea of baptizing as “LunchBox isolation”.
Para hacerla he empleado una caja de plástico estanca que no hacía más que dar vueltas por mi mesa de trabajo y no sabía como quitármela de en medio, así nació la idea de bautizarla como “Insoladora LunchBox”.
I wanted to choose between one or two sides etch simultaneously, choose the time in minutes and seconds and have a sneak outside to tell me when the process was over. Also want to have to press a button if needed to etch more plates. Also had to be compact, portable, and of course “cheap”.
Quería poder elegir entre insolar una o dos caras simultáneamente, elegir el tiempo en minutos y segundos y tener un chivato externo que me dijese cuando había acabado el proceso. También quería tener que pulsar solo un botón si tenía que insolar más placas. Además tenia que ser compacto, portátil y por supuesto “apañado”.
What you will need:
1 x Arduino NANO or similar
1 x Module I2C/TWI LCD1602
6 x pushbuttons
1 x switch
Cables and connectors varied
electronic components
For light plates
64 x LED ultraviolet (you can use high intensity)
64 x 220 Ohm resistors 1/4w
2 x C.I. terminals
For Arduino prototype board
3 x C.I. terminals
4 x connectors C.I. 4 pin
2 x 220 Ohm resistors 1/4w
7 x 10 K Ohm resistors 1/4w
1 x LED red-green single encapsulated
1 x LDR
Que vas a necesitar:
1 x Arduino NANo osimilar
1 x Modulo I2C/TWI LCD1602
6 x pulsadores
1 x interruptor
Cables y conectores variados
Componentes electrónicos
Para las placas de luz
64 x led ultravioleta (se pueden usar de alta intensidad)
64 x resistencias 220 Ohm 1/4w
2 x terminales para C.I.
Para la placa del prototipo Arduino
3 x terminales para C.I.
4 x conectores C.I. de 4 pines
2 x resistencias 220 Ohm 1/4w
7 x resistencias 10 K Ohm 1/4w
1 x led rojo-verde encapsulado único
1 x resistencia LDR
Step 1: How it works
Anyway, with this in mind I started thinking about what I wanted him to do and most importantly … how to do it.
En fin, con esta idea en mente me puse a pensar en lo que quería que hiciese y lo más importante… cómo hacerlo.
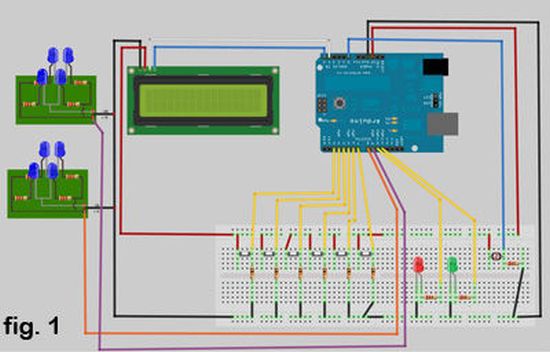
Finally, after several changes, modifications, extensions and others, I started with the prototype. Design the prototype with Fritzing (wonderful tool) and after modifications I run something like this (fig.1)
The prototype is made on an Arduino Uno which was what I had on hand, and ignoring any buttons, has a painting like this (fig.2)
Al final y después de varios cambios, modificaciones, ampliaciones y demás, me puse con el prototipo. Diseñe el prototipo con el Fritzing (maravillosa herramienta) y después de las modificaciones me quedo algo como esto (fig.1)
El prototipo esta hecho sobre un arduino uno que era lo que tenía a mano, y obviando algún botón, tiene una pinta como esta (fig.2)
It has a display for displaying data, LDR resistance that detects the lid opening after finishing the process, 2 LEDs that make external sneak (red and green in the same package) and six buttons, two up and down the minutes two do the same with the second (in units of 10), you change the faces to etch (1 or 2) and the last begins the process of heatstroke. We also have plates that give light led to the exposure unit, obviously there are two, one for the top face and a bottom face for.
Tiene un display para mostrar los datos, una resistencia LDR que detecta la apertura de la tapa una vez acabado el proceso, 2 led que hacen de chivato externo (rojo y verde en un mismo encapsulado) y seis botones, dos suben y bajan los minutos, dos hacen lo propio con los segundos (en unidades de 10), uno cambia las caras a insolar (1 o 2) y el último inicia el proceso de insolación. También tenemos las placas de led que dan la luz a la insoladora, evidentemente hay dos, una para la cara de arriba y una para la cara de abajo.
Step 2: Building it all
Once the prototype software running and turn to the construction schedule. For reasons of space I decided to put an Arduino Nano, and I wanted to put so much in so little space …
Una vez el prototipo funcionando y el software programado pasamos a la construcción. Por motivos de espacio decidí poner un Arduino NANO, ya que quería meter tantas cosas en tan poco espacio…
The first thing was to make the PCB where the LED will light. As the design is easy to draw the hair. I have used ultraviolet LED and they had plenty on hand to make another project that did not see the light (pun intended) as my mail is somewhat forgotten chooses the method of diode-resistance seen, certainly not the best, but it works and resistors are cheap …..
Lo primero de todo era hacer las placas de circuito impreso donde van los led de luz. Como el diseño es muy sencillo lo dibuje a pelo. He empleado led ultravioleta ya que tenía un montón a mano para hacer otro proyecto que no vio la luz (valga la expresión) como mi electrónica está algo olvidada opte por el método visto de diodo-resistencia, seguro que no es el mejor , pero funciona y las resistencias son baratas…..
I got to work and cleaned a window (for the last time, at least for circuits), as had largely forgotten the times, the first resulted very low insolation and as I wanted to use the plate (the thing is very “achucha “not to recycle), drew on the ancient and laborious method of permanent marker and ruler. The second came out flawless.
Me puse manos a la obra y limpié una ventana (por última vez, al menos para hacer circuitos), como tenía muy olvidados los tiempos, la primera resulto muy escasa de insolación y como quería usar la placa (que la cosa está muy “achucha” como para no reciclar), la dibujé por el antiguo y laborioso método de rotulador indeleble y regla. La segunda me salió impecable.
1 x Module I2C/TWI LCD1602
6 x pushbuttons
1 x switch
Cables and connectors varied
electronic components
For light plates
64 x LED ultraviolet (you can use high intensity)
64 x 220 Ohm resistors 1/4w
2 x C.I. terminals
For Arduino prototype board
3 x C.I. terminals
4 x connectors C.I. 4 pin
2 x 220 Ohm resistors 1/4w
7 x 10 K Ohm resistors 1/4w
1 x LED red-green single encapsulated
1 x LDR
For more detail: PCB on a Box using Arduino Board