Summary of Nokia 5110 LCD and Arduino – Ultimate Tutorial and Guide
This article provides a tutorial on interfacing the Nokia 5110 graphical LCD with an Arduino. The Nokia 5110 features a 48x84 pixel display with an internal PCD8544 controller, communicating via a serial bus. The tutorial covers hardware connections to Arduino pins, explains the LCD’s command and data modes, and provides code for displaying graphics and text, including custom logos. It also includes subroutine explanations for pixel control, cursor setting, clearing the display, and initialization. A supporting library simplifies programming, and resources for converting images to displayable data are provided.
Parts used in the Nokia 5110 Arduino Interfacing Project:
- Nokia 5110 Graphic LCD Display
- Arduino Board
- Connection wires
- 3.3V power supply (from Arduino)
Interfacing Nokia 5110 LCD Display To Arduino
In this article, we are publishing a project tutorial which explains different aspects of interfacing a Graphical LCD (GLCD ) Nokia 5110 with Arduino. Nokia 5110 is a 48 x 84 graphic LCD that has an internal controller PCD8544 to control all displays and operations. The Nokia 5110 is interfaced to the microcontroller through a serial bus interface. After going through the project you can display the graphics or text you wish to be displayed. So let’s begin our tutorial and learn how to interface a graphical LCD like Nokia 5110 to Arduino.
Before proceeding, please go through our tutorial on interfacing Nokia 5110 with 8051 Micro controller.
So let’s come to our project – Nokia 5110 Arduino Interfacing!
Objectives of the Project
- Understanding the basics of Nokia 5110 GLCD.
- Serial Bus interfacing of GLCD with Arduino.
- Generating code for displaying the graphics or text you need to display.
Let’s begin to build our project!
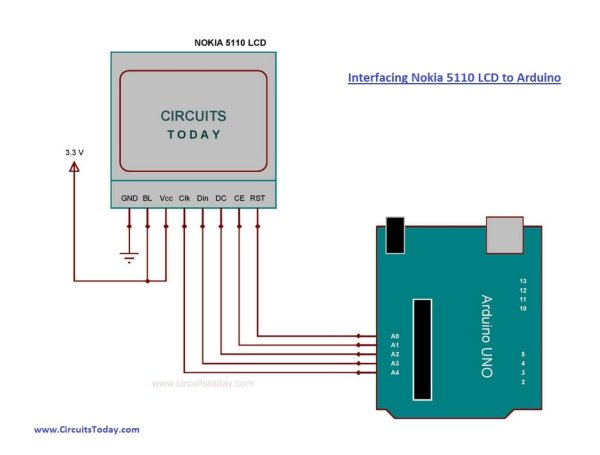
Circuit Diagram – Nokia 5110 Arduino Interfacing
Nokia 5110 Graphic LCD Display
Assemble the circuit as shown in the diagram! Component and connections are explained below
Specifications
- 48 x 84 Graphic LCD Display
- Serial Bus Interface
- Internal Controller – PCD8544
- LED Back-Light
- Supply Voltage 2.7 -5.0 Volt
- Low power consumption
Connections Explained
- GND => Ground Pin | Connect to Arduino GND
- BL => Pin to control LED (Back Light) | Connect to 3.3V output pin of Arduino
- VCC => Power Supply Pin from 7 – 5 V | Connect to 3.3V
- CLK => Pin Clock (Serial Clock Line for SPI communication) | Connect to A0.
- DIN => Pin Data (Serial Data Line for SPI communication) | Connect to A1.
- DC => Pin to select Command or Data mode for data formats | Connect to A2.
- CE => Chip enable input. The enable pin allows data to be clocked in. The signal is active LOW. | Connect to A3.
- RST => External reset. This signal will reset the device and must be applied to properly initialize the chip. The signal is active LOW. | Connect to A4.
The Program/Code
The important aspects and subroutines of the program are explained below.
Download Nokia 5110 Arduino – Program
Download Library for Arduino – Nokia 5110
At the beginning of the program, you can see two large arrays named “CircuitsTodayLogo” and “LookUpTable”. First one is for displaying the CircuitsToday Logo (as you can see in the header area of this website). And the latter is for writing normal text. You can replace the first one with the array of your own logo. Array for your logo can be generated by simply uploading the logo image in the following link. https://www.riyas.org/2017/01/online-tool-to-convert-bitmap-to-hex-nokia-arduino.html.
As mentioned earlier the signal connection for controlling operation of LCD is the Serial format. Command mode and Data mode are the two modes that are used for communicating with LCD.
The DC pin of the LCD is used for selecting the mode. if DC = 0, the data that is sent to the LCD is Command and if DC = 1, the data that is sent to LCD will be Data and it will be placed in DDRAM Memory (Display Data RAM) to be displayed on LCD Display. The value of DDRAM will be incremented automatically after writing 1 byte into it. While sending each byte, the MSB will be sent first.
“Data()” and “Cmd()” are the subroutines used for selecting the mode of sending data (Data mode and Command mode). The arrangement of memory in LCD 5110 is in matrix form consist of 6 rows (Y Address) and 84 columns (X Address). Data will be sent as bytes and it will be arranged as a vertical line. If we want to access to the position of displaying the result on LCD Display, we must refer to the relationship between X-Address and Y-Address. Subroutines used for this are “setPixel()” and “setCursor()”. “allClear()” is the subroutine used for clearing the entire DDRAM.
As the name says “Initialize_LCD()” is the function used for sending commands to the LCD for its initialization. “charDisp()” and “stringDisp()” are for displaying characters and strings respectively.
A simple library for Nokia5110 module is also attached with this article. Using library will make your program appear more simple. Few examples are also included in it, which will show how to use it properly.
Source : Nokia 5110 LCD and Arduino – Ultimate Tutorial and Guide