Summary of Matrix sound machine: Generative music with a particle system using Arduino
Creating emergent visual patterns converted to sound, this proof-of-concept Arduino project uses a Gameduino for audio and particles bouncing on an LED matrix as interactive sound generators. A joystick adds particles (press 2s) and serves as a drawing pen to create obstacles. Basic soldering and enclosure work (laser-cut acrylic, wooden box) complete the build. Code and wiring follow Adafruit LED matrix guidance with configurable pin defines.
Parts used in the Matrix sound machine:
- Prototyping shield
- Pin headers
- Joystick
- Wires
- LED matrix
- Gameduino (sound processor)
- Wooden box (enclosure)
- Female jack
- Audio wire
- Pieces of scrap wood
- Semi transparent acrylic plate
- 10k resistor
This project is a part of experiments done while doing an artist in residence at Instructables. You can see the other projects here.
Creating emergent patterns that can be converted into sounds fascinates me. So this is my first experiment in building an arduino platform for creating such patterns. This version uses a Gameduino as its sound processor and uses particles that bounces around on a led matrix as the interactive sound generators. You can add more particles by pressing the joystick down for two seconds and the joystick serves as a drawing pen to create elements for the particles to bounce on.
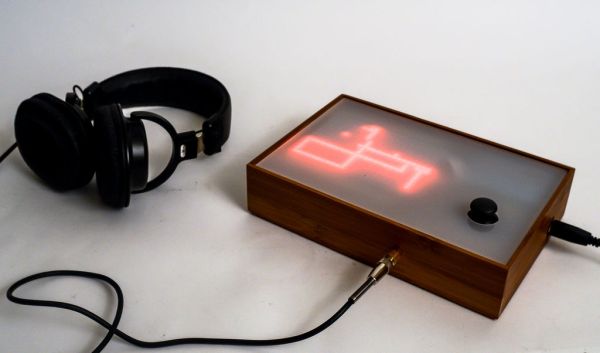
As you can see in the video the code is still a little crude and only the first proof of concept for the platform.
Of similar projects I would recommend you look into: Bloom an iPhone app made by brian Eno and Otomata by earslap.
Step 1: Components needed
The following componets are needed:
- Prototyping shield.
- Pin headers
- Joystick
- Wires.
- Led Matrix.
- Wooden box (I got mine from the container store in San Francisco).
- Female Jack.
- Audio wire.
- Pieces of scrap wood.
- Semi transparent Acrylic plate.
The electronics can be done with basic soldering tools. The enclosure was made with a laser cutting some acrylics and a drillpress to make holes in the wooden box
Step 2: Mount the led matrix
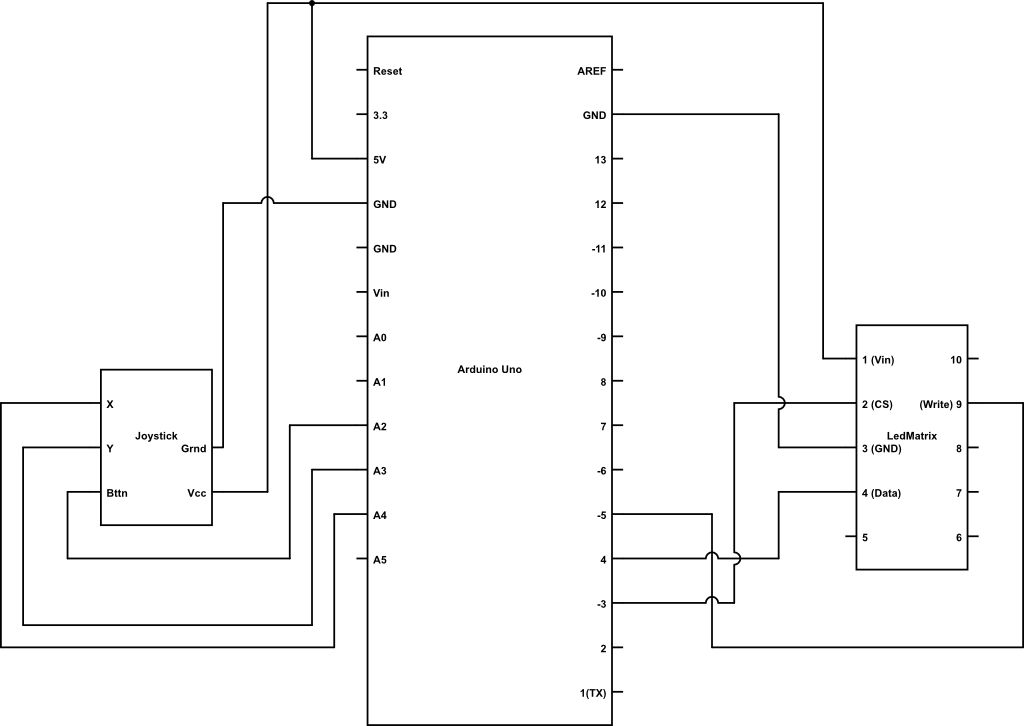
Adafruit has made a toturial for how to wire up the led matrix. You can find it here. Please refer to how I wired it up in diagram in step 1. If you are going to wire it up according to the Adafruit toturial (see the picture with the jumper wires), then Red = 5v, Black = Ground, White = Pin3, Orange = pin4, Yellow = pin5.
If you want to use your own custom pins you should change this section in the code:
#define DATA 4
#define WR 5
#define CS 3
Step 3: Connect the joystick
As shown in the diagram Xout is connected to analog 4, You connect to analog 3 and button (sel) is connected to analog 2. A 10k resistor is connected from analog 2 to ground – this functions as a pull down resistor.
- Prototyping shield.
- Pin headers
- Joystick
- Wires.
- Led Matrix.
- Wooden box (I got mine from the container store in San Francisco).
- Female Jack.
- Audio wire.
- Pieces of scrap wood.
- Semi transparent Acrylic plate.
For more detail: Matrix sound machine: Generative music with a particle system using Arduino
- What does this project create?
It creates emergent visual patterns on an LED matrix that are converted into sounds using a Gameduino. - How do you add more particles?
Press the joystick down for two seconds to add more particles. - Can the joystick be used for drawing?
Yes, the joystick serves as a drawing pen to create elements for particles to bounce on. - Which component handles sound processing?
The Gameduino is used as the sound processor. - Where are joystick pins connected?
Xout is connected to analog 4, Y to analog 3, and the button (sel) to analog 2 with a 10k resistor to ground as a pull-down. - How should the LED matrix be wired by default?
If following the Adafruit tutorial shown, Red = 5V, Black = Ground, White = Pin3, Orange = Pin4, Yellow = Pin5. - Can I change the LED matrix pins in code?
Yes; change the DATA, WR, and CS defines in the code (default shown as DATA 4, WR 5, CS 3). - What tools are needed for the enclosure?
The enclosure used laser cutting for acrylic and a drill press for holes in the wooden box.