Summary of LEGO T-Intersection LED Traffic Light using Arduino
This article details a DIY project to build an Arduino-controlled LED traffic light for a LEGO T-intersection. The author explains the inspiration, parts selection (including salvaged Christmas tree LEDs), and testing procedures. It provides two variations: a standard three-light setup and an alternate four-light cross-intersection design, complete with specific electronic and LEGO part lists and necessary tools.
Parts used in the LEGO T-Intersection LED Traffic Light:
- 4-green LEDs, 20,000mcd
- 3-yellow LEDs, 20,000mcd
- 3-red LEDs, 20,000mcd
- 2-220Ω ¼-watt resistors
- 2-150Ω ¼-watt resistors
- 1-Arduino Nano micro-controller
- 1-5 pin male header
- 2-4 pin male headers
- 2-2x15 long female headers
- 1-2x6 long female header
- 1-50 foot spool Kynar #30AWG wire
- 36-2x2 round grey bricks
- 3-1x2 grey brick
- 3-1x2 modified grey technic brick with hole
- 12-1x1 round grey brick with holes in the stud
- 3-2x2 round grey tile
- 1-1x2 yellow plate
- 1-1x3 yellow plate
- 1-1x1 yellow tile
- 3-1x4 yellow tiles
- 2-1x4 yellow plates
- 13-yellow head light bricks
- 1-T-intersection road plate
- #14AWG wire-stripper
- #30-guage wire-stripper
- 2-pliers
- 1-utility knife
- 2-wires with alligator clips at each end for testing LEDs
- 1-hot glue gun
- 25 Watt soldering iron
- fine rosin core solder
- wire cutters/nippers
- heat shrink tubing
- heat shrink gun (or use heat from a soldering iron)
Video not playing? See it on YouTube: http://www.youtube.com/watch?v=q0tiiWwC6Zo
Background
Every Christmas we set up a large LEGO train layout in a section of the living room. This year, I ended up winning an eBay auction for a number of older-model LEGO road plates, one of which included a T-intersection. At about the same time, I saw a web magazine article on how to get started programming an Arduino embedded microcontroller. I’m a computer programmer by trade.
Inspiration
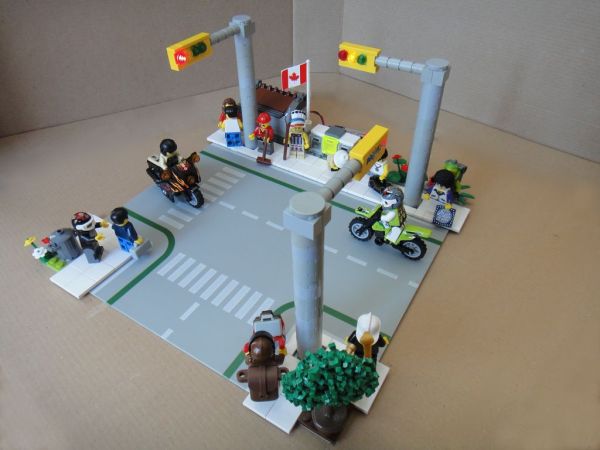
It seemed obvious to me at this point that a perfect project would be to create an LED traffic light out of LEGO bricks, some LEDs and resistors and an Arduino Nano controller. The T-Intersection became the center-piece of the layout. This Instructable will lead you through building the traffic light, as well as illustrate how the Arduino program works.
Take Two
This is my second attempt at building the traffic light. On the first attempt, my 9-year old son helped me. Being slightly impatient, as 9-year-olds are apt to be, I was left with no time to take detailed photographs. The LEDs I used, found in my parts bin, were also extremely dim: bright at night, but invisible in the day.
With this second attempt, I obtained much brighter LEDs from a string of LED Christmas Tree lights that only half lit up. I also took very detailed close-up photographs with a brand new Sony DSC-TX5 digital camera that can close focus down to 1cm. I’ve annotated many of the photos.
Alternates
You can choose to build this Instructable as presented or just use it for inspiration for your own creation. I realize that LEGO T-intersection road plates have long since been discontinued and are hard to come by now. Cross-intersections are all that are available in LEGO stores now. You might choose to build a fourth light. I’ve supplied an alternate program that should drive a cross-intersection with four advance green-lights. It should work, but since I was testing the program only on my T-intersection, it might not work perfectly. You’ll need more LEGO bricks and LEDs to build such a light.
Step 1: Part list
Electronic parts for this Instructable,
- 4-green LEDs, 20,000mcd
- 3-yellow LEDs, 20,000mcd
- 3-red LEDs, 20,000mcd
- 2-220& ¼-watt resistors
- 2-150Ω ¼-watt resistors
- 1-Arduino Nano micro-controller
- 1-5 pin male header
- 2-4 pin male headers
- 2-2×15 long female headers
- 1-2×6 long female header
- 1-50 foot spool Kynar #30AWG wire
LEGO parts:
- 36-2×2 round grey bricks
- 3-1×2 grey brick
- 3-1×2 modified grey technic brick with hole
- 12-1×1 round grey brick with holes in the stud
- 3-2×2 round grey tile
- 1-1×2 yellow plate
- 1-1×3 yellow plate
- 1-1×1 yellow tile
- 3-1×4 yellow tiles
- 2-1×4 yellow plates
- 13-yellow head light bricks
- 1-T-interesection road plate
Miscellaneous things needed to build this Instructable:
- :#14AWG wire-stripper
- #30-guage wire-stripper2-pliers
- 1-utility knife2-wires with alligator clips at each end for testing LEDs
- 1-hot glue gun
- 25 Watt soldering iron
- fine rosin core solder
- wire cutters/nippers
- heat shrink tubing
- heat shrink gun (or use heat from a soldering iron)
Parts for a cross-intersection with four advance-green lights
Should you choose to build the alternate model, this is my best guess at the parts that are required.
Electronic Parts:
- 8-green LEDs, 20,000mcd
- 4-yellow LEDs, 20,000mcd
- 4-red LEDs, 20,000mcd
- 2-220& ¼-watt resistors
- 2-150Ω ¼-watt resistors
- 1-Arduino Nano micro-controller
- 4-5 pin male headers
- 2-2×15 long female headers
- 2-2×6 long female header
- 1-50 foot spool Kynar #30AWG wire
LEGO parts:
- 48-2×2 round grey bricks
- 4-1×2 grey brick
- 4-1×2 modified grey technic brick with hole
- 16-1×1 round grey brick with holes in the stud
- 4-2×2 round grey tile
- 4-1×2 yellow plate
- 4-1×3 yellow plate
- 4-1×1 yellow tile
- 4-1×4 yellow tiles
- 13-yellow head light bricks
- 1-Cross-interesection road plate
Step 2: Testing LEDs from a string of Christmas Tree lights
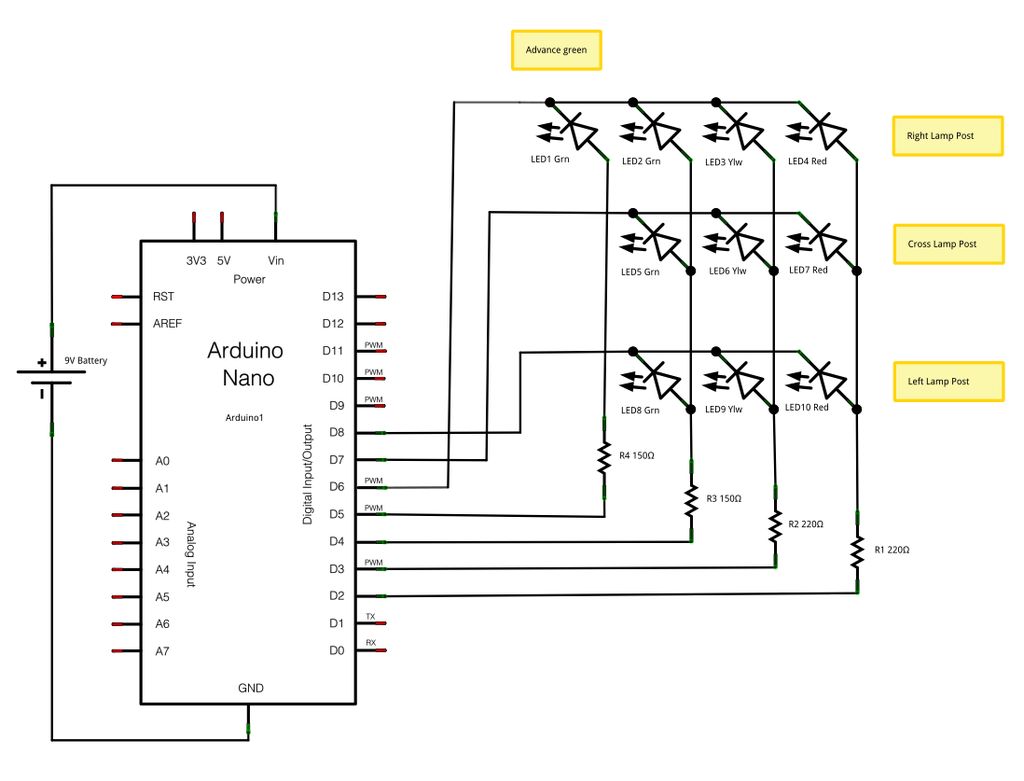
Looking at the LEGO base-plate, it became obvious to me that one of the lights just needed to have an advance turn indicator. So for this project, a total of 10-LEDs will be needed:
- 4-green
- 3-yellow
- 3-red
All the LEDs in this project are T-1 size, which is 3mm in diameter that fit perfectly in the round hole of a head light brick. I happened to have a broken string of LED Christmas Tree lights in which only half the string lit. This became a perfect supply of very bright LEDs.
You can opt to purchase LEDs if you wish. You’ll want LEDs that are rated at 20,000mcd (millicandela). That’s bright enough to see them in sunlight. If you buy LEDs or have some on hand, you can skip straight ahead to step 7.
This, up to step 6, are all about extracting an LED from an individual Christmas tree bulb.
First cut an LED from the string of lights, strip the ends of the wire with a #14AWG (American Wire Gauge) wire-stripper and test the LED. Do this for each LED. You don’t want to bother breaking into a light only to find out later it was burnt out. LEDs last a long time, but they can burn out.
I like to fiddle with electronic circuits from time to time, so long ago I built myself a dual-voltage, dual-polarity power supply and incorporated some other features into it, such as some fixed rate frequencies, a variable-rate frequency generator, and an LED tester. That’s what you’re looking at in the image.
The LED tester is simply nothing more than a 1KΩ (kilo-ohm) resistor connected to the +5-volt portion of the power supply. The LED is then connected to the other end of the resistor resistor and the ground of the power supply.
You can make your own LED tester from a 9V battery and a 1KΩ resistor. Tape one lead of the resistor to the positive (+) terminal of the battery. Then briefly touch one lead of the LED to the other lead of the resistor and touch the second lead of the LED to the ground (-) terminal of the battery.
LEDs light in only one direction. If it doesn’t light, swap the leads around and try again. If it still doesn’t light, toss it out and try another LED.
- 4-green LEDs, 20,000mcd
- 3-yellow LEDs, 20,000mcd
- 3-red LEDs, 20,000mcd
- 2-220& ¼-watt resistors
- 2-150Ω ¼-watt resistors
- 1-Arduino Nano micro-controller
For more detail: LEGO T-Intersection LED Traffic Light using Arduino
- How can I obtain bright LEDs for this project?
You can extract them from a broken string of LED Christmas Tree lights or purchase new ones rated at 20,000mcd. - What size LEDs fit perfectly in the round hole of a head light brick?
T-1 size LEDs, which are 3mm in diameter, fit perfectly in the round hole of a head light brick. - Does the project work if I use a different intersection type?
Yes, an alternate program is supplied that should drive a cross-intersection with four advance green-lights, though it may not work perfectly without further testing. - What components are needed to test an LED before installation?
You need a power supply, a 1KΩ resistor, and wires; you can also make a tester using a 9V battery and a 1KΩ resistor. - Can I use LEDs found in my parts bin even if they seem dim?
The author notes that older LEDs found in parts bins were extremely dim and invisible during the day, so brighter ones are recommended. - What is the best way to verify if a salvaged LED from Christmas lights is burnt out?
Strip the ends of the wire, connect it to a tester or battery circuit, and check if it lights; if it does not light in either direction, toss it out. - How many LEDs are required for the standard T-intersection model?
A total of 10 LEDs are needed: 4 green, 3 yellow, and 3 red. - What specific LEGO piece serves as the centerpiece for this layout?
The T-intersection road plate becomes the center-piece of the layout.