Summary of Infinity Gauntlet Controlled Home Automation
Summary: A DIY infinity gauntlet-based home automation system uses six wearable stones to control appliances, door locks, or lights via wireless Arduino nodes. The project employs NRF24L01 radios with RF24Network, an MPU6050 sensor in the gauntlet to send commands, and servo motors and WS2812B LED strips at remote nodes. Stones are cast with resin around gemstones and mounted on a cardboard gauntlet housing Arduino electronics and batteries.
Parts used in the Infinity Gauntlet Home Automation:
- Arduino Mega
- Arduino Uno
- Arduino Nano
- NRF24L01+ 2.4GHz Wireless RF Transceiver Module
- RF24Network Library (software)
- MPU6050 (accelerometer/gyroscope)
- Micro Servo 9g
- WS2812B LED Strip
- 9V battery (previously used)
- 4 x AA batteries
- 9V Battery Clip Connector
- Male DC Barrel Jack Adapter for Arduino
- Mini Breadboard
- Jumper wires
- Switch
- Resin and Hardener
- Color paint for resin
- Clay or silicone for molds
- Ruby (gemstone) or similar
- Cardboard (for gauntlet structure)
In my previous project i have made an infinity gauntlet that control a light switch. I wanted to use six stones and each stone can control appliance, door lock, or lighting.So, I made a home automation system using infinity gauntlet. In this project I used the RF24Network Library, which enables to build a wireless network with many Arduino boards.
Step 1: Hardware and Materials Required
Arduino Mega + USB Cable II Arduino Uno : https://amzn.to/2qU18sO II https://amzn.to/2qU18sO
Arduino nano: https://amzn.to/2zMXJU8
9v battery: https://amzn.to/2zIcBmL
AA battery: https://amzn.to/2utifnx
Resin : https://amzn.to/2JX9RDD
Switch: https://amzn.to/2zIcBmL
Jumper wires: https://amzn.to/2zIcBmL
Male DC Barrel Jack Adapter for Arduino : https://amzn.to/2zIcBmL
Micro Servo 9g : https://amzn.to/2zIcBmL
Mini Breadboard : https://amzn.to/2zIcBmL
9v Battery Clip Connector : https://amzn.to/2zIcBmL
Cardboard : https://amzn.to/2zIcBmL
Ruby : https://amzn.to/2zIcBmL
NRF24L01+ 2.4GHz Wireless RF Transceiver Module: https://amzn.to/2zIcBmL
MPU 6050 : https://amzn.to/2zIcBmL
LED Strips : https://amzn.to/2zIcBmL
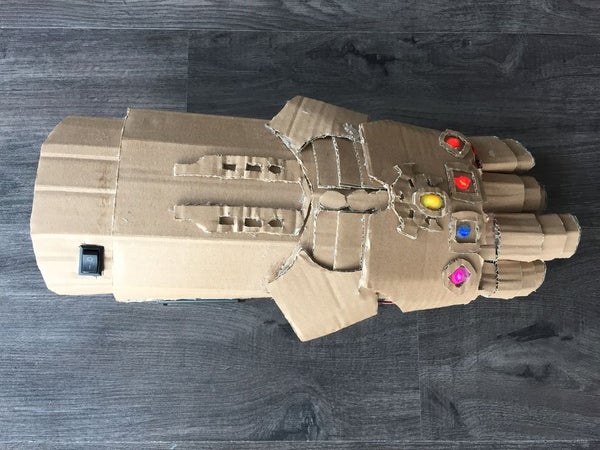
Step 2: Making the Infinity Stones and the Infinity Gauntlet From Cardboard
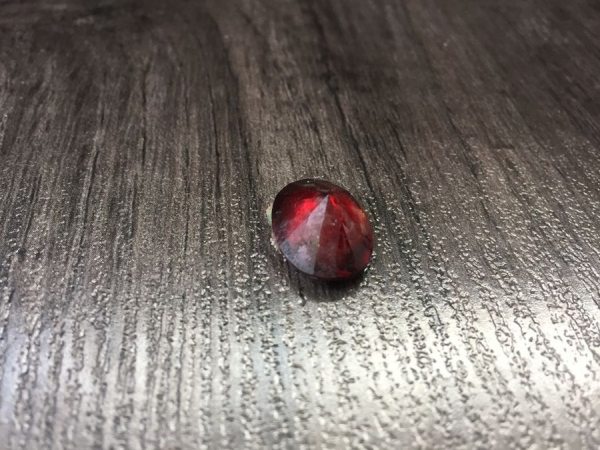
For making infinity stones, I used ruby, epoxy resin + Hardener, colour paint, and clay (you can use silicon).
– Push ruby into the clay and pull it out.
– Mix the resin, hardener, colour paint and divide it into six different cups, one for each color.
– Pour the epoxy into the mold and Let it dry.
You can watch this video , if you want to know how I made infinity gauntlet from cardboard.
Step 3: Arduino Wireless Network With Multiple NRF24L01 Modules
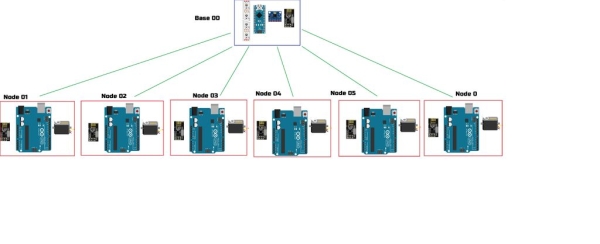
A single NRF24L01 module can actively listen up to 6 other modules at the same time. You can define the addresses of the nodes in octal format. In this project, the address of the base (Infinity Gauntlet) is 00, the base children addresses are 01 to 0. So from the base (Infinity Gauntlet) , using a MPU6050 we will control the servo motor at the node 01 – 0.
Step 4: Base( Infinity Gauntlet) Code
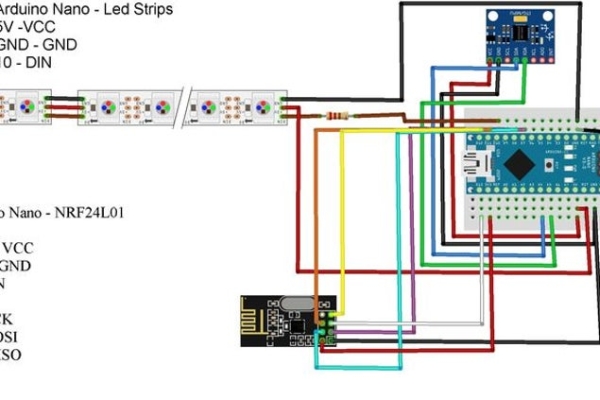
From Base, We can send data to the node 01 – 0 for controlling the servo motors and WS2812B LED strip
Step 5: Node(01 – 0) Code
The nodes (01 – 0) are receiving data from Base, we use it to control the servos.
Upload each program to each arduino.
Step 6: Wiring Diagram for Infinity Gauntlet
I added additional cardboard for placing the electronics and changed 9 Volt battery to 4 xAA battery from my previous project.
Read more: Infinity Gauntlet Controlled Home Automation
- What does the project do?
It creates a home automation system where six infinity stones on a gauntlet control appliances, door locks, or lighting via wireless Arduino nodes. - Which wireless modules are used?
NRF24L01+ 2.4GHz wireless RF transceiver modules are used with the RF24Network library. - How many nodes can a single NRF24L01 actively listen to?
A single NRF24L01 module can actively listen to up to six other modules at the same time. - What sensor is used in the gauntlet to send commands?
The MPU6050 accelerometer/gyroscope is used to control commands from the base gauntlet. - What do the nodes control?
Nodes receive data from the base and control servo motors and WS2812B LED strip effects. - How are the infinity stones made?
Stones are made by pressing a ruby into clay to form a mold, mixing resin with hardener and color, pouring into molds, and letting them dry. - What Arduinos are mentioned for the project?
Arduino Mega, Arduino Uno, and Arduino Nano are mentioned for various roles in the project. - How are node addresses defined?
Node addresses are defined in octal format; the base is 00 and children nodes use addresses like 01 to 0 as described. - What power change was made from the previous project?
The 9V battery was replaced with 4 x AA batteries for powering the gauntlet electronics.