
Summary of How To Create An External Hardware Monitor Using Arduino
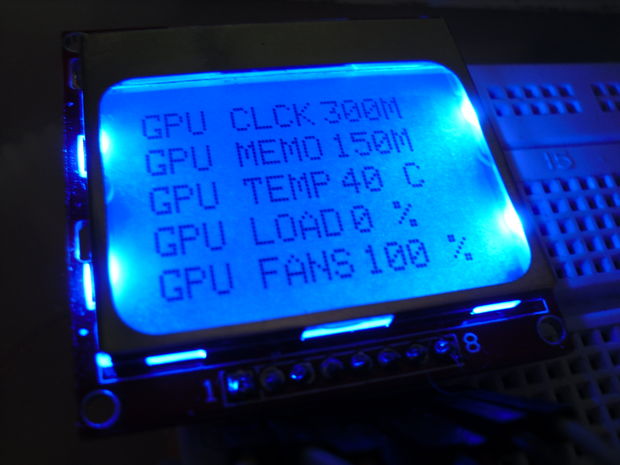
This project demonstrates building a compact external hardware monitor using an Arduino Pro Micro, a Nokia 5110 LCD, and custom VB programming to display real-time GPU metrics like temperature, load, fan speed, and clock speeds. Unlike in-game overlays that obscure the screen, this solution offers a dedicated physical display for gamers. The setup involves specific wiring between the LCD and Arduino, utilizing Adafruit libraries for the display code and serial communication to transmit data from the PC to the microcontroller.
Parts used in External Hardware Monitor:
- Arduino board (specifically Pro Micro)
- Nokia 5110 LCD
- Some wires
- Breadboard
- Adafruit_PCD8544 Library
- Adafruit_GFX Library
Hi guys! Today I will show you how create an external hardware monitor with any Arduino board(in my case a pro micro board), a Nokia 5110 LCD and some VB programming! Let’s get started!
ps. Sorry for my bad English
Step 1: What Is the Aim?
The aim of this project is for monitoring pc hardware while you’re in game. There are other many system to do that, like afterburner ingame overlay, but for me is too cumbersome (this covers always the GUI in every videogame). So I decided to create my own external system for HW monitoring!
Step 2: Materials
-Arduino board
-Nokia 5110 LCD
-Some wires
-A breadboard
Step 3: Wiring the LCD to Arduino!
Here are my connections:
VCC -> Arduino 3.3V
LIGHT -> Arduino GND (I am going to be using it on)
GND -> Arduino GND
CLK (SCLK) -> Arduino pin 7
DIN (MOSI) -> Arduino pin 6
DC -> Arduino pin 5
CE or CS -> Arduino pin 4
RST (RESET) -> Arduino pin 3
Remember that! The LCD runs on 3.3V ! With 5V, it has worked but gave some weird effects, so I suggest connecting to the 3.3V output of the Arduino.
Step 4: Some Arduino Codes and Libraries!
For the LCD, we use Adafruits Libraries:
Adafruit_PCD8544: Here
Adafruit_GFX: Here
The code: For this code I decided to monitor Temperature, Load, Fan Usage, Clock and Memory Clock of my GPU. For these “parameters” I have created a few variables for serial reading and for casting to string(so we can display the values on the LCD)
You don’t know how works parseInt()? ->Solution!
Finally the code:
Step 5: Now VB 😀
First of ALL upload the sketch to your Arduino board, open the serial monitor and write “100,1500,60,100,100”
Read more: How To Create An External Hardware Monitor Using Arduino
-
What is the main aim of this project?
The aim is to monitor PC hardware while gaming without using cumbersome in-game overlays that cover the GUI. -
How should the Nokia 5110 LCD be powered?
The LCD runs on 3.3V; connecting it to 5V may work but causes weird effects, so 3.3V is suggested. -
Which Arduino pins are used for the LCD connections?
CLK uses pin 7, DIN uses pin 6, DC uses pin 5, CE uses pin 4, and RST uses pin 3. -
What libraries are required for the Arduino code?
You need the Adafruit_PCD8544 and Adafruit_GFX libraries. -
What GPU parameters does the system monitor?
The system monitors Temperature, Load, Fan Usage, Clock, and Memory Clock. -
How do you initialize data transmission to the Arduino?
After uploading the sketch, open the serial monitor and write "100,1500,60,100,100" to start reading values. -
Why did the author choose an external monitor over software overlays?
Software overlays are considered too cumbersome because they cover the game interface.
