A robot is a virtual or mechanical artificial agent. In practice, it is usually an electro-mechanical machine which is guided by computer or electronic programming, and is thus able to do tasks on its own (http://en.wikipedia.org/wiki/Robot). Well, today you will learn exactly how to build a Homemade Magic Lamp Card Box. Really, this is two instructables combined into one, them being:
1) How to sculpt nearly ANYTHING out of extruded polystyrene.
2) How to design and build a pneumatic mechanism and control system.
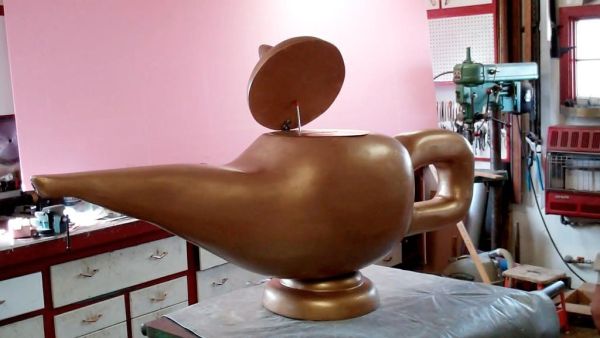
As an introverted electrical engineering student sculpting really isn’t my forte, so that took most of the time. Nearly 33 hours to get a final product! Needless to say I made up for some of that with the designing and building of the electronic control system, but it is all pretty simple, just takes a lot of time and dedication. The reason I made this was for my sister’s wedding. The theme is the magic of Disney, so like any good brother would do I set off on a journey to design and create one of the most elaborate card boxes the world has ever seen!
Let’s Get Started!
Step 1: Design & Preparation
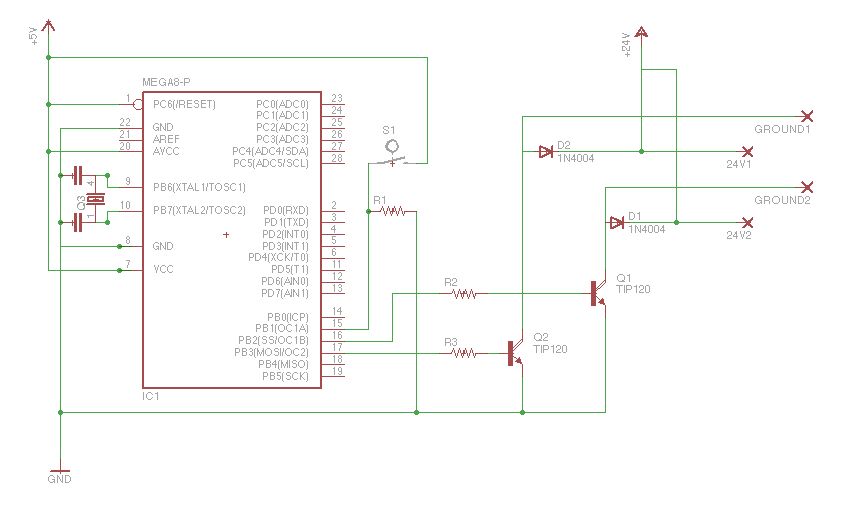
Like all good robots, they must be well designed to function properly. However, I know that everyone will be building their own robot with their own design so I won’t spend too long on this section. I just wanted to stress it’s importance by giving it it’s own step. For my project, I started from a picture of the magic lamp and created a scale drawing using Google SketchUp 8. It is a really great program for any hobbyist to learn because it’s free and there isn’t a very steep learning curve at all! I’ll post the link for the download below. After I created my scale drawing, I knew I would need a design for the electronics. I used the EAGLE software package to design a schematic for my Electronic Control Board. Next, I decided that there would be too many cards to hold inside of the box, so I planned on making a chute for the cards to go through the table into their own container. Also, underneath the container would be the general control board shown in this picture. It would include the Electronic Control Box and the Pneumatic Control System.
Links:
Google SketchUp 8 Free Download
CadSoft EAGLE Free Download
Step 2: Tools for the Job
This is mostly where I needed help but couldn’t find it online so I hope I can help some of you out there who are trying to do this also. One of the most crucial things for this project was the type of foam being sculpted. Expanded Polystyrene is white styrofoam that comes in little round spheres packed tightly together. Extruded Polystyrene is the type of foam used for insulation. For this project we NEED Extruded Polystyrene! Without it our strength and level of detail are critically impacted. This material is susceptible to some chemicals and paints. However, the chemicals I used are perfect for what I want to do with it and what most people want to do with their models too. You will need to fill your sculpture with Patch n Paint and then sand it to get a good level of detail, from there you can clear coat it with Minwax Polycrylic then repeat until you feel your model is smooth enough to paint.
Here is an extensive list of the tools and materials needed for this project:
For the Styrofoam:
– Extruded Polystyrene
– Clamps
– Spray Adhesive
– Saws
– Mini Keyhole Saw
– Large Keyhole Saw
– Band Saw (optional)
– Bench Saw (really nice, but you can make due without)
– Hack Saw Blade
– Rough Wood File
– Fine Wood File
– Drywall Sandpaper (Black)
– Regular Sandpaper (Brown)
– Patch n Paint
– Minwax Polycrylic
– Dowel Rods
– Power Grab (comes in a tube, looks a lot like caulking)
– Hinge
– Plexiglass
– A Hard Wood(Oak)
– Assortment of screws
– Screwdriver
– Yardstick
For the Robotic Mechanism:
– 1/8″ Clear Tubing
– 1/4″ Air Compressor adapter
– Pressure regulator (300 p.s.i. max)
– 2 x 24V 3-way Solenoid Valves (50 p.s.i. max)
– 3 x Ball Valves (to act as flow regulators)
– Assortment of 1/8″ to 1/4″ adapters, fittings, tees, elbows, and nipples. (really personal preference)
– Wrenches
– Pliers
– Teflon Tape
– Vice (optional)
Step 3: Sculpting
1. To start building your model, cut the styrofoam into sheets and layer them to make a block. If you know you don’t need some sections and want to save on material you can cut the general shape before you glue them all together.
2. Once you have your block setup the way you like it, use spray adhesive to hold the sheets of styrofoam together. If you know that you wont be sculpting where the glue will be USE POWER GRAB. Power grab is much stronger but it is very tough to sculpt it because when it dries it is hard as rock. I knew I was going to hollow out the inside of the lamp but wasn’t sure exactly where, so I used spray adhesive and it worked well. Spray both sheets of styrofoam and then lay them together. Repeat until you have a solid block (or whatever shape you want). I should warn you if you use too much spray adhesive you will eat the foam! Be careful not to leave drips or spray too much!
Pressure regulator
– Extruded Polystyrene
– Clamps
– Spray Adhesive
For more detail: Homemade Magic Lamp Card Box using an Arduino