OK, I know that sounds weird, but bear with me for a moment. My Pops really enjoys two things; 1) channel surfing and 2) farting.
So one day I was over at http://hackaday.com/ and read about a guy who used his Arduino to turn a TV on and off with one of those brainwave reading headsets. Then later on that same day I was here at Instructables and a fellow had made an office chair that twitters every time he farted. So, I got to thinking and decided to mash those two hacks into one remote that changes the TV to a random channel every time he tutes!
Plus, if you throw it in a plastic enclosure and hide it between the couch cushions, you’ve got a purdy dang good prank!

(As an aside, I’ve done some internet searching and I think this might be the first flatulent operated remote control in the history of the world… I’m happy to be an innovator.)
*****VIDEO UPDATE*****
You asked for it, here’s a short video of the remote in action.
Step 1: Parts And Sketches
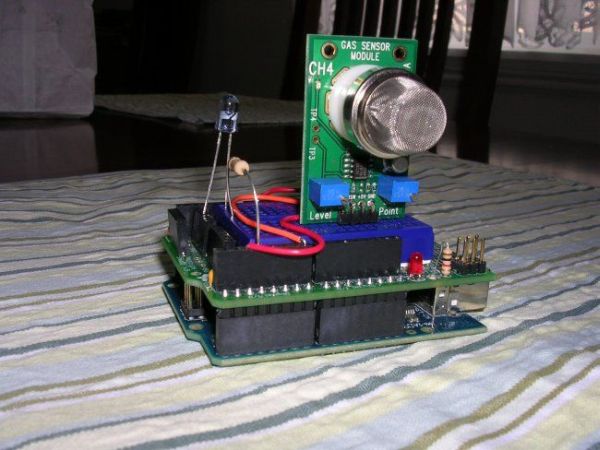
The idea here is you have a Methane sensor that smells a fart, then sends a high signal to an Arduino that picks a random number (which will be your new TV channel) and then sends the correct light pulses to an Infrared LED to change the channel. So to do that I’m going to break up the components list into two parts. Part One is all set up components and Part Two is stuff that’s actually going to be a permanent part of the project.
Miscellaneous Parts:
Arduino (I use a Duemilanove… $30-$35 depending on where you buy it. I bought mine from Make: as part of a kit http://www.makershed.com/ProductDetails.asp?ProductCode=MSGSA which comes with a Tactile Switch. But a cheaper option might be to go to Spikenzie Labs and buy an Arduino/Switch combo from them http://www.spikenzielabs.com/Catalog/index.php?main_page=product_info&cPath=12&products_id=40 is the Arduino and the switch is linked lower)
Prototyping shield ($12.50)
http://www.adafruit.com/index.php?main_page=product_info&cPath=17_21&products_id=51
1/4-Size Breadboard ($4)
http://www.adafruit.com/index.php?main_page=product_info&products_id=65
(Or you could replace the ProtoShield and 1/4-Size breadboard with a solderless breadboard)
1X Working TV with,
1X Working TV remote
Part One Components:
1X 10K Ohm 1/4Watt resistor ($0.99 for a 5 pack)
http://www.radioshack.com/product/index.jsp?productId=2062347
1X 100 Ohm 1/4Watt resistor ($0.99 for a 5 pack)
http://www.radioshack.com/product/index.jsp?productId=2062339
5X 15 Ohm 1/2Watt resistors ($0.99 for a 5 pack)
http://www.radioshack.com/product/index.jsp?productId=2062310
1X Momentary Tactile Pushbutton Switch ($0.35)
http://www.spikenzielabs.com/Catalog/index.php?main_page=product_info&cPath=34&products_id=185
1X 38kHz Infrared Receiver Module ($3.95)
http://www.parallax.com/Store/Sensors/ColorLight/tabid/175/CategoryID/50/List/0/SortField/0/Level/a/ProductID/177/Default.aspx
Part Two Components:
1X CH4 Methane Sensor ($29.99)
http://www.parallax.com/Store/Sensors/GasSensors/tabid/843/CategoryID/91/List/0/SortField/0/Level/a/ProductID/592/Default.aspx
1X Infrared LED ($1.99)
http://www.radioshack.com/product/index.jsp?productId=2062565
(Some of the resistors from Part One; I’ll explain this in a later step)
Optional:
1X Plastic Enclosure (RadioShack sells them, but I was going to use one I picked up at Fry’s a while back)
1X 9V battery and battery holder
Tools:
Multimeter (for calibrating your CH4 Methane Sensor)
So if you’re starting from scratch you’re looking at about USD$86.00. I’m guessing most folks on this site and looking at this ‘Ible already have the tools, Arduino and ProtoShield which would put the cost around USD$40.00 (A $34.00 CH4 Methane Sensor/IR Receiver Parallax order and a trip to RadioShack for resistors/IR LED).
Sketches:
Sketches are linked on the steps that they are used in. I did my best to document and put notes into my code but I’ll be happy to explain anything that isn’t clear. Just ask.
Step 2: Getting Pulse Codes from your TV Remote
First you’ll need to download IRremote.zip below and unzip it into your Arduino’s, “Library,” folder. I’m using Arduino version 0018 and my directory looks like this;
arduino-0018/libraries

This is Ken Shirriff’s infrared library that’s capable of recording and displaying raw pulse codes. Since it gives raw codes instead of only specific company protocols it should work with any remote sending IR pulses.
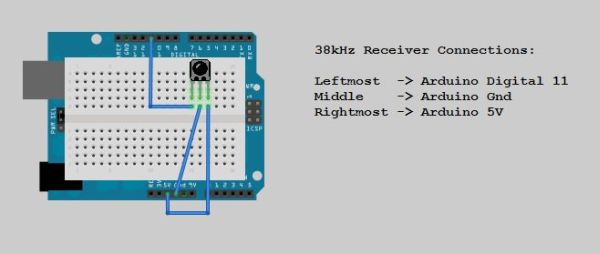
Next set up your Arduino like the picture. If you’re looking at the black lense of your 38kHz IR Receiver:
the leftmost Receiver pin gets jumped to Arduino digital pin 11
the middle Receiver pin gets jumped to Arduino Gnd
the rightmost Receiver pin gets jumped to Arduino 5V
Then plug your Arduino into your computer and open your Arduino software. From the File menu select;
File>Examples>IRremote>IRrecvDump
Click on the Upload button and once your sketch is uploaded to your Arduino click on the Serial Monitor button. There’s a picture pointing out these buttons if you get lost.
Now point your remote at the 38kHz Receiver and you should see your Serial Monitor come to life when you push a button. We’ll want to click the remote buttons 0 through 9 one at a time and save the pulses we get from each so we can clean them up and put them in our Arduino sketch later on.
Prototyping shield
5X 15 Ohm 1/2Watt resistors
For more detail: Fart Operated Random Channel TV Remote using an Arduino
