Summary of Teardown of Kentli PH5 1.5 V Li-Ion AA battery
This article details the teardown of a Kentli lithium-ion AA battery featuring an internal 1.5V regulator. The author disassembles the cell to examine its internal components after previously failing to receive or open one. The process involves removing the label, identifying the unique positive terminal with a recessed ring for charging, and carefully cutting the laser spot-welded seam to reveal the interior without causing a short circuit.
Parts used in the Kentli PH5 1.5 V Li-Ion AA battery:
- Lithium-ion AA battery
- Internal 1.5 volt regulator
- Steel case
- End cap
- Laser spot welds
- Small pipe cutter
After having an entire month of dormancy on this blog, I’m finally beginning to cross off the blog posts on my “Pending” list.
Last year, I made a blog post talking about Kentli’s lithium-ion based AA battery that has an internal 1.5 volt regulator. The first order never arrived, and the second one had arrived a few months ago but I never got to actually taking one of the cells apart. That changes today.
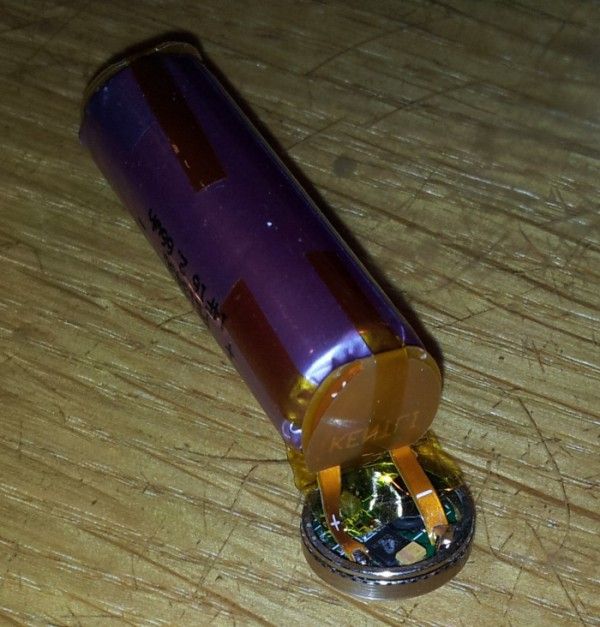
Cell overview
The battery itself looks like a regular AA battery, except for the top positive terminal. There’s the familiar ‘nub’ that constitutes the 1.5 volt output, but also has a recessed ring around it that provides a direct connection to the Li-ion cell’s positive connection for charging.
After peeling the label, we are met with a plain steel case, save for the end cap that appears to be laser spot-welded. Wanting to take apart the cell with minimal risk of shorting something out inside, I used a small pipe cutter to gently break apart the welded seam. Two revolutions and a satisfying pop sound later, the battery’s guts are revealed.
For more detail: Teardown of Kentli PH5 1.5 V Li-Ion AA battery
- What makes the Kentli AA battery different from regular ones?
The top positive terminal has a recessed ring around the 1.5 volt output nub that provides a direct connection to the Li-ion cell's positive connection for charging. - How did the author open the battery casing safely?
The author used a small pipe cutter to gently break apart the welded seam to minimize the risk of shorting something out inside. - What material is the main body of the battery made of?
After peeling the label, the battery reveals a plain steel case. - How was the end cap attached to the battery?
The end cap appears to be laser spot-welded to the rest of the battery structure. - What happened during the first order of this battery?
The first order never arrived at all. - Why did the author wait before taking the cell apart?
The second order arrived a few months ago but the author never got to actually take one of the cells apart until today. - What sound indicated the casing was successfully opened?
A satisfying pop sound occurred after two revolutions of the pipe cutter broke the seam.