The 4Duino DJ Mixer is a fun and interactive project similar to a keyboard MIDI Controller that has the ability to play sample beats and songs.
Before, DJ and music artist needs to use computers, recording and playback devices before they can mix and play their own customized music. But using this project, the user can utilize the 4Duino LCD screens and the 4D SOMO-II music module.

The 4Duino will serve as the GUI and controller that will send the data that the SOMO-II needs to play music. Two SOMO-II music modules will be used in this project, one SOMO-II will play the beats and one SOMO-II will play the songs.
The SOMO-II is a simple and easy to use audio module that only needs a speaker to function, it can play .wav and .mp3 audio files that are accessed through microSD card or USB devices. UART is used to communicate with the SOMO-II module with any other host by using serial byte commands.
HOW IT WORKS
Components
- 1 4DUino Module
- 2 SOMO-II Modules
- Jumper wires
- 1 bread board
Implementation
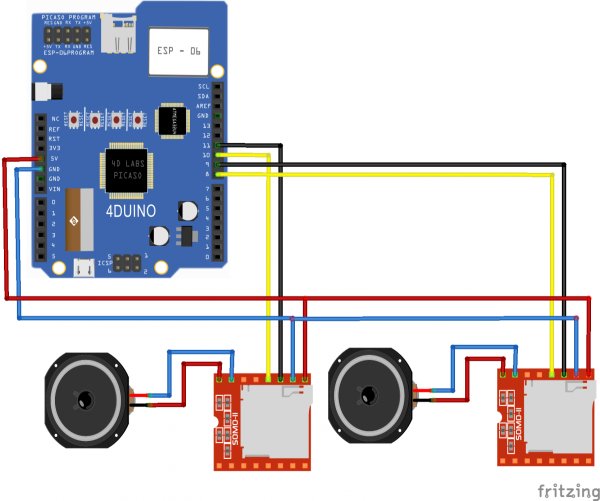
Step 1: Build
Build the circuit as shown in the following diagram and schematic.
Step 2: Program
Workshop 4 – 4Duino Extended Graphics environment is used to program this project. (The same could be implemented in the latest Arduino IDE)
This project requires the Arduino IDE to be installed as Workshop calls the Arduino IDE for compiling the Arduino sketches. The Arduino IDE however is not required to be opened or modified to program the 4Duino.
Open this file using Workshop 4.
Note: Download the project file here.
Step3: Comms Port
Connect the 4Duino to the PC using µUSB cable.
Then navigate to the Comms tab and select the Comms port to which the 4Duino connected.
Step4: Compile and Upload
Finally, go back to “Home” tab and now click on the “Comp’nLoad” button.
The Workshop 4 IDE will prompt you to insert a µSD card to the PC in order to save the widget images. Insert µSD card, select the appropriate drive and press button “OK”.
If the µSD card has the widget images you can click button “No Thanks”.
Step 5: Insert µSD card
After uploading the program in to the 4Duino, it will try to mount the µSD card. If the µSD card is not present it will print an error message.
All you need to do is insert the µSD card you saved the image files into the 4Duino.
Demonstration
Working setup of the DJ Mixer, two software serials were used in this setup to transmit data commands to each of the SOMO-II, therefore, One SOMO-II will play the note that each SOMO-II module has their own microSD card with the saved song files, the SOMO-II implements a file-naming of the song tracks saved inside the microSD card. For more information on that topic, please view the SOMO-II datasheet that can be downloaded here.
Read more: DJ Mixer featuring 4Duino-24