Summary of DIY 3X3X3 LED Cube with Arduino
This article outlines the construction of a 3x3x3 LED cube controlled by an Arduino UNO, designed for beginners to display various patterns. The project utilizes 27 LEDs arranged in layers, emphasizing low power consumption and simplified wiring without shift registers. The guide details checking components with a button cell, preparing bridge wires, and using a cardboard box template to mark and drill holes for precise LED placement.
Parts used in the Arduino 3x3x3 LED Cube:
- Arduino UNO
- 220Ω resistors (3 pieces)
- 5V power supply
- 27 white LEDs
- Breadboard wire
- Soldering Iron
- Soldering wire
- Flux
- SR2032 button cell
- Empty cardboard box
- Pencil
- Ruler
- Jumpers
In this project we are going to design a 3x3x3 LED CUBE and connect it to Arduino UNO to get different patterns. For a beginner we will start with a simple pattern.
A typical 3*3*3 LED cube connected to UNO is shown in the image above, the cube consists of 27 Light Emitting Diodes, these 27 LEDs are arranged in rows and columns forming a cube.
There are many types of cubes that can be designed. The simplest one is 3x3x3 LED cube. For 4*4*4 LED cube the work almost triples because you need to do work for 64 LEDs. With each higher number, the work almost doubles or triples. But every cube more or less works on the same way.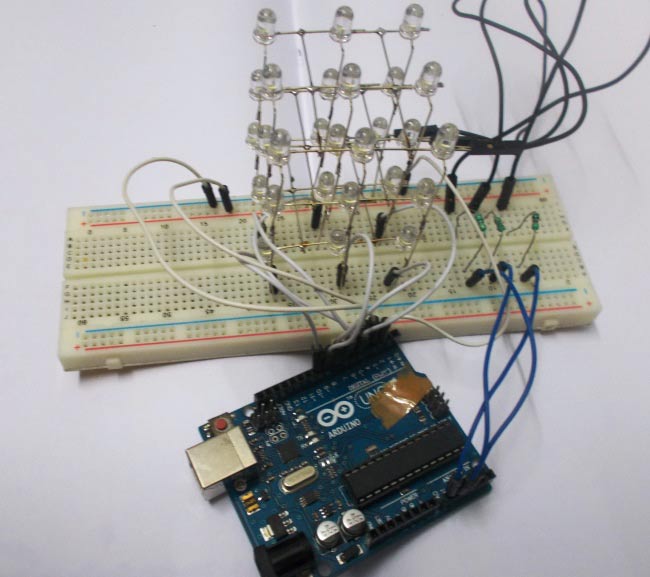
3x3x3 LED cube is simplest because there are some advantages to this design like,
- For this cube you need not to worry about power consumption or dissipation.
- Low Power supply demand.
- We don’t need any switching electronics for this cube.
- We need lesser logic terminals so we don’t need shift registers or anything like that.
We need not worry about power drawn by LED because the LED usually stated to work at 20mA current but that is wrong, that number provides the maximum current allowed through the LED. Normally an LED works well from 2mA to 5mA. Anything higher than that, the LED will heat intensely and it will burn out.
So we can drive 9 LEDs carrying 2mA current from a single pin of UNO with no problems. The UNO pins are capable of delivering 20-30mA.
For the cube I chose clear white LED, because I have them spare. You can choose any LED type or color of your choice, but the LED with colored shall work great for this projects.
For the cube we need to spare 12 pins of UNO.
Components Required:
ARDUINO UNO, 220Ω resisters (3 pieces), , power supply (5v),
- 27 white LEDs, Breadboard wire,
- Soldering Iron, Soldering wire and flux,
- SR2032 button cell, Some tools,
And a empty cardboard box, pencil, ruler and some jumpers.
Building the Arduino 3x3x3 LED Cube:
Step 1:
At first we need to check each LED, once the cube is done if there is any faulty LED present in the cube it would be very difficult to replace, so first we need to check each LED.
This is done by button cell SR2032, it’s a lithium ion battery that has a terminal voltage of 3V it is perfect for checking LED, and one can also use MULTIMETER to check the LED.
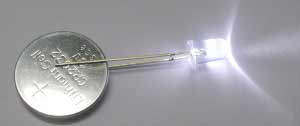
After confirming all the 27 LEDs are working keep it aside and lets move one to next step.
Step 2:
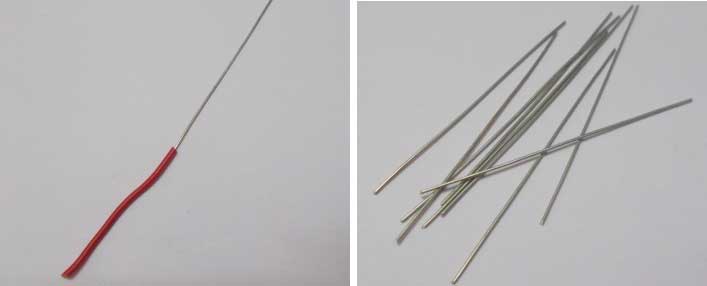
Now take the breadboard wire and peel the layer off the conductor, we can use any wire but breadboard connecting wires works great. After peeling off we will have something as shown in above figure, cut the conductor wire in a length of 7cm and continue the process until we have six 7cm conducting wires (figure below). These wires are used for bridging the LED layers, we will get to this point shortly.
Step 3:
Now we need to take the empty card board box and stick a white paper on top, as shown in the figure. The paper is just for marking the points clearly, there is no specific use for it. Just use cello tape or glue at the corners for holding the paper in place while marking and drilling the holes.
After that take pencil and scale, mark nine points on paper each 2cm apart forming a structure of cube as shown in below figure.
Here we are using 2cm because; the negative terminal of LED is of length 2.5cm. So with 2cm apart, we will have 5mm for soldering one LED to another. Any length higher from it, the LED terminals soldering becomes troubling, with lower length the cube looks very clumsy after finishing. So 2cm would be very appropriate.
After that take a pointy object like a pencil or a pen and poke a hole at each point, make sure you poke a hole just about the size of LED, first poke one hole take the LED fit it in, the LED should not fall through the hole nor the LED should the too tight. While soldering the pins we don’t the LED to move so it should not be lose. If the LED is fitted in the hole too tight we cannot wiggle it out easily, so each time you poke a hole, check it with the LED.
Read More: DIY 3X3X3 LED Cube with Arduino
- How many LEDs are required for a 3x3x3 cube?
A typical 3x3x3 LED cube consists of 27 Light Emitting Diodes. - Can I use colored LEDs instead of white ones?
Yes, you can choose any LED type or color, though white was chosen because they were spare. - What is the recommended current for driving the LEDs?
LEDs work well from 2mA to 5mA; higher currents cause intense heating and potential burnout. - How many pins of the UNO are needed for this cube?
The design requires sparring 12 pins of the UNO. - What tool is used to check if each LED is working before assembly?
An SR2032 button cell or a multimeter can be used to test the LEDs. - Why is a 2cm spacing used when marking points on the cardboard?
2cm spacing allows 5mm for soldering while ensuring the cube does not look clumsy or make soldering too difficult. - Do I need switching electronics like shift registers for this project?
No, the 3x3x3 design needs lesser logic terminals so shift registers are not required. - What length should the breadboard wires be cut to for bridging layers?
The conductor wires should be cut to a length of 7cm.