
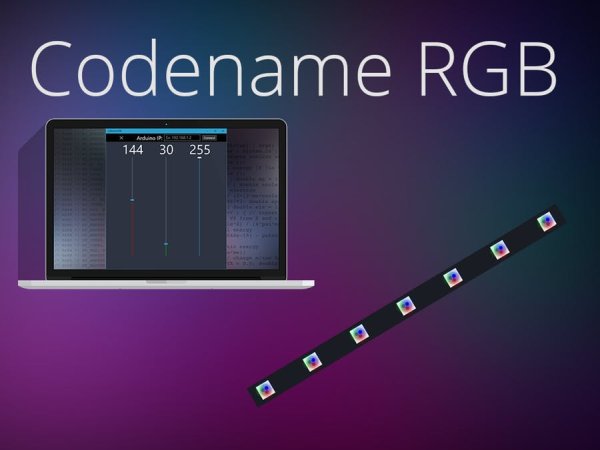
Remotely control your RGB LED strip from your pc.
Things used in this project
Hardware components |
||||||
 |
|
× | 1 | |||
|
|
× | 3 | |||
|
× | 1 | ||||
|
× | 1 | ||||
|
× | 1 | ||||
|
|
× | 1 | |||
Software apps and online services |
||||||
|
|
|||||
|
|
|||||
Hand tools and fabrication machines |
||||||
|
|
|||||
Story
You want to control your LED strip remotely. To do so you need an Arduino with internet capabilities. In this project we will use a Arduino MKR1000. To do so we will need to follow this steps:
- Build the voltage booster (not necessary if your Arduino can output as much power as your strip needs, usually 12v, but the MKR1000 outputs only 3.3v).
- Configure the Arduino.
- Install the Codename RGB Software.
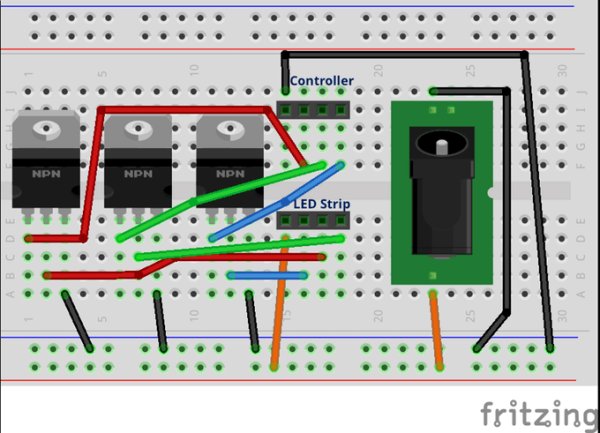
Building the Voltage Booster
You will need the materials in the material list. In here you have 3 options:
- Build on a breadboard
- Build on a perfboard
- Print a PCB
In this guide we will use a breadboard.
First Step
In this step we will put on our breadboard the Mosfets and wire them to the negative rail.

Second Step
Now we will add some jumper wires (male to female), this will be used to connect this to the Arduino.
Third Step
Now we will connect the wires that will be connected to the led strip. Note: the wires sequence may change depending on your led strip.
Fourth Step
In this step we will connect our 12v power input (the voltage of the input depends on your led strip requirements). Make sure this cables don’t touch.
Fifth Step
Now we will put in the breadboard the led strip’s header. Note: the wires sequence may change depending on your led strip.
Sixth Step
Now we will connect our led strip to its header. Make sure the arrow is pointing towards your V+12 cable. Note: the wires sequence may change depending on your led strip.
This is a render of how your final product might look like:
Seventh Step
In this last step now you need to connect the Arduino to our Voltage Booster. We are going to use the jumper wires we connected in the second step to the MOSFETS. Connect them this way (you may vary this but the Arduino pin must support PWM and you must change the VS app config):
- R Mosfet ~4 Arduino pin
- G Mosfet ~3 Arduino pin
- B Mosfet ~2 Arduino pin
Now to finish the connections connect a jumper wire to the ground (-) rail and then connect that one to the Arduino’s ground pin.
Set Up The Arduino
First Step
Set up your computer and your Arduino IDE according to your Arduinio
Note: be sure to add your compatible WiFi libraries.
Second Step
In the Arduino IDE click on File->Examples->Firmata->StandardFirmataWiFi

Third Step
In this step we’ll setup FirmataWiFi. To do these open the wifiConfig.h tab. Then uncomment the option that defines the WiFi library used by your Arduino (MKR100 uses WIFI_101, option B) and comment #define ARDUINO_WIFI_SHIELD if it isnt the library your device uses.
Fourth Step
To connect to a WiFi network go to the SSID var and change the value to match your SSID, this is case sensitive. Then it is recommended to set a static ip because it make it easier to connect to your Arduino later. After that scroll down until you find WIFI_WPA_SECURITY, in here set your WiFi security and password, the first option is uncommented but if it doesn’t match your WiFi security please comment it. The options are:
a) WIFI_WPA_SECURITY
b) WIFI_WEP_SECURITY
c) WIFI_NO_SECURITY
Fifth Step
Upload the sketch to the Arduino and save.
Codename RGB App
This app is a Windows 10 Universal App, it will only run in Windows 10. This app is made in C#. To get this app open the GitHub repo and there you can find the Visual Studio Project. Then build it and run it, in the app button bar enter your Arduino IP and then click connect.

If you connected your jumper wires to different pins here is where you’ll want to change them. In Visual Studio open MainPage.xaml.cs. In there find the Globals vars. From those you should only modify the var’s value from the ones inside the pinSetup subclass.
public static class pinSetup
            {
                public static byte rPin = 4;
                public static byte gPin = 3;
                public static byte bPin = 2;
            }
I hope you enjoyed this project as much as I did, and thanks for reading.
Schematics
Code
Source: Codename RGB