Summary of CatBot: Automated Cat Laser using an Arduino
The CatBot is an autonomous laser toy project designed to keep cats entertained by automating a standard $3 laser pointer. Using an Arduino Uno and two servos, the device pans and tilts the laser beam, preventing the cat from becoming bored or obsessed with a stationary light. The build involves modifying the laser, mounting it on servo arms constructed from Hillman Hobby Parts, and wiring the system to control movement automatically.
Parts used in the CatBot:
- Arduino Uno
- Hillman Hobby Parts
- 2 Servos
- Zip Ties
- $3 Laser cat toy
The CatBot is an autonomous laser toy for your cat. You may say “But Joe, isn’t the laser pointer the best toy for the lazy cat owner?” I’d have to say no, the CatBot takes one step further.
Using two servos, an Arduino and a cheap $3 laser you can provide your cat with endless fun.
Step 1: The Problem
I was buying pet food and saw a $3 laser from PetCo. I thought the cat might like it. I was wrong. The cat became obsessed. Constantly grabbing the toy off of the coffee table. But she only wants to play for 1 minute then sit and stare at it. So you think, OK I guess she is bored. You put it down….
And she’s back pawing at it.
The CatBot is the solution.
Step 2: Parts
For this I used the following:
Arduino Uno
Hillman Hobby Parts (found @ Lowes in the screws/nuts/bolts area)
2 Servos
Zip Ties
$3 Laser cat toy.
Step 3: Disassemble the Laser
The laser pops open with a screw driver. You can see it used 2×1.5v batteries. But it actually runs better at 4.5v.
Step 4: Cut the Laser
The laser had to be cut up to fit on the servo arm. I drilled a hole in the center so I could mount it to the servo arm as well.
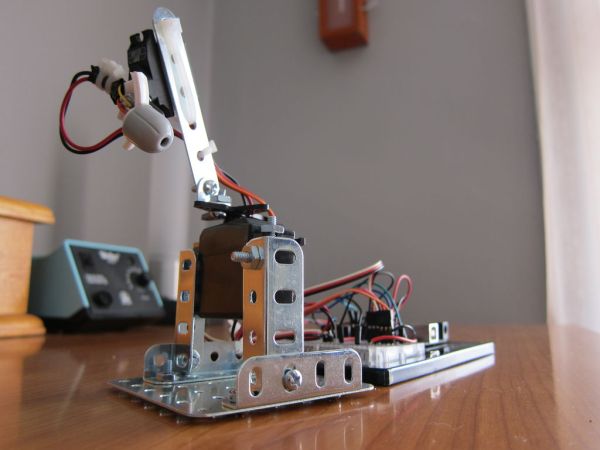
Step 5: Build the Servo Tilt/Pan
I used a hodgepodge of these cool mechano/erector set pieces from Hillman. They can be found in the screw/small parts drawers at Lowes.
Step 6: Wire up the Arduino
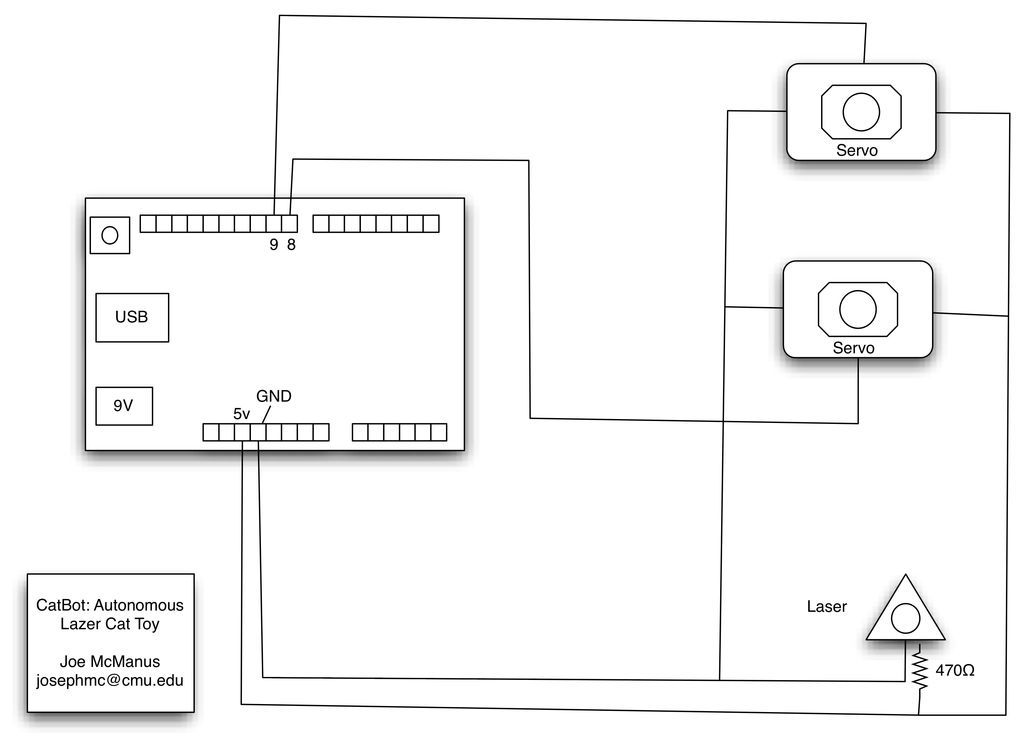
For the Arduino wiring, attach pins 8 & 9 to the servos.
Attach the laser to 5v, but 470 ohm resistor inline before the laser.
Hillman Hobby Parts (found @ Lowes in the screws/nuts/bolts area)
2 Servos
Zip Ties
$3 Laser cat toy.
For more detail: CatBot: Automated Cat Laser using an Arduino
- What components are required to build the CatBot?
You need an Arduino Uno, Hillman Hobby Parts, 2 servos, zip ties, and a $3 laser cat toy. - How does the CatBot improve upon a regular laser pointer?
The CatBot takes the concept further by providing endless fun through automation rather than requiring constant human interaction. - Can I use standard batteries for the laser in this project?
The original laser uses 2x1.5v batteries but runs better at 4.5v when connected to the 5v Arduino pin. - How do you mount the laser to the servo arm?
You must cut the laser to fit and drill a hole in the center to mount it onto the servo arm. - Which Arduino pins connect to the servos?
Pins 8 and 9 on the Arduino should be attached to the servos. - Is a resistor necessary for the laser connection?
Yes, a 470 ohm resistor must be placed inline before connecting the laser to the 5v power source. - Where can I find the mechanical parts for the tilt/pan mechanism?
The Hillman Hobby Parts, which include mechano/erector set pieces, can be found at Lowes in the screws/nuts/bolts area.