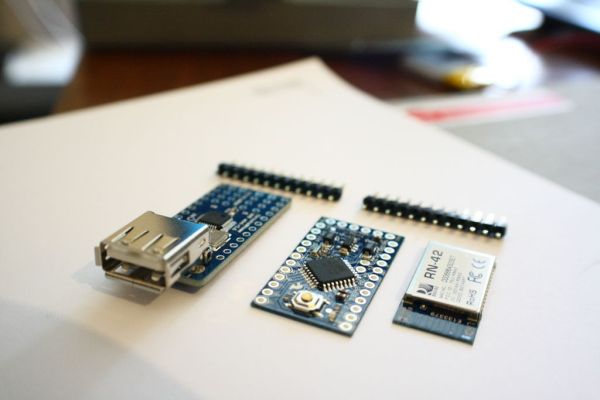
The YaNis EOS controller is a device that allows you to wirelessly control your Canon DSLR from your Android phone.
What’s really exciting here is that the Android interface allows you to change most of the camera’s settings (like Shutter Speed, Aperture Size, ISO, White Balance, Focus Position and others) from more than 20 meters away!

The controller is based on the Arduino platform and some commonly available parts. And as I will show you here, it’s also very easy to assemble.
First, the list of things you will need:
1. An Arduino Pro Mini Board (3.3V version)
2. A USB Host Shield (Arduino Mini version)
3. A Bluetooth Module. (BlueSMIRF , RN-42 , or cheap ebay ones) [Anything SPP compatible will do]
4. A power source for the Arduino board
As you might have guessed, the 3 modules listed above will be simply stacked onto each other to obtain the nice PCB Sandwich that I decided to call “YaNis EOS Controller”. Impressive.
When you have completed all the steps in this instructable, you will basically have a hardware interface that allows your camera to accept commands from your android phone via bluetooth. Now, to make your phone issue those specific commands, you will need the YaNis EOS app that I created. It’s free, open source and available on the Android Market.
Step 1: Soldering the Arduino and USB Shield
Step 1: Insert the pin headers on the USB Host Shield’s two sides. Solder them to the USB Shield PCB.
Step 2: Insert the Arduino Pro Mini in those headers. Make sure you respect the orientation shown in the picture for this step.
Step 3: Solder the Arduino Board to the USB Shield’s pins you just installed in step 1.
Step 4: (Optional) Cut off the pins leaving only the 3 pins shown in the picture.
If you have followed those steps correctly, you should get something similar to picture 2 and 3.
Step 2: Programming the Device
You will need to upload the firmware to the device BEFORE connecting the Bluetooth Module.
The firmware(or Arduino sketch) can be downloaded here:
http://code.google.com/p/yanis-android-wireless-camera-controller/downloads/list
(If there are several files, download the most recent one)
If you google around, you will see that there are several ways to program an Arduino Pro Mini board. Here I used an Arduino UNO board as a programmer.
Step 1: First, remove the ATMega Chip from the Arduino Uno.
Step 2: Connect the UNO and the Mini as described below:
(Uno -> Mini)
RX -> RX
TX -> TX
+3.3v -> VCC
GND -> GND
Reset -> GRN (Reset/DTR)
Step 3: Open up the Arduino IDE. Go to Tools>Board>Arduino Pro Mini (3.3v/8Mhz / 328)
(See picture 2)
Step 4: In the Arduino IDE, open the sketch you downloaded in the first paragraph above. Click upload.
If you get errors here, check your connections between the Arduino UNO and Arduino Mini. Make sure you did Step 3 correctly.
Step 5: At this point, you have uploaded the firmware successfully, adn you can now proceed to connect the Bluetooth module to the Arduino Mini/USB Host contraption.
1. An Arduino Pro Mini Board (3.3V version)
2. A USB Host Shield (Arduino Mini version)
3. A Bluetooth Module. (BlueSMIRF , RN-42 , or cheap ebay ones) [Anything SPP compatible will do]
4. A power source for the Arduino board
For more detail: Building the YaNis EOS Controller using Arduino
