Another quick project for today! How all started? A few hours ago I took a delivery box with few high resolution LCD’s on it. The box was made of foam material and was covered with dirty (from the delivery across two continents) yellowish tape.
To begin with, in order to open the box I had to remove half of this tape and by “playing” with the box I manage to remove everything without to damage it! Yes, the tape was strong enough to tear apart everything! The result is the one below
Usually I throw all of those delivery containers on one of trashcans that I use in my “lab”(separate ones because of recycling purposes). But this box was telling me that I have to use it for something. And somehow I totally agree with it!
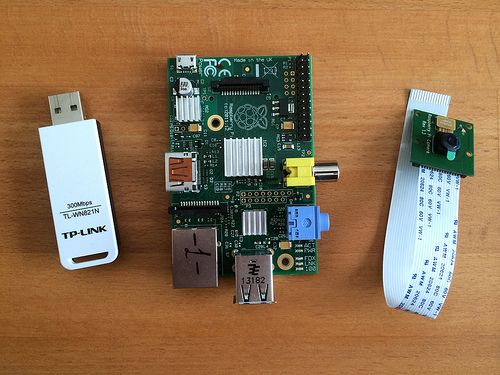
I didn’t just keep it for a latter project somewhere on a self. If I was doing that probably the outcome will be to stay there forever. So, I decided to take a Raspberry Pi lying next to me together with a camera module and a WiFi to USB stick.
I was still not sure what the main project title would be. For example it will be just an indoor IP camera in a fancy foam box or an external wildlife-capturing device? Maybe a weather station that captures the atmospheric phenomena on top of raw data? Or just a way to spend my little free time crafting with an empty box? Despirte all my thoghts I carry on.
I test fit the RPi with the WiFi stick on it and then the camera module as well.
The RPi-WiFi combo was a perfect fit! I can mount it latter with a little bit of hot glue. The only problem for now is the microUSB power supply connector position. The solution to this one will be the use of the 2×13 pin header or to solder a cable underneath the Raspberry Pi. But again I will decide latter!
And now it’s time for the camera. This will go on the lid of the box. A few measurements here and there together with some small markings and the result was the following
I am using a small paper knife. Depending on the density of the foam you should do extremely small movements in order to keep the cutting surface as clean as possible. The denser the foam the cleaner the surface will be. The exact method of foam crafting is with hot wires but I don’t have anything like that around me and to make one will be a waste of time for just a few small cuttings.
I remove the small foam cube and place fit the camera. It fits great!
The problem now is the depth of the foam lid. This is around a centimeter of so and the camera is unable to have a clear view.
The solution is simple! A few more markings, then diagonal cuttings and you have a nice “lens” that I will paint black a few steps latter!
To properly mount the camera to my foam lens I am using black electrical tape. Even with the one on top the module is held perfectly without any movements or possibilities to fell down. I even pull gently from the flexible tape cable by paying attention not to destroy the SMD connector and still the piece of tape was holding well! But just in case a place another piece to 110% sure!
For more detail: Rescuing a foam box