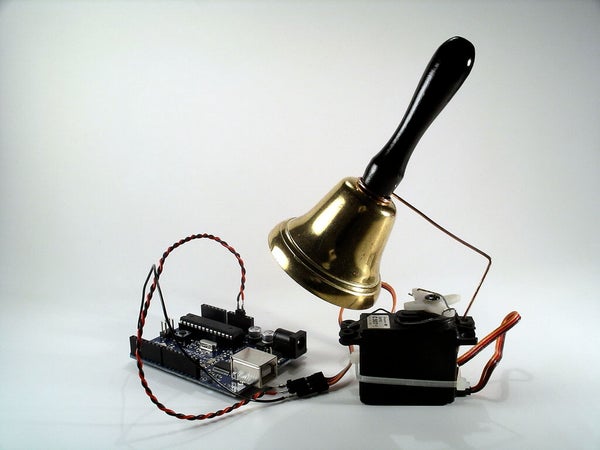
Christmas is coming closer, so here is my contribution to put you in the right mood. It is a blog hitcounter, that rings a bell. Literally. It puts a smile on your face, every time someone hits your blog.
It consists of an Arduino board, a bell, a servo and a couple of lines of code in c, python and php. Most parts are fairly common and should be easy to get.
Step 1: Tools and Materials
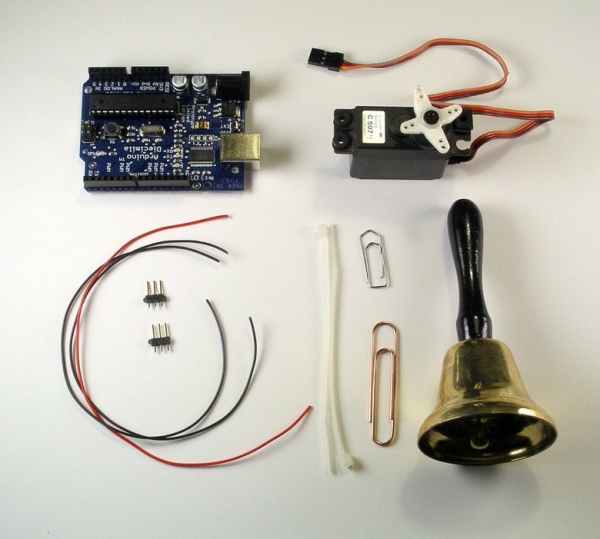
So what is needed?
- Arduino Board. I got an Arduino Diecimila from Adafruits. In the meantime there are really cheap and handy clones out there, e.g. the really bare bone board from Modern Devices, especially if you want to use them on a breadboard.
- A servo motor. Any servo will do. I took an old one that was used in my former hobby.
- A bell. Preferably one that is small enough to shake it with the servo.
- Two paperclips. A large one to hold the bell and a small one to build the actuator to ring the bell.
- Wires to connect the servo with the Arduino.
- A website. In fact it has not to be a website or a blog. Actually everything that can be counted, will work.
- A PC or a Mac to connect the Arduino board with the blog or website.
You may need an soldering iron, if the wires can not be connected directly to the Arduino.
Step 2: Hardware Assembly
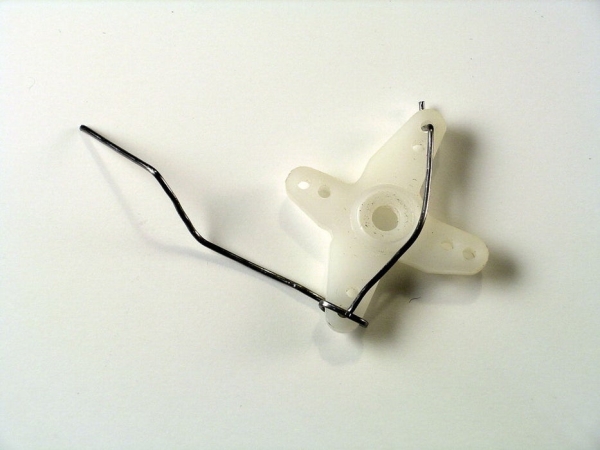
The bell is held by a strong paperclip. The small paperclip is used to form a kind of arm that is atached to the servo motor.
Note, that you want to bent the paperclip that holds the bell in a way, that already a little shaking generates a ding.
Step 3: Schematics

There is no real schematic. Just attach the servo motor to the Arduino. The servo has three wires:
- yellow or orange: signal
- red: VCC
- brown: GND
The red and the brown one are attached to the according pins on the Arduino (5V and GND). The orange one is wired to pin 2. It will signal the servo in which direction to turn.
You may want to solder small connectors to the wires if the wires do not fit directly into the Arduino or the servo.
Step 4: Programming the Arduino
Arduino
If you are new to the Arduino, it is a small board, fully assembled with a AVR microcontroller. It is well suited for hacking and interacting with your environment. Many things that are hard with microcontrollers are rather easy with Arduino. Some of the advantages:
- no need for a separate programming device (programmer)
- comes with an integrated development environment (IDE)
- runs on any platform, Windows, Mac, Linux.
- easy connection to your PC with USB
- hardware is open source (but the name Arduino is not)
- has a great community
More information can be found at the official Arduino website. Be sure, to check out John’s Arduino instructable for further details on how to get started with Arduino.
What does the software do?
The small piece of software that gets uploaded to the Arduino, controls the servo. It receives single bytes via the serial connection over the USB cable. If it receives a value of 5, it moves the servo arm five times forth and back. So the max value to send is 255.
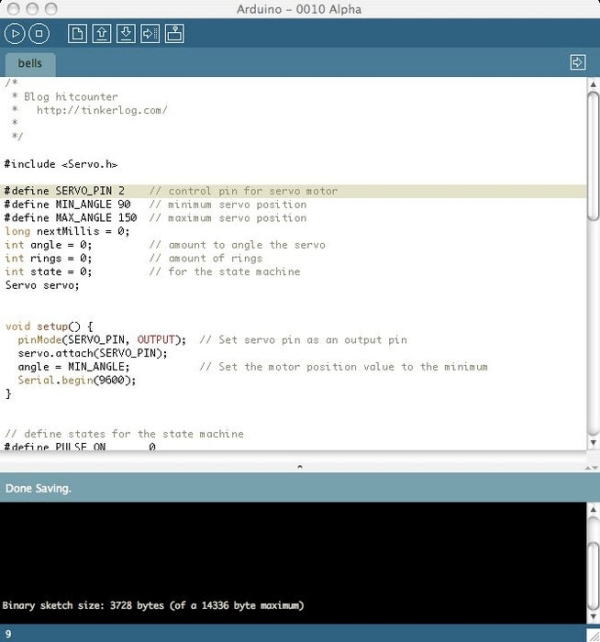
Program the Ardiuno
So I assume you have downloaded and installed the latest Arduino IDE from Arduino.cc. For now it is version 0010 Alpha.
To drive the servo more comfortably you have to download a library. You can find it on the Arduino Playground. Unzip it and put the folder in …/arduino-0010/hardware/libraries/.
- Attach the Arduino to your PC with the USB cable.
- Open the IDE and start a new sketch. Sketch is Arduino speak for program. Select File -> New.
- Select the appropriate serial device (Tools -> Serial Port). This depends on your environment, for me it is /dev/tty.usbserial-A4001JAh.
- Download the attached source file and paste it into the new sketch. Hit the save button.
- Hit the verify button. This compiles your sketch into a hex file that can be transferred to your Arduino.
- Hit the upload button to transfer your sketch to the Arduino.
Testing
Now your hitcounter is ready for some action. Let’s see if it works.
- Hit the serial monitor button.
- Select the text box next to the send button.
- Hit the tab key and send it.
- By now the servo arm should move forward and back.
Phew. That was the hardest part. For now you can send a byte to the Arduino and the servo waves at you. Next is to find something that you want to trigger the bell.
We are almost done.
Step 5: Make It a Hitcounter
To make it a hitcounter for your website, we need two small code pieces. One two create and take care of the counter and a second to fetch the value of the counter and to send it to the Arduino.
Note: If you are not familliar with Python or PHP, the scripts can be easily ported to your favorite programming language.
The counter
Here is a small PHP script, that reads a value from a file (hitcounter.txt), increments it and writes it back to the file. That is all, that is needed. This file can be saved as counter.php on your server for example. You can then trigger a count with you webbrowser pointing to http : //www.youdomain.com/counter.php. I included this snippet in my wordpress blog.
$hits = file($count_my_page);
$hit = trim($hits[0]);
$hit++;
$fp = fopen($count_my_page , “w”);
fputs($fp , “$hit”);
fclose($fp);
echo $hit;
?>
The glue code
This next code snippet is used to fetch the counter. I used Python but anything should work. It opens an HTTP connection and fetches the hitcounter.txt. If the value has changed since the last fetching, the diff is calculated and pushed to the Arduino. This is done every ten seconds until you interrupt the script with crtl-c.
Adapt the myUrl and the serial connection below to your needs.
#
# fetch counter
#
import time
import urllib
import serial
# usb serial connection to arduino
ser = serial.Serial(‘/dev/tty.usbserial-A4001JAh’, 9600)
myUrl = ‘http://tinkerlog.com/hitcounter.txt’
last_counter = urllib.urlopen(myUrl).read()
while (True):
_ counter = urllib.urlopen(myUrl).read()
_ delta = int(counter) – int(last_counter)
_ print “counter: %s, delta: %s” % (counter, delta)
_ ser.write(chr(ord(chr(delta))))
_ last_counter = counter
_ time.sleep(10)
I could not upload files with php extension, so you have to rename the counterphp.txt to counter.php.
If your Arduino is still attached to your PC, then start the Python script to fetch your hitcounter.
..>python counter.py
and you should see the output of the counter. If you point your browser to the URL of your counter.php and hit reload, you should hear your hitcounter ringing.
Yes, now we are done. Time to lean back and enjoy our work.
Step 6: Conclusion

It is the first time, that I built something, that has moving parts. That is the first step to bridge the gap between the virtual and the real world. And it was really easy, the code is straight forward. Also most of the parts were in my trash bin, except the bell. Putting everything together and waiting for someone to hit my blog was fun.
Hope you enjoyed it.
Source: Arduino XMAS Hitcounter