
There are lots of Arduino projects to read temperature with different devices, this is an easy one to measure high temperatures with type K thermocouples (1300ºC).
Skills necessary for this project are basic (buying max IC already mounted) but I have mount an MAX31855 in a printed circuit (thanks to Antonio an specialist in this).
With this hand held instrument, is possible to have an accurate temperature reading and also display cold junction temp (ambient temp) in Celsius an Fahrenheit units by pressing a switch. That is not all, if you connect the Arduino board to a computer or recorder its possible to record CJ, TC and binary fault codes.
Step 1: Wiring
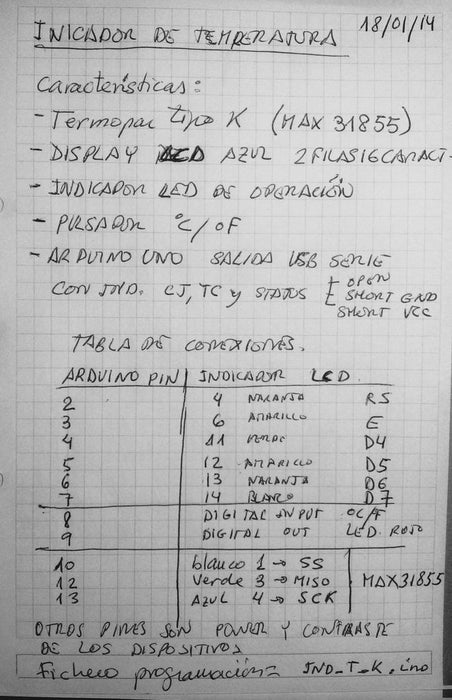
See attached a table with Arduino, LCD display and MAX31855 connections.
Step 2: Indication
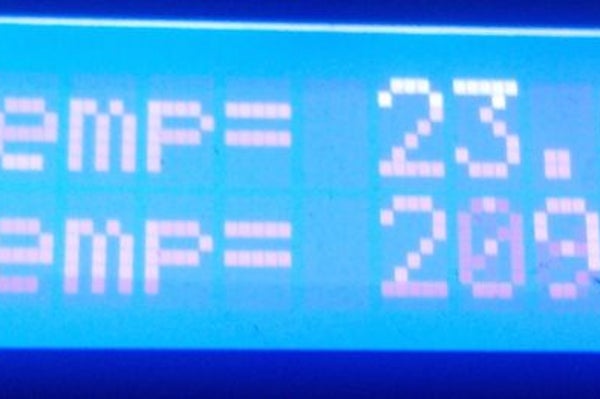
This two images shows display indication
Step 3: Sketch
Arduino sketch.
In order to get MAX31855 library:
https://github.com/adafruit/Adafruit-MAX31855-libr…
Only is necessary change Arduino pins selection.
For LCD display remember is included in Arduino IDE, only is necessary change pin selection.
// Este proyecto se realizo en enero de 2014 para hacer una demo de la operatividad
// del integrado MAX31855, que integro en circuito impreso mi curso Antonio
// las pruebas son un éxito y se añadión un display LCD, tambien hay cambios en la
// salida por puerto serie para monitorizar y registrar la indicación.
// Las siguientes etapas tratan de realizar multiples medidas de termopar y además realizar
// La comunicación a través de una conexión de red TCP-IP
// Incluye el código de la librería:
#include <LiquidCrystal.h>
// initialize the library with the numbers of the interface pins
LiquidCrystal lcd(2, 3, 4, 5, 6, 7);
// Adruino 1.0 pre-defines these variables
#include <MAX31855.h>
#if ARDUINO < 100
int SCK = 13;
int MISO = 12;
int SS = 10;
#endif
// Declaración de las variables enteras
int LED = 9;
int buttonPin = 8;
int buttonState = 0;
// Declaración de las variables de usadas con el MAX
double tempTC, tempCJC;
bool faultOpen, faultShortGND, faultShortVCC, x;
bool temp_unit = 0; // 0 = Celsius, 1 = Fahrenheit
// Init the MAX31855 library for the chip.
MAX31855 temp(SCK, SS, MISO);
void setup() {
// put your setup code here, to run once:
Serial.begin(9600);
pinMode(LED, OUTPUT);
// set up the LCD’s number of columns and rows:
lcd.begin(16, 2);
// Print a message to the LCD.
lcd.print(“Hola Curso!”); // Write on LCD
// initialize the pushbutton pin as an input:
pinMode(buttonPin, INPUT);
}
void loop() {
// put your main code here, to run repeatedly:
x = temp.readMAX31855(&tempTC, &tempCJC, &faultOpen, &faultShortGND, &faultShortVCC, temp_unit);
// lo que escribimos en el puerto serie lo podemos modificar en las siguientes líneas
Serial.print(tempTC);
Serial.print(“\t”);
Serial.print(tempCJC);
Serial.print(“\t”);
Serial.print(faultOpen);
Serial.print(faultShortGND);
Serial.println(faultShortVCC);
// lo que escribimos en el LCD lo definimos a partir de aquí
lcd.begin(16, 2);//The first tells the Liquid Crystal library how many columns and rows the display has
lcd.setCursor (0,0);//The first sets the cursor position (where the next text will appear) to column 0 or row 1. Both
//column and row numbers start at 0 rather than 1.
if (buttonState == HIGH) {
// Cambia unidades a F
lcd.print(“CJ Temp= F”);
}
else {
// Deja las unidades en C
lcd.print(“CJ Temp= C”);
}
lcd.setCursor(9, 0);
lcd.print(tempCJC);
lcd.setCursor (0,1);
if (buttonState == HIGH) {
// Cambia unidades a F
lcd.print(“TC Temp= F”);
}
else {
// Deja las unidades en C
lcd.print(“TC Temp= C”);
}
lcd.setCursor(9, 1);
lcd.print(tempTC);
// El led parpadea al ritmo impuesto por el delay dando ritmo al bucle
digitalWrite(LED, HIGH);
delay(100);
digitalWrite(LED, LOW);
delay(100);
// read the state of the pushbutton value:
buttonState = digitalRead(buttonPin);
// check if the pushbutton is pressed.
// if it is, the buttonState is HIGH:
if (buttonState == HIGH) {
// turn LED on:
temp_unit = 1;
}
else {
// turn LED off:
temp_unit = 0;
}
}
Source: Arduino Type K Temperature Indicator