Summary of Arduino-Powered Fire Fighter Robot: A Step-by-Step Guide
The article introduces the Firefighter Robot, an autonomous machine designed to detect and extinguish fires using IR flame sensors and Arduino control. The robot, similar in design to a Bluetooth-controlled RC car, uses three sensors to identify fire and obstacles, four wheels for mobility, and a water tank with a pump to spray water on flames. The Arduino processes sensor inputs to navigate towards fires and activate the water pump. This project offers an efficient alternative to traditional firefighting, minimizing human risk during fire emergencies.
Parts used in the Firefighter Robot:
- Arduino Uno
- Flame IR Sensor
- Robot Chassis
- 12v Battery
- Wires
- Nozzle for water
- Water pump 5v
- Single channel relay
- Servo motor
Greetings to all, we are glad to have you back at Techatronic. You may have heard of a fire-fighting vehicle before. Today, we are unveiling a groundbreaking breakthrough – the Firefighter Robot. This machine is specifically created to function independently, thereby fitting the definition of a robot. Our design is coded to respond to fires and start firefighting procedures. The abilities of the Firefighter Robot are remarkable, providing a more efficient option for firefighting than conventional vehicles.

In contemporary times, when fire accidents occur in power plants, buildings, and similar settings, the amount of time and human effort required for mitigation is considerable. Consequently, there exists a significant risk of substantial harm to individuals involved.
Introduction
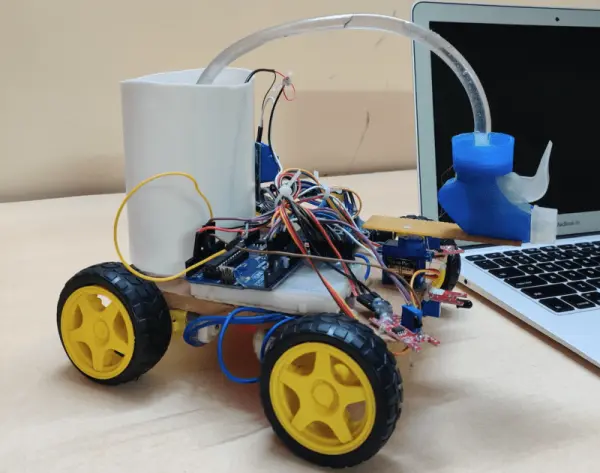
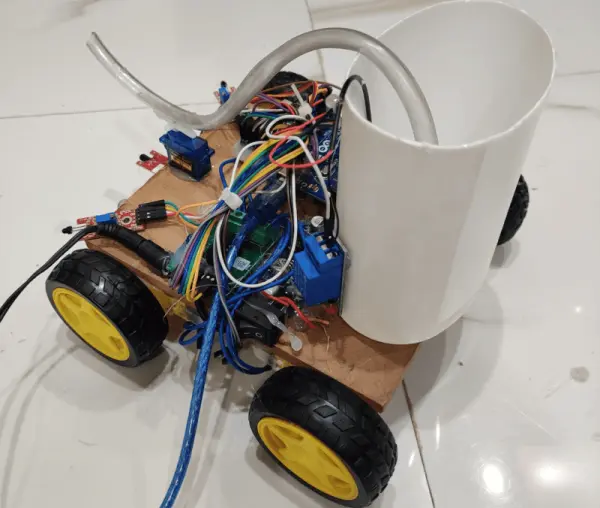
A fire-fighting robot serves the purpose of fire control. This autonomous robot possesses the ability to detect fires independently and manage them by deploying water. Equipped with specific sensors, it identifies fires and navigates towards them for extinguishment. The design of the fire-fighting robot resembles that of a Bluetooth-controlled RC car. It integrates three sensors: one frontal sensor to detect obstacles ahead and two additional sensors placed at the front corners to detect fire. Upon sensing a fire, the robot maneuvers towards the detected site. This specialized robot is outfitted with four wheels, three sensors, a water tank, a nozzle, and a computer system that aids in decision-making, programmed using Arduino code.

As of the publication date, the robot still exists in a smaller form and with restricted capabilities. When turned on, the robot’s main purpose is to advance until it senses a fire. When one of the robot’s sensors identifies a flame, it will change its course towards the fire and use the water nozzle incorporated into the Arduino-controlled firefighting robot to put out the targeted area. While the firefighting robot and line follower robot have similar sensors, their operations vary greatly depending on the circumstances.
Construction
I will provide thorough information on creating a Firefighter robot with Arduino. I will offer a detailed list of necessary parts, the circuit’s code, and guidance for putting it together. Following these instructions makes the assembly of the robot easy and simple. Moreover, if you’re looking to gain some foundational understanding, you can discover educational materials on our site.
Components Required
- Arduino Uno
- flame IR Sensor
- Robot Chassis
- 12v Battery
- Wires
- Nozzle for water
- Water pump 5v
- Single channel relay
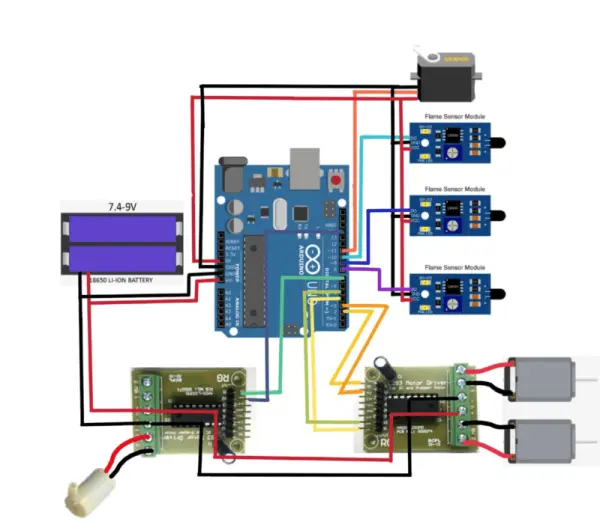
Circuit Diagram
Make all the connection as the given in the circuit diagram.

After completing the Connection next step is to write the code and program for our project.
Code
#include
Servo myservo; // create servo object to control a servo
// twelve servo objects can be created on most boards
int pos = 0;
void setup() {
// put your setup code here, to run once:
myservo.attach(11);
pinMode(2, OUTPUT);
pinMode(3, OUTPUT);
pinMode(4, OUTPUT);
pinMode(5, OUTPUT);
pinMode(6, OUTPUT);
pinMode(A0, INPUT);
pinMode(A1, INPUT);
pinMode(A2, INPUT);
Serial.begin(9600);
digitalWrite(6, HIGH);
}
void loop() {
// put your main code here, to run repeatedly:
int a = analogRead(A0);
int b = analogRead(A1);
int c = analogRead(A2);
Serial.print(a);
Serial.print(” “);
Serial.print(b);
Serial.print(” “);
Serial.print(c);
Serial.println(” “);
delay(50);
if (a<=250)
{
digitalWrite(2, LOW);
digitalWrite(3, LOW);
digitalWrite(4, LOW);
digitalWrite(5, LOW);
digitalWrite(6, LOW);
for (pos = 60; pos <= 120; pos += 1) { // goes from 0 degrees to 180 degrees // in steps of 1 degree myservo.write(pos); // tell servo to go to position in variable ‘pos’ delay(15); // waits 15 ms for the servo to reach the position } for (pos = 120; pos >= 60; pos -= 1) { // goes from 180 degrees to 0 degrees
myservo.write(pos); // tell servo to go to position in variable ‘pos’
delay(15); // waits 15 ms for the servo to reach the position
}
//delay(200);
}
else if(b<=450)
{
digitalWrite(2, LOW);
digitalWrite(3, LOW);
digitalWrite(4, LOW);
digitalWrite(5, LOW);
digitalWrite(6, LOW);
for (pos = 60; pos <= 120; pos += 1) { // goes from 0 degrees to 180 degrees // in steps of 1 degree myservo.write(pos); // tell servo to go to position in variable ‘pos’ delay(15); // waits 15 ms for the servo to reach the position } for (pos = 120; pos >= 60; pos -= 1) { // goes from 180 degrees to 0 degrees
myservo.write(pos); // tell servo to go to position in variable ‘pos’
delay(15); // waits 15 ms for the servo to reach the position
}
for (pos = 60; pos <= 120; pos += 1) { // goes from 0 degrees to 180 degrees // in steps of 1 degree myservo.write(pos); // tell servo to go to position in variable ‘pos’ delay(15); // waits 15 ms for the servo to reach the position } for (pos = 120; pos >= 60; pos -= 1) { // goes from 180 degrees to 0 degrees
myservo.write(pos); // tell servo to go to position in variable ‘pos’
delay(15); // waits 15 ms for the servo to reach the position
}
for (pos = 60; pos <= 120; pos += 1) { // goes from 0 degrees to 180 degrees // in steps of 1 degree myservo.write(pos); // tell servo to go to position in variable ‘pos’ delay(15); // waits 15 ms for the servo to reach the position } for (pos = 120; pos >= 60; pos -= 1) { // goes from 180 degrees to 0 degrees
myservo.write(pos); // tell servo to go to position in variable ‘pos’
delay(15); // waits 15 ms for the servo to reach the position
}
}
else if(c<=250)
{
digitalWrite(2, LOW);
digitalWrite(3, LOW);
digitalWrite(4, LOW);
digitalWrite(5, LOW);
digitalWrite(6, LOW);
for (pos = 60; pos <= 120; pos += 1) { // goes from 0 degrees to 180 degrees // in steps of 1 degree myservo.write(pos); // tell servo to go to position in variable ‘pos’ delay(15); // waits 15 ms for the servo to reach the position } for (pos = 120; pos >= 60; pos -= 1) { // goes from 180 degrees to 0 degrees
myservo.write(pos); // tell servo to go to position in variable ‘pos’
delay(15); // waits 15 ms for the servo to reach the position
}
for (pos = 60; pos <= 120; pos += 1) { // goes from 0 degrees to 180 degrees // in steps of 1 degree myservo.write(pos); // tell servo to go to position in variable ‘pos’ delay(15); // waits 15 ms for the servo to reach the position } for (pos = 120; pos >= 60; pos -= 1) { // goes from 180 degrees to 0 degrees
myservo.write(pos); // tell servo to go to position in variable ‘pos’
delay(15); // waits 15 ms for the servo to reach the position
}
for (pos = 60; pos <= 120; pos += 1) { // goes from 0 degrees to 180 degrees // in steps of 1 degree myservo.write(pos); // tell servo to go to position in variable ‘pos’ delay(15); // waits 15 ms for the servo to reach the position } for (pos = 120; pos >= 60; pos -= 1) { // goes from 180 degrees to 0 degrees
myservo.write(pos); // tell servo to go to position in variable ‘pos’
delay(15); // waits 15 ms for the servo to reach the position
}
}
else if(a>=251 && a<=700) { digitalWrite(6, HIGH); digitalWrite(2, LOW); digitalWrite(3,HIGH); digitalWrite(4, HIGH); digitalWrite(5, LOW); delay(500); digitalWrite(6, HIGH); digitalWrite(2, HIGH); digitalWrite(3, LOW); digitalWrite(4, HIGH); digitalWrite(5, LOW); delay(500); } else if(b>=251 && b<=800) { digitalWrite(2, LOW); digitalWrite(3,HIGH); digitalWrite(4, HIGH); digitalWrite(5, LOW); digitalWrite(6, HIGH); } else if(c>=251 && c<=800)
{
digitalWrite(2, HIGH);
digitalWrite(3, LOW);
digitalWrite(4, LOW);
digitalWrite(5, HIGH);
digitalWrite(6, HIGH);
delay(500);
digitalWrite(6, HIGH);
digitalWrite(2, HIGH);
digitalWrite(3, LOW);
digitalWrite(4, HIGH);
digitalWrite(5, LOW);
delay(500);
}
else
{
digitalWrite(6, HIGH);
digitalWrite(2, HIGH);
digitalWrite(3, LOW);
digitalWrite(4, HIGH);
digitalWrite(5, LOW);
}
}
Working
In explaining the operation of the Firefighter Robot, we begin by outlining the algorithm to provide a fundamental understanding of the robot’s functionality.
We utilize three IR flame sensors that continuously scan for signs of fire or flames. These sensors detect warmth and heat emitted by any source and are programmed to identify flames in their vicinity. Constantly active, all three sensors actively search for any indication of fire. Upon detection by any of the sensors, the robot initiates a turn and proceeds toward the fire.
How does it function?
The flame sensors help to sense fire and relay this info to the Arduino; the main control system of the robot. The received data is analyzed at the Arduino end to prompt responsive actions resulting from specified statuses. They call the motors to act in a manner required by the path of the fire- either, left, right or forward depending on which sensor was triggered.
Upon reaching the vicinity of the fire, the robot halts and begins the process of extinguishing it by applying water until the fire is brought under control.
