Summary of Arduino-powered A-10 stick grip remote w/Emergency Party Button
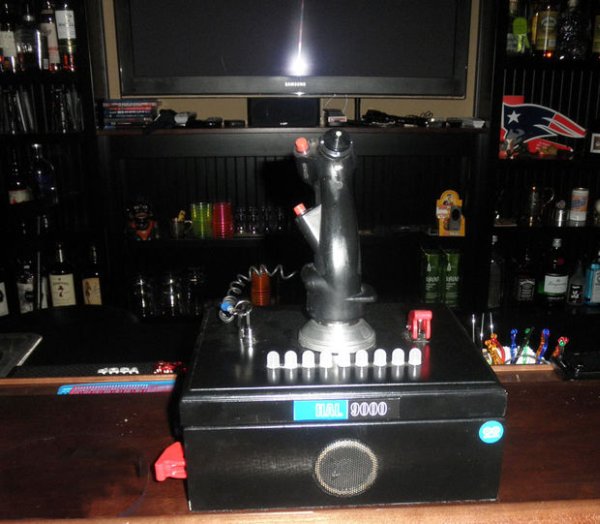
The author repurposed a USAF B-8 stick grip into a master control box for a bar's AV system and lighting. Using two Arduinos, the device controls SAT TV, music, iPod docks, overhead lights, and an emergency party system via IR and X10 protocols. The build incorporates various switches, LEDs, sound effects like sirens, and multiple battery packs to power distinct subsystems independently.
Parts used in the Emergency Party Button:
- Soldering iron, flux, solder, and small gauge hookup wire
- Hot glue gun, epoxy, wire shrink wrap, and wire ties
- Project box or cigar humidor
- B-8 stick grip or similar control interface
- Two Arduino Uno boards with protoshields
- DC toggle switches with missile guards and a key switch
- IR remote control circuit and 38kHz Infrared Receiver Module
- IR LED(s) for signal transmission
- X-10 CM-17A Firecracker dongle
- X-10 transceiver (TM751 Mini Transceiver Module)
- X-10 lamp and appliance modules
- Old female serial plug
- LED arrays and LED cyclon kit
- Transistors (Tip120 and 2N4401)
- Red Alert siren kit using 555 timers
- LM386 amplifier circuit
- Speaker
- Multiple Li-Po and Li-ion battery packs
I came across Plama2002’s “Emergency Party Button” build a while back and wanted something similar for my bar. I also had an old USAF B-8 stick grip from an A-10A that I picked up in my previous life. I figured instead of just being a conversation piece, I could put it to good use as a remote control for my AV system. What I came up with is a master control box that:
– Controls my SAT TV, music server and iPod dock via my Audio Visual Receiver (AVR)
– Controls the overhead lighting in the bar and the components of the Emergency Party System.
– Looks really cool sitting on the bar!
It uses two Arduinos: one for switching and IR transmission, and one to wirelessly control the X10 devices.
This build is not really that difficult as both the Arduino and X10 applications in this project are really pretty simple. You just need to figure out exactly what you want yours to do and adapt it. Since I’m writing this ex post facto I’ll try to make up for the lack of step-by-step photos with thorough explanations. Sorry I don’t have the circuitry sketched out but there’s not much to it – we’re mostly just hooking up buttons with pulldown resistors, just like in the Arduino tutorials. There are a few slightly more complicated things going on but I’ll be sure to explain them as we proceed!
Step 1: Gathering Stuff
This build is really a few builds within a build, and uses mostly optional components which you can choose to incorporate or not.
The basics:
– Soldering iron, flux, solder and plenty of small gauge hookup wire. I think I used mosty 24g or 26g
– Hot glue gun, epoxy, wire shrink wrap and wire ties as desired
– A project box, cigar box or something big enough to fit all the components into. I used a cheap, old cigar humidor.
– B-8 stick grip or similar control interface. It’s up to you what you use – the interface could be as simple as a cheap array of switches or buttons
– 2 Arduinos (I used Uno’s), one to run the IR remote control stuff and one to run the X10 stuff. You may be able to use just one if you know what you’re doing. This was my first real Arduino project and I didn’t :-).I also used protoshields to make these circuits permanent, but breadboarding will do!
-Switches. I used two DC toggle switches with ‘missile guards’ and a cheap Chinese key switch for effect. Since this is a custom build to your own preferences, use whatever you like!
For the Arduino remote control:
-IR remote control circuit to capture IR signals from your remote and decode them. See here
– 38kHz Infrared (IR) Receiver Module
– An IR LED or two to transmit the codes to your device(s)
For the Party Button
X-10 CM-17A Firecracker dongle
X-10 transceiver such as TM751 Mini Transceiver Module
X-10 lamp and appliance (3-prong) modules, receptacles and light switches as required
– Arduino with BroHogan’s X10 Firecracker remote library installed.
– Old female serial plug that you can tear apart
Light effects for the box:
– LED’s. I used a couple of LED arrays I found online that run off 12v DC and an LED ‘cyclon’ kit I had lying around that will run off 3v from the arduino. You’ll need IR LEDs too, and couple of regular ones.
– A couple of transistors to provide switching from the Arduino to any external devices that run on their own power supply. I used a Tip120 connected to the Red Alert siren and amp, a Tip120 connected to the 12v Police Flashers, and a 2N4401 to connect the IR LED’s to the Arduino. I’ll explain all this as we go on.
Sound FX for the box:
-A simple siren kit or something similar. I used a cheap ‘Red Alert’ circuit using 555 timers
– An LM386 amplifier circuit or similar, if desired. I wanted the alarm to be load so I used the amp.
-Speaker
Power:
A 12v li-po pack powers the LED “police flashers” on the outside of the box, a 9v pack powers the X10 Arduino, a set of two 3.7v li-ions powers the IR remote Arduino, another set of 2 li-ions powers the IR LED”s themselves, and a regular 9v powers the siren. The LED cyclon on the top of the box is powered directly with 3v from the Arduino board.
I know there is a more efficient way to power the whole thing, but I built it in stages and as I got each part of it running, I didn’t feel like taking the time to re-engineer the power system. I could probably run the whole thing off of the 12v li-po pack but I’m too lazy to figure out how to do it. Plus I had a bunch of rechargeable 14500 and 10440’s (AA and AAA size li-ions batteries) in stock and there’s plenty of room inside the box, so space was not a problem.
For more detail: Arduino-powered A-10 stick grip remote w/Emergency Party Button
- What is the primary function of the project described?
The project creates a master control box to manage SAT TV, music servers, iPod docks, overhead lighting, and emergency party system components. - How does the system control different devices?
It uses two Arduinos; one handles switching and IR transmission while the other wirelessly controls X10 devices. - Can I use only one Arduino for this build?
The author notes it might be possible to use just one if you know what you are doing, but they used two for simplicity. - What type of power sources are used in the build?
The build utilizes a 12v li-po pack, 9v packs, and sets of 3.7v li-ions to power various subsystems like LEDs, Arduinos, and the siren. - What specific switches were used for the control interface?
The author used two DC toggle switches with missile guards and a cheap Chinese key switch. - Does the project include sound effects?
Yes, it includes a Red Alert siren kit and an LM386 amplifier connected to a speaker. - How are the external devices switched by the Arduino?
Transistors such as the Tip120 and 2N4401 are used to provide switching from the Arduino to external devices running on their own power supplies. - What library is required for the X10 functionality?
The project requires BroHogan's X10 Firecracker remote library installed on the Arduino. - Is the project difficult to assemble?
The author states the build is not really that difficult because the applications are simple and mostly involve hooking up buttons with pulldown resistors.