
Summary of Arduino Button Mouse Control Code
Summary: An Arduino Leonardo, Micro, or Due uses the Mouse library and five pushbuttons to control a computer cursor: four buttons move the cursor in relative steps of 5 units (up, down, left, right) and a fifth issues a left mouse click. Cursor updates occur only while buttons are pressed; using Mouse.move() hands control of the cursor to the Arduino.
Parts used in the Button Mouse Control Project:
- Arduino Leonardo, Micro, or Due board
- 5 momentary pushbuttons
- Five 10-kilohm resistors
- Hook up wire
- Breadboard
With the Mouse library, an Arduino Leonardo, Micro, or Due can manipulate the onscreen cursor of a computer. This specific instance involves the use of five pushbuttons to control the movement of the cursor on the screen. Four buttons control direction (up, down, left, right) and one activates a left mouse click.
Cursor movement on the Arduino is consistently based on a relative position. Whenever an input is received, the cursor’s position is adjusted in relation to its existing location.
Each time a directional button is activated, the Arduino will manipulate the mouse by translating a HIGH signal into a movement of 5 units in the correct direction.
The fifth button controls a left mouse click. When the board is pressed, it sends a signal to the computer. Upon releasing the button, the computer will acknowledge the occurrence.
Note: The Arduino seizes control of your computer’s cursor when the Mouse.move() command is used! Make sure to establish a controller before using Mouse.move() to prevent losing control of your computer during the sketch. The cursor position in this sketch is only updated when a button is pressed.
Software Required
- none
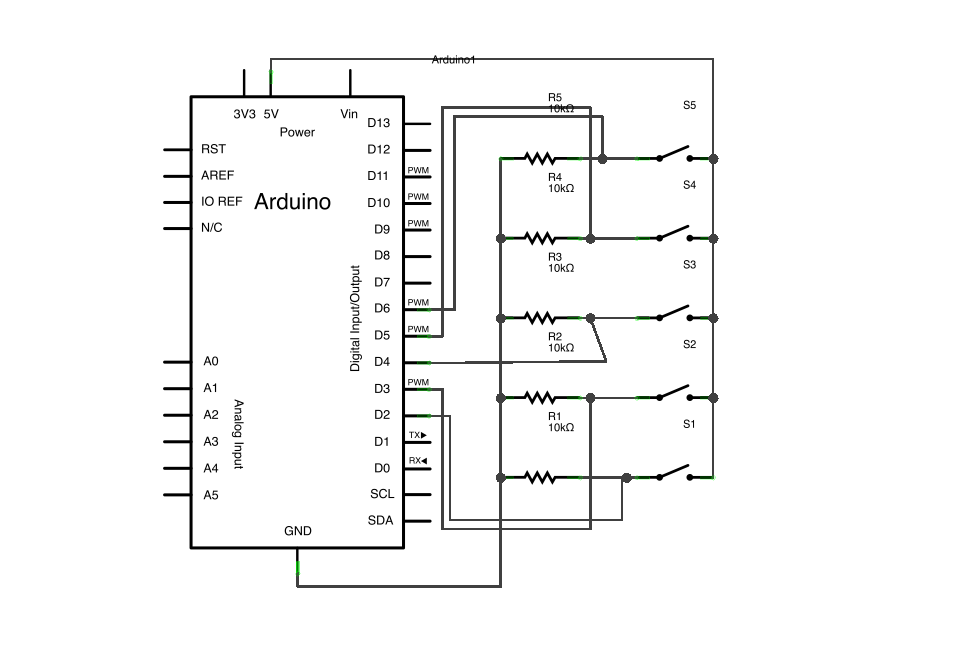
image developed using Fritzing. For more circuit examples, see the Fritzing project page
Schematic:
Code
/*
ButtonMouseControl

Controls the mouse from five pushbuttons on an Arduino Leonardo or Micro.

Hardware:
* 5 pushbuttons attached to D2, D3, D4, D5, D6

The mouse movement is always relative. This sketch reads
four pushbuttons, and uses them to set the movement of the mouse.

WARNING:  When you use the Mouse.move() command, the Arduino takes
over your mouse!  Make sure you have control before you use the mouse commands.

created 15 Mar 2012
modified 27 Mar 2012
by Tom Igoe

this code is in the public domain

*/
Hardware Required
- Arduino Leonardo, Micr or Due board
- 5 momentary pushbuttons
- Five 10-kilohm resistors
- hook up wire
- breadboard
For more detail: Arduino Button Mouse Control Code
- What does this project do?
It lets an Arduino Leonardo, Micro, or Due control the computer cursor with five pushbuttons: four for directional movement and one for left click. - Which Arduino boards are compatible?
Arduino Leonardo, Micro, or Due are compatible. - How are the buttons used to move the cursor?
Four buttons map to up, down, left, and right; each press moves the cursor 5 units in the corresponding direction. - How is the left mouse click performed?
The fifth button sends a left click signal when pressed and the computer registers it on release. - Is cursor movement absolute or relative?
Cursor movement is relative; each input adjusts the cursor relative to its current position. - When does the cursor position update?
The cursor position is updated only when a button is pressed. - What warning is given about Mouse.move()?
Using Mouse.move() lets the Arduino take control of your computer cursor, so ensure you have control before running the sketch. - Are any special software requirements needed?
No additional software is required for this project.
