
Summary of Arduino Bluetooth PC Fan Wind Sensor With RemoteXY
This project transforms an old PC fan into a wind speed sensor by removing its internal electronic commutator, allowing it to function as a brushless DC generator. The modified fan generates 3-4 volts when spun by wind, which is read by an Arduino UNO via an analog pin. Data is transmitted wirelessly to a smartphone using an HC-06 Bluetooth module and visualized through the RemoteXY application interface.
Parts used in the Arduino Bluetooth PC Fan Wind Sensor:
- Modified PC Fan
- Arduino UNO
- Bluetooth Module HC-06
- Wires
- Crocodile Clips
- Smartphone running RemoteXY application
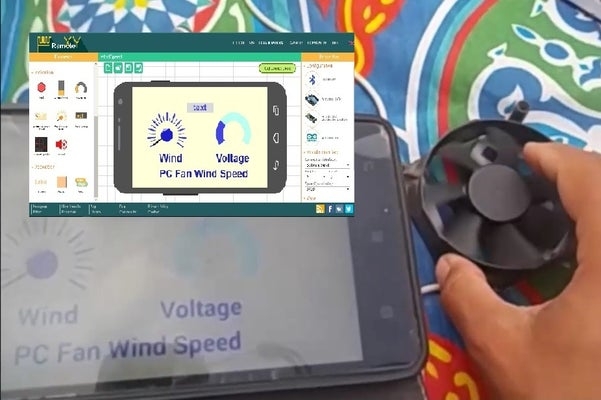
This projects is a mix of two of my main passions, Arduino and Wind. Here is a simple project that I used this OLD PC fan as a small wind generator to sense the wind speed.
Here we are using modified PC fan as a wind speed sensor using Arduino and showing the results on a smartphone running the RemoteXY application.
Background
The PC Fan is a brushless DC motor and has a permanent magnet. Normally, a DC motor with a permanent magnet can act also as a generator without any modification as you turn the rotor.
But the PC Fan is brushless DC motor with an electronic commutator.
The Magnet is the rotor and the coils are the stator. In motor operation, the rotating magnetic field is generated by the electronic commutator circuit.
As you start to rotate the PC Fan blades, the magnet also rotates and produces voltage inside the stator coils.
But the problem is that the electronic commutator circuit blocks the induced voltage from getting outside the PC Fan terminals as it only acts in one direction (from the terminals to the coil and not the other way).
The main idea behind the modification is the removal of the electronic commutator IC and connect the terminals to the coils to take the induced voltage from the PC Fan as a generator.
The modified PC Fan can generate small voltage (about 3 to 4 volts) and it’s enough to light an LED or charge your smartphone. So you can call it a PC Fan Wind Turbine.
Here are detailed steps and videos on the modification process.
https://www.instructables.com/id/Old-PC-Fan-Wind-Turbine-in-10-Minutes/
Supplies
PC Fan wind Turbine
This is a modified PC Fan that can generate small voltage (about 3-4 Volts)
Arduino UNO Banggood , ebay , Aliexpress
Bluetooth Module HC-06 Banggood , ebay , Aliexpress
Wires Crocodile Clips
Smartphone running RemoteXY application
Step 1: Components Used
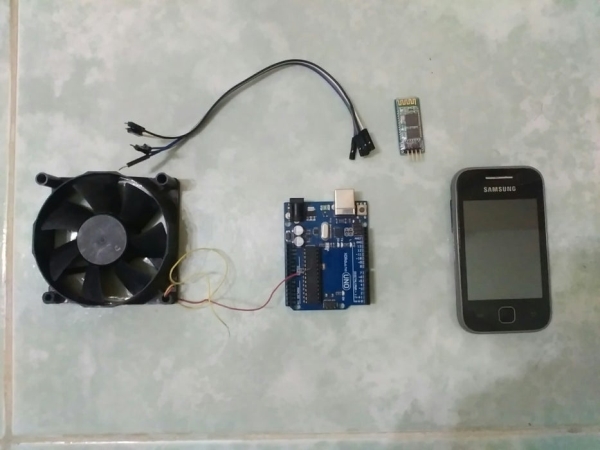
PC Fan wind Turbine
This is a modified PC Fan that can generate small voltage (about 3-4 Volts)
Arduino UNO Banggood , ebay , aliexpress
Bluetooth Module HC-06 Banggood , ebay , aliexpress
Wires
Crocodile Clips
Smartphone running RemoteXY application
Step 2: Connection of the Circuit
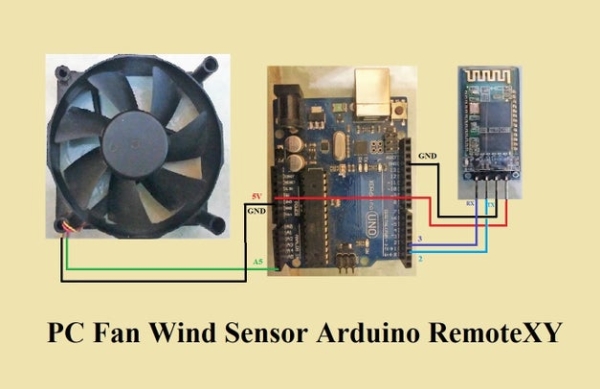
Connect PC Fan to A5 (Arduino Analog Input)
Connect Bluetooth Module HC-06 to Arduino
Vcc to Vcc
GND to GND
TX to 2
RX to 3
Step 3: RemoteXY Interface
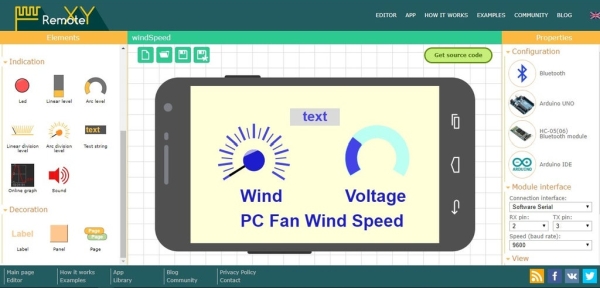
Open RemoteXY.com website.
Download RemoteXY to your smartphone.
Open RemoteXY Editor and Create new project.
Click Configuration
Click Connection and Choose Bluetooth
Click Module and Choose HC-06
Click Device and Choose Arduino Uno
Click IDE and Choose Arduino IDE
On the Module interface the Connection type to be Software Serial and Choose Connections 2 RX and 3 TX
Choose the default baud rate to be 9600
From Indication,
Add Level Meters and customize them as you like.
Add the text box tool.
From Decoration,
Add labels and customize its text and colors.
From View,
Change the interface background and you like to be.
Step 4: Arduino Code
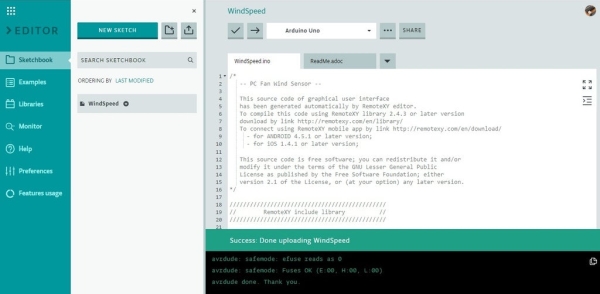
On the RemoteXY website save your project and click Get Source Code button.
Copy the generated Software and paste it into Arduino IDE.
Add the following lines of the code in loop() function to use the level meters and the text box.
RemoteXY.level_1 = ( analogRead(sensorPin) /5 ) ;
RemoteXY.level_2 = analogRead(sensorPin);
dtostrf(analogRead(sensorPin), 0, 1, RemoteXY.text_1);
Download the RemoteXY library and add it to the Arduino environment.
Compile the software, connect Arduino UNO board and upload the code to Arduino UNO.
Step 5: Test the Circuit
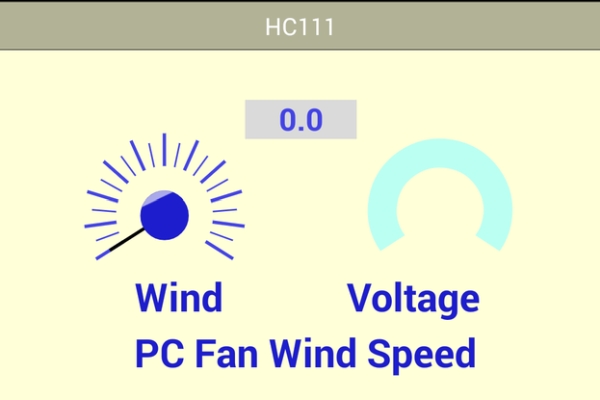
Now you have a complete circuit and you can test it in the wind.
Power the Arduino Circuit.
On the smartphone,
– Open the RemoteXY app.
– Enable Bluetooth.
– Connect to your HC-06 Module.
You can see the fan rotate and the Level meter is moving. Also the Analog input text box responding.
Step 6: Notes

- The voltage generated from the PC Fan is small and will not hurt the Arduino analog input pin. But if you’re concerned about that you need to connect a regulator or a voltage divider circuit.
- You can change the coefficient multiplied by the analog input to get the wind speed.
Here are some of my latest books on Amazon.
Source: Arduino Bluetooth PC Fan Wind Sensor With RemoteXY
-
How does the PC Fan work as a generator?
The modification involves removing the electronic commutator IC so that induced voltage from the rotating magnet can exit the stator coils. -
Can I connect the PC Fan directly to the Arduino?
Yes, you connect the modified PC Fan to Analog Input A5 on the Arduino UNO. -
What voltage does the modified fan generate?
The modified PC Fan generates a small voltage of about 3 to 4 volts. -
Which app is used to display the wind speed data?
The RemoteXY application running on a smartphone is used to view the results. -
How do I configure the Bluetooth connection in RemoteXY?
You must select Bluetooth as the connection type, choose the HC-06 module, set the baud rate to 9600, and use Software Serial on pins 2 and 3. -
Is the generated voltage safe for the Arduino?
Yes, the voltage is small enough not to hurt the Arduino analog input pin, though a regulator or voltage divider can be added if concerned. -
How do I calculate the wind speed value in the code?
You can change the coefficient multiplied by the analog input value in the loop function to adjust the reading.
