Summary of Arduino Bluetooth Car Controlled by Labview
This Arduino RC car uses an Arduino Uno controlled via LabVIEW (with LabVIEW MakerHub) and an HC-06 Bluetooth module to drive an L298N motor driver on a standard RC car platform. Power is supplied by six AA batteries regulated to 5V with an LM7805; components are mounted with double-sided tape and some screws. The project emphasizes maneuverability, wiring notes, and troubleshooting LabVIEW initialization and Bluetooth serial connection issues.
Parts used in the Arduino RC car:
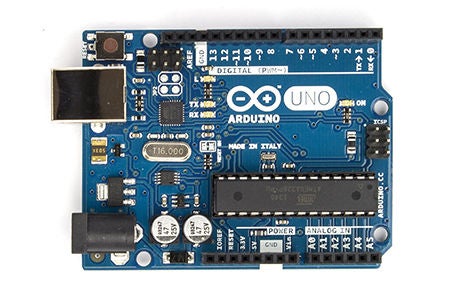
- Arduino Uno Board
- RC Car Platform
- L298n Motor Controller
- HC-06 Bluetooth Module
- 1.5V AA Battery (6 needed)
- 6 AA Battery Holder
- Resistor 5.1K Ohm (x3)
- Resistor 2K Ohm (x1)
- Resistor 1K Ohm (x1)
- Capacitor 10uF 10V (x2)
- 5V Regulator LM7805
- 9V Snap Connector
- On/Off Switch
- Double-sided tape and screws (for mounting)
- Wiring and soldering materials
- LabVIEW software
- LabVIEW MakerHub add-on
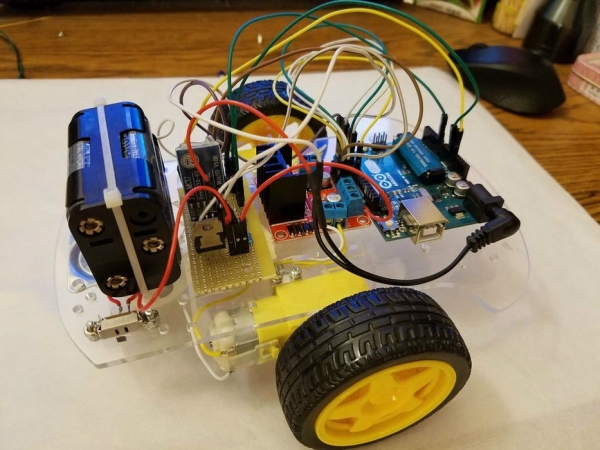
This is a Arduino RC car, originally based off of a project made by Owen_soo. It is very maneuverable, able to do quick turns, go backward and forward with just a flick of a switch. This was originally just going to be a very basic RC car that can go forward and turn right or left. It uses an Arduino Uno. I decided to change the software and use Labview instead.
Step 1: Parts
This are the necessary parts needed to build this project.
Primary Materials
1. Arduino Uno Board
2. RC Car Platform
3. L298n Motor Control
4. HC-06 Bluetooth Module
5. 1.5V AA Battery(6 needed)
6. 6 AA Battery Holder
7. Resistor 5.1K Ohm(x3), 2K Ohm(x1), 1K Ohm(x1)
8. Capacitor 10uF 10V (x2)
9. 5V Regulator LM7805
10.9V Snap Connector
11. On/Off Switch
Software
Labview Makerhub (Labview Add-on)
All components on the platform is put in place using double sided tape with the addition of a few screws.
Step 2: Programming

The software that I use is called Labview. Unlike many of the more popular programming languages, Labview is a drag and drop icon base language. It has built in functions and uses data wires to connect and transfer information. One of the major problems that I ran into while creating the code was that Labview was unable to complete the initialization sequence. If there are any errors please scroll down.
Labview consists of two platforms called the “Block Diagram” and “Control Panel”. The Block Diagram consist of the code which the program is runned by. The control panel is how the car will be controlled.
When the program is running, DO NOT press the stop button on the top left hand corner otherwise the program will stop working. If this does happen then turn the power off and back on. Disconnect the bluetooth and reconnect the bluetooth again. After that verify which serial port and connect to the right serial port.
Step 3: Wiring
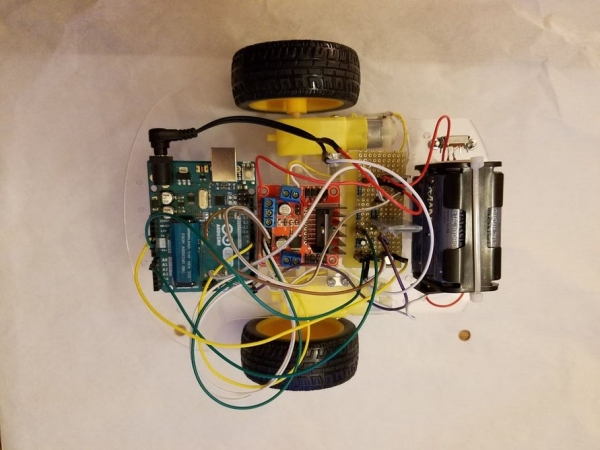
This is the wiring for the car. The underside of the power regulator is soldered together including the bluetooth. The schematic shows how the wire connections work. For the motors, if the wiring doesn’t work at first just switch the wires for each of the motors. The wire connecting to the battery and the Arduino’s power port is soldered together. You can see this in the pictures above.
Source: Arduino Bluetooth Car Controlled by Labview
- What microcontroller does the project use?
The project uses an Arduino Uno board. - How is wireless control achieved?
Wireless control is achieved using an HC-06 Bluetooth module connected to the Arduino. - What software is used to control the car?
LabVIEW with the LabVIEW MakerHub add-on is used to control the car. - What motor driver is used for the motors?
The L298n motor controller is used to drive the motors. - How is the 5V supply generated?
A 5V regulator LM7805 is used to regulate power from six 1.5V AA batteries. - What should I do if the motors spin the wrong direction?
If motor wiring is incorrect, swap the wires for each motor until the direction is correct. - What happens if LabVIEW fails to initialize?
The article notes LabVIEW may fail the initialization sequence; check for errors as detailed in the project notes. - What should I avoid while the LabVIEW program is running?
Do not press the stop button on the top left while running, as it will stop the program and cause issues. - How do I recover if the program stops working?
Turn the power off and back on, disconnect and reconnect Bluetooth, and verify and reconnect to the correct serial port. - How are components mounted to the platform?
Components are mounted using double-sided tape and a few screws.