Summary of Arduino Basics #5 – Add SD storage to Arduino
The article describes a project to enhance the Arduino Uno's limited storage by integrating a low-cost microSD card reader. This setup allows users to log environmental data, such as temperature and humidity, using a DHT22 sensor. The system writes data to a FAT32-formatted CSV file every five seconds, enabling easy transfer to a PC for analysis. It is presented as an ideal, solder-free science project for students to monitor weather conditions over time with minimal power consumption.
Parts used in the WeatherStore Project:
- Arduino Uno board
- MicroSD card reader module
- MicroSD card (up to 32GB)
- DHT22 temperature/humidity sensor
- SdFat library
- dht library
- Arduino protoshield or breadboard
Arduino Uno’s microcontroller board is great, but the one thing it’s not overly generous with is storage.
Having 32KB of program flash storage, 2KB of RAM and 1KB of programmable EEPROM space at your disposal is fine for many Arduino projects, but it’s not enough when you need to record data.
But with a $2 microSD card reader module from eBay, you can quickly add up to 32GB of space. What’s more, FAT32 software libraries for Arduino mean you can also load the card back into your PC.
MicroSD card reader
Not much larger than a full-size SD card, these new low-cost MicroSD card readers take care of translating the 5V digital signals from the Arduino into 3.3V signals microSD cards requir
What’s key is that the reader uses the Arduino’s Serial Peripheral Interface (SPI) port. SPI is a low-speed low-power serial interface common to microcontroller chips like the ATMEGA328P found on most Arduino Uno boards — but fast enough to handle data transfer at reasonable speed.
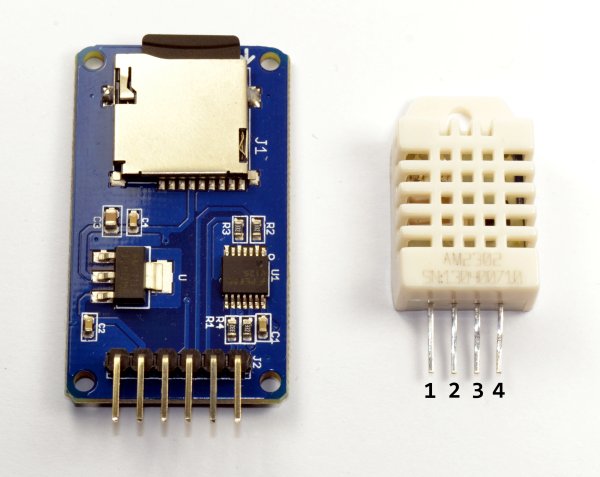 The reader we’re using has only six pins, four for data and two for power, so it won’t chew up too many I/O pins from your projects. What’s great about it is that it can read and write data, plus the software libraries are easy to use.
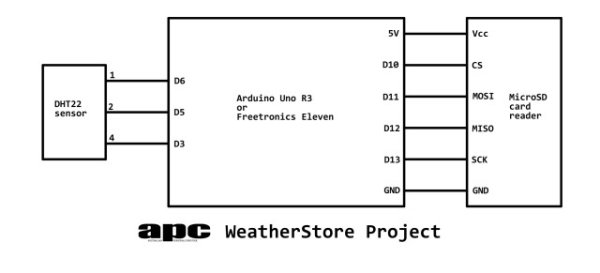
Connections, always connections
But because the card reader requires the Arduino’s SPI, it does mean you must use certain I/O pins that are connected to the SPI bus to make it work.
Apart from the Vcc and GND pins which must go to the Arduino’s 5V and GND pins respectively, you need to connect D10 to the CS pin on the microSD module, D11 to MOSI, D12 to the MISO pin and D13 to SCK. Once that’s done, you’re ready to hit the Arduino IDE and begin coding.
Simple weather monitor
If you live near Australia’s eastern seaboard, you’ll remember the recent spate of stormy conditions, which saw temperature and humidity go up and down like a yo-yo every day for a couple of weeks.
You can make a very simple weather logger using a temperature/humidity sensor and our microSD module. We’ve discussed the low-cost DHT11 sensor previously, but this time, we’ve upped it to the DHT22, available on eBay for around $5 including shipping.
It’s also known as the AM2302 and while it has the same four pins as the cheaper DHT11, it has a greater accuracy and can measure temperatures from -40 to +80-degrees C and humidity from 0 to 100%.
Again, we’re incorporating the Arduino protoshield, but you can use any standard breadboard. The circuit diagram and overlay diagram here will give you all the details you need to building the project yourself.
Reading, writing, arithmetic
To get both of these devices talking with the Arduino Uno, you need two libraries — SdFat and dht. We’ve included them in the project zip file this month here, so just copy the contents of the /libraries subfolder into the same in your Arduino IDE folder, then restart the IDE and load in the .ino source file.
We’ve purposely kept our ‘WeatherStore’ project simple, so that you can get a handle on how the code works. Basically, there are two tasks running — reading the DHT22 sensor for temperature and humidity; and writing that data to a microSD card every five seconds. The ‘five seconds’ is arbitrary, you can change it in the code.
There are two main methods or procedures in our code — setup() and loop(). Like all Arduino code, the setup() runs once right at the start, then loop() takes over and runs until the power is removed.
In our code, the setup() routine is used to initialise the sensor and the microSD reader — the code leaves basic information on the serial monitor (magnifying glass icon top-right of the Arduino IDE).
The loop() method takes over and captures readings every five seconds by default — it begins by opening up the WEATHER.CSV file, locating the end of the file, capturing the sensor readings, appends those readings as pairs using a comma delimiter to the end of the file and closes it again.
This constant opening and closing might seem a bit dopey but there’s a reason — by closing the file when it’s not in use, it should survive having the power randomly removed (whether intentionally or accidentally). If we left the file open, a loss of power may corrupt it.
The benefits of using a comma-separated variable (CSV) format are that it’s easy to write on an Arduino-powered project, but also easily opened as an Excel spreadsheet.
One final thing, look at the logFile.open command in the loop() method and you’ll see the O_AT_END flag at the end — this tells the Arduino to open the WEATHER.CSV and append the new reading to the end.
It shouldn’t erase previous data, but we recommend making copies of previous data before starting the WeatherStore again.
 Science project
Another option you could add to this project is a real-time clock (RTC) module to allow you to write the current time to the file as well. Still, if you just note the time you power up the WeatherStore, you can track the readings with sufficient accuracy.
Because there’s no soldering involved, this would be a great project for a high-school science or technology class, allowing you to carry out experiments and log changes in environment temperature and humidity over time.
The project consumes around 40mA of current, which would still give around two days’ continuous monitoring from a set of 2000mAh NiMH batteries or about 12 hours from a 9V Energizer battery.
That gives scope for plenty of questions to answer:
- Are temperature and humidity related? If so, how?
- What general temperature and humidity conditions create severe fire weather?
- In cold climates, does humidity change when temperature reaches 0-degreesC?
Obviously, this is just one example of how you can use microSD card storage in your projects. However, the fact you can use FAT32-formatted storage makes it easy to transfer files from an Arduino to your other devices.
For more detail: Arduino Basics #5 – Add SD storage to Arduino
- How much storage can be added to an Arduino Uno?
You can add up to 32GB of space using a low-cost MicroSD card reader module. - Which pins on the Arduino Uno connect to the MicroSD reader?
You must connect D10 to CS, D11 to MOSI, D12 to MISO, and D13 to SCK. - What are the benefits of using a comma-separated variable format?
CSV format is easy to write on an Arduino-powered project and easily opened as an Excel spreadsheet. - Why does the code close the file after every write operation?
Closing the file prevents corruption if power is randomly removed while the file is open. - Can you change the frequency of data logging in the code?
Yes, the default five-second interval is arbitrary and can be changed in the code. - What is the estimated battery life for this project?
The project consumes around 40mA, providing about two days from 2000mAh NiMH batteries or 12 hours from a 9V battery. - Is soldering required to build this project?
No, there is no soldering involved, making it suitable for high-school science classes. - What libraries are needed for this project?
You need the SdFat library for the SD card and the dht library for the sensor.