Summary of Arduino Basic Wifi Project using ESP8266 wifi module
ESP8266 tutorial shows how to use a Seeeduino (or Arduino) to control an ESP8266 Wi-Fi module to request a static web page via TCP. It covers connections, Arduino code using SoftwareSerial (with baud-rate limitations), AT commands to reset, join Wi-Fi, start TCP, send an HTTP GET, and monitor serial output. Notes warn about software serial max baud and recommend boards with multiple hardware serial ports for reliable communication.
Parts used in the Arduino Basic Wifi Project using ESP8266 wifi module:
- Seeeduino V3 or Arduino Uno
- ESP8266 Serial WiFi module
- UartSBee v4 or other USB to TTL converter
Overview
In this tutorial, we’ll use a seeeduino to control the ESP8266 WiFi module to request a static page from the internet. This is a basic use of TCP socket, for other usage, please refer to the AT command guide of the module.
Material list
- Seeeduino V3 / Arduino Uno
- ESP8266 Serial WiFi module
- UartSBee v4 / other USB to TTL converter
Note: We used a software serial to print some debugging information as there’s only one hardware serial on seeeduino board. But the limitation of software serial is that it can’t communicate in a higher baud rate than 19200. So part of the output from ESP module will be dropped because the baud rate 57600 of ESP module is higher than that of the software serial. If you have a board with more than one hardware serial (e.g. Arduino Mega 2560), the case will be easier.
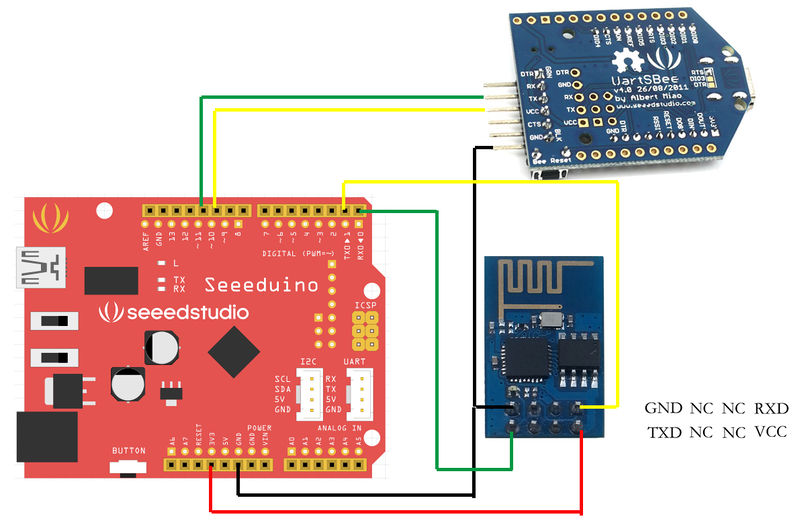
Step 1 – Connection
Step 2 – Programming
- Open Arduino IDE and create a new sketch;
- Parse the following code into the sketch editor (need modifying the SSID and PASS macros into your own situation);
#define SSID “xxxxxxxx”
#define PASS “xxxxxxxx”
#define DST_IP “220.181.111.85” //baidu.com
SoftwareSerial dbgSerial(10, 11); // RX, TX
void setup()
{
// Open serial communications and wait for port to open:
Serial.begin(57600);
Serial.setTimeout(5000);
dbgSerial.begin(9600); //can’t be faster than 19200 for softserial
dbgSerial.println(“ESP8266 Demo”);
//test if the module is ready
Serial.println(“AT+RST”);
delay(1000);
if(Serial.find(“ready”))
{
dbgSerial.println(“Module is ready”);
}
else
{
dbgSerial.println(“Module have no response.”);
while(1);
}
delay(1000);
//connect to the wifi
boolean connected=false;
for(int i=0;i<5;i++) { if(connectWiFi()) { connected = true; break; } } if (!connected){while(1);} delay(5000); //print the ip addr /*Serial.println(“AT+CIFSR”); dbgSerial.println(“ip address:”); while (Serial.available()) dbgSerial.write(Serial.read());*/ //set the single connection mode Serial.println(“AT+CIPMUX=0”); } void loop() { String cmd = “AT+CIPSTART=\”TCP\”,\””; cmd += DST_IP; cmd += “\”,80″; Serial.println(cmd); dbgSerial.println(cmd); if(Serial.find(“Error”)) return; cmd = “GET / HTTP/1.0\r\n\r\n”; Serial.print(“AT+CIPSEND=”); Serial.println(cmd.length()); if(Serial.find(“>”))
{
dbgSerial.print(“>”);
}else
{
Serial.println(“AT+CIPCLOSE”);
dbgSerial.println(“connect timeout”);
delay(1000);
return;
}
Serial.print(cmd);
delay(2000);
//Serial.find(“+IPD”);
while (Serial.available())
{
char c = Serial.read();
dbgSerial.write(c);
if(c==’\r’) dbgSerial.print(‘\n’);
}
dbgSerial.println(“====”);
delay(1000);
}
boolean connectWiFi()
{
Serial.println(“AT+CWMODE=1″);
String cmd=”AT+CWJAP=\””;
cmd+=SSID;
cmd+=”\”,\””;
cmd+=PASS;
cmd+=”\””;
dbgSerial.println(cmd);
Serial.println(cmd);
delay(2000);
if(Serial.find(“OK”))
{
dbgSerial.println(“OK, Connected to WiFi.”);
return true;
}else
{
dbgSerial.println(“Can not connect to the WiFi.”);
return false;
}
}
Step 3 – Monitor
Open Serial Monitor and press the reset button of board, you’ll see the output.
At last, Happy Hacking! ![]()
Resources
Here’s the main wiki item for it:
http://www.seeedstudio.com/wiki/WiFi_Serial_Transceiver_Module
We’d like to thank Rudy who translate the entire datasheet, we recommend all developers take a look at this before you tinkering.
With thanks to Arduino Basic Wifi Project using ESP8266 wifi module
- What is the purpose of this tutorial?
To use a Seeeduino to control an ESP8266 module to request a static web page via TCP using AT commands. - Which boards are suggested for this project?
Seeeduino V3 or Arduino Uno are suggested; a board with multiple hardware serials like Arduino Mega 2560 is recommended for easier use. - What additional hardware is needed besides the ESP8266 and Seeeduino?
A UartSBee v4 or other USB to TTL converter is listed in the materials. - Why is SoftwareSerial used in the example code?
SoftwareSerial is used to print debugging information because Seeeduino has only one hardware serial port. - What limitation does SoftwareSerial have according to the article?
SoftwareSerial cannot communicate faster than 19200 baud, so some ESP8266 output at 57600 baud may be dropped. - How does the sketch connect the ESP8266 to Wi Fi?
By sending AT+CWMODE=1 and AT+CWJAP with SSID and PASS to the ESP8266 and checking for OK. - How does the sketch request a web page from a server?
It sends AT+CIPSTART with TCP and the destination IP, then AT+CIPSEND with the GET request length, and transmits the HTTP GET string. - What should you do to monitor the module output?
Open the Arduino Serial Monitor and reset the board to view the debug and ESP8266 responses.