
Summary of AmazonDRS NFC Replenisher
This project, Replenisher, uses the AmazonDRS Arduino library and NFC tags to trigger Amazon Dash Replenishment purchases by scanning tags containing product ASINs. It combines an Arduino (WiFi-enabled like MKR1000 or Due/Zero), an NFC PN532 shield (SPI mode), and optionally a custom shield integrating ATWINC1500, EEPROM, and LCD. The workflow lets passive RFID stickers initiate orders without batteries or complex setup; guides cover account authorization, token exchange, wiring, and soldering details.
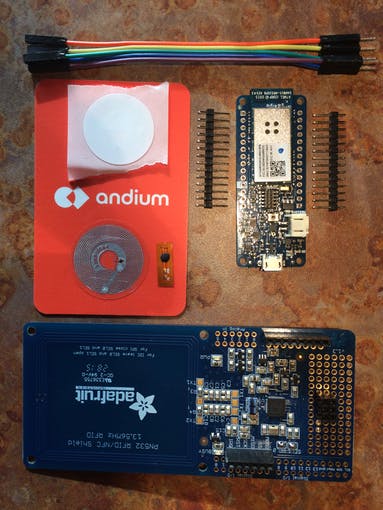
Parts used in the Replenisher:
- Arduino MKR1000 (or any WiFi 101 enabled Arduino; compatible: Due, Zero)
- Adafruit PN532 NFC shield with built-in antenna
- ATWINC1500 WiFi module (for planned custom shield)
- EEPROM (on custom shield)
- LCD (on custom shield)
- Header pins for Arduino and PN532 shield
- Jumper cables
- Ntag203 Mifare Ultralight NFC tags (round sticker tags)
- Soldering tools and solder (for headers and SEL 0/SEL 1 bridging)
You just say what the thing does and then you add ‘-er’.” Replenisher keeps your fridge, office…stocked! Just scan! “I’m going on break!
Story
TL;DR; This project utilizes the AmazonDRS Arduino library to initiate frictionless purchases on Amazon by scanning NFC tags.
Looking for some help getting started with AmazonDRS Dash Replenishment for Arduino and still need to get your Amazon accounts setup, authorize ‘Log in with Amazon’, exchange tokens, etc? Hop on over to the Getting Started guide at the AmazonDRS GitHub repo and try out the Amazon Dash Button for Arduino project.
1/12/2017 – Coming Soon!
I’m working on creating an Arduino shield(aimed at the Due and Zero) that will incorporate the ATWINC1500 WiFi and the PN532 transceiver for NFC all in one shield sized package. Stay tuned for more updates!
2/26/2017 – The Shields Are In!
Check out the video below for a complete demo of Replenisher! I The shield combines NFC, WiFi, EEPROM, and an LCD. The open source design and libraries for interacting with the shield are all available here! Big thanks to Andium(a new IoT startup I work at) for working with me to spin off a small batch of these shields to make available to the community! You can grab one here. I created a project hub on hackster where I’ll start posting more projects and ideas that spin off from the new shield.
Motivation
The Amazon Dash Button for Arduino is cool, but once the excitement of interacting with the API wears off there really isn’t anything too mind blowing about hitting a button to place an order. So I decided to create this project to show a different way you might want to initiate frictionless Dash Replenishment around your home or office.
The idea is to use NFC tags to create a more fluid replenishment process for products that might not necessarily pair with a “smart” device. A smart fridge that orders groceries is great, but does your T.V. remote really need a WiFi connection to order new batteries? Utilizing the unique product identifiers Amazon uses called ASINs we can burn an identifier into each RFID tag. The sticker tags could be placed anywhere! Manufacturers could even print them onto their packaging or place them inside their devices. Since RFID tags are passively powered they require no batteries, no WiFi, no time consuming setup. The only device we need to connect to WiFi is the NFC scanner that we’re about to create!
Getting Started
Hardware
First lets make sure you have all of the necessary hardware for the project. I’ve used the Arduino MKR1000 but any WiFi 101 enabled Arduino should work.
In order to scan NFC tags we’re also going to need an NFC antenna and transceiver. I’ve decided to go with Adafruit’s PN532 NFC shield with a built-in antenna. The shield is designed for the typical Arduino Uno/Due/Zero/Etc shield form factor but there are breakouts on the board for SPI so we can easily wire up our MKR1000. In addition to headers that ship with the shield and the Arduino we’ll also need, jumper cables, and some NFC tags. Specifically Ntag203 Mifare Ultra-light tags(I chose the round stickers, you’ll see why in a minute!) This specific flavor or RFID tags are compatible with Adafruit’s shield as well as most Android phones and tablets I’ve tried.
If you haven’t already, solder the two rows of header pins to your MKR1000 and solder the provided shield headers to your PN532 shield. We’ll be using SPI so you only need to solder the NFC shield headers to the strip labeled for power (IOr, RST, 3v, 5v, GND…) and the SPI header(MOSI, SS, MISO…etc). You’ll also want to make sure you bridge ‘SEL 1’ and ‘SEL 0’ with a blob of solder to configure the shield for SPI. If you’re a bit lost on setting up the shield check out Adafruit’s getting started guide for the PN532 shield.
Let’s wire up the shield!
Outlined in this Fritzing diagram are all the connections you’ll need to make between the shield and the Arduino. Take note below of SEL 1 and SEl 0. Those are the copper contacts that need to be bridged together, each witch a blob of solder, so we can use SPI to communicate with the shield instead of I2C.
Read more: AmazonDRS NFC Replenisher
- What does Replenisher do?
Replenisher uses NFC tags and the AmazonDRS Arduino library to initiate Amazon Dash Replenishment purchases by scanning tags containing product identifiers. - Which Arduino boards are supported?
The project uses the Arduino MKR1000 but any WiFi 101 enabled Arduino such as the Due or Zero should work. - Which NFC hardware is recommended?
The Adafruit PN532 NFC shield with built-in antenna is recommended and compatible with the project. - Which NFC tags should I use?
Ntag203 Mifare Ultralight tags, specifically round sticker tags, are used in the project. - Do I need to solder components?
Yes; solder header pins to the MKR1000 and the provided shield headers to the PN532, and bridge SEL 1 and SEL 0 with solder for SPI mode. - How do I connect the PN532 to the Arduino?
Use SPI connections (MOSI, MISO, SS, SCK) as outlined in the Fritzing wiring diagram and bridge SEL 1 and SEL 0 for SPI mode. - Does the project require WiFi on each tag?
No; the NFC tags are passive and require no batteries or WiFi—the NFC scanner (Arduino) provides the WiFi connection. - Where can I find setup guidance for Amazon Dash Replenishment?
The Getting Started guide at the AmazonDRS GitHub repo covers account setup, Log in with Amazon authorization, and token exchange.
