
Summary of Arduino Ping Ultrasonic Range Finder Code
The Ping))) ultrasonic range finder detects object distances between 2 cm and 3 meters by emitting ultrasound pulses and measuring echo return times. An Arduino board triggers the sensor via a short pulse and calculates distance using the `pulseIn()` function and the speed of sound. The setup connects the sensor's +V, GND, and SIG pins to the Arduino's 5V, ground, and digital pin 7 respectively.
Parts used in the Ping Ultrasonic Range Finder:
- Arduino Board
- Ping Ultrasonic Range Finder
- Hook-up wire
The Ping))) is an ultrasonic range finder from Parallax. It detects the distance of the closest object in front of the sensor (from 2 cm up to 3m). It works by sending out a burst of ultrasound and listening for the echo when it bounces off of an object.

The Arduino board sends a short pulse to trigger the detection, then listens for a pulse on the same pin using the pulseIn() function. The duration of this second pulse is equal to the time taken by the ultrasound to travel to the object and back to the sensor. Using the speed of sound, this time can be converted to distance.
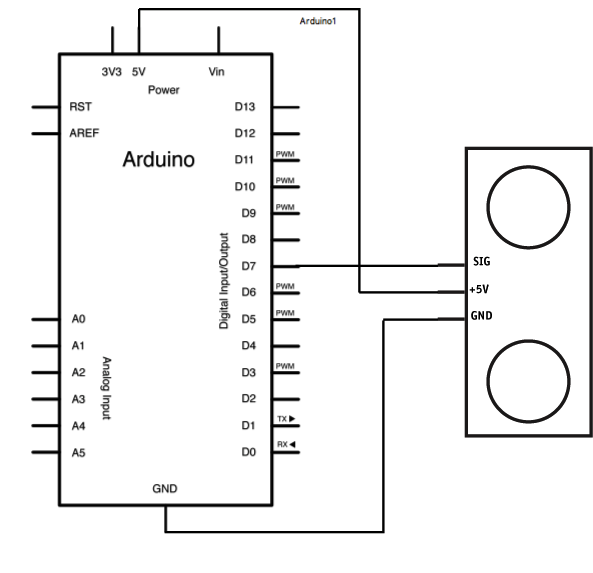
Circuit
The 5V pin of the PING))) is connected to the 5V pin on the Arduino, the GND pin is connected to the GND pin, and the SIG (signal) pin is connected to digital pin 7 on the Arduino.
image developed using Fritzing. For more circuit examples, see the Fritzing project page
Schematic:
Code
/* Ping))) Sensor

This sketch reads a PING))) ultrasonic rangefinder and returns the
distance to the closest object in range. To do this, it sends a pulse
to the sensor to initiate a reading, then listens for a pulse
to return.  The length of the returning pulse is proportional to
the distance of the object from the sensor.

The circuit:
* +V connection of the PING))) attached to +5V
* GND connection of the PING))) attached to ground
* SIG connection of the PING))) attached to digital pin 7

http://www.arduino.cc/en/Tutorial/Ping

created 3 Nov 2008
by David A. Mellis
modified 30 Aug 2011
by Tom Igoe

This example code is in the public domain.

*/
Hardware Required
- Arduino Board
- (1) Ping Ultrasonic Range Finder
- hook-up wire
For more detail: Arduino Ping Ultrasonic Range Finder Code
- What is the detection range of the Ping))) sensor?
The sensor detects objects from 2 cm up to 3 meters. - How does the Ping))) sensor determine distance?
It sends an ultrasound burst and listens for the echo to calculate time traveled. - Which Arduino function measures the pulse duration?
The code uses the pulseIn() function to listen for the returning pulse. - What happens if the Arduino sends a short pulse to the sensor?
This action triggers the sensor to initiate a distance reading. - How is the signal pin connected on the Arduino?
The SIG pin connects to digital pin 7 on the Arduino board. - Can this project be performed without hook-up wires?
No, hook-up wires are listed as required hardware to connect the components.