Summary of Capacitive Touch Sensor on Arduino
This article introduces a capacitive touch sensor board ideal for adding touch sensitivity to electronics like trackpads and consoles. It operates by detecting changes in an electrostatic field caused by conductive objects, such as fingers. The board functions via I2C communication within a 2.7V to 5.25V voltage range, compatible with both 3.3V and 5V Arduino pins. Successful integration requires pull-up resistors on SDA and SCL lines and sample code from Marcus Nowotny's blog post to simplify setup.
Parts used in the Capacitive Touch Sensor Project:
- Capacitive touch sensor board
- Arduino board
- Two LEDs
- Pull-up resistors
If you ever wanted to integrate touch sensitivity into your project, this board could just do the trick. It’s a capacitive touch sensor. These sensors are used in our everyday consumer electronics like notebook trackpads, video game consoles, touchscreens…just to name a few.
 They work on the principle of alteration of the electrostatic field. The sensor builds up an electrostatic field which will be altered if conductive objects get in contact with the field.
In this case your finger is the conductive object which triggers the change in the field. For detailed information about capacitive sensing have a look here.
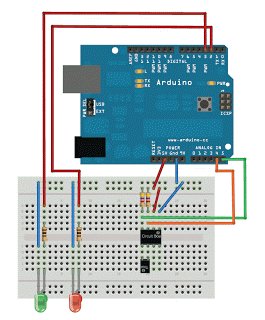
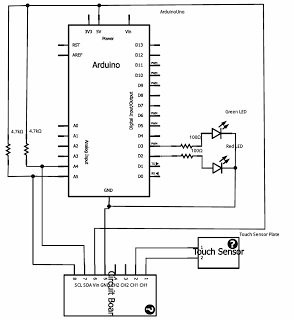
The board works in I2C mode and needs pull-up resistors for the SDA and SCL pins. The operating voltage range is from 2.7V to 5.25V, so you can use either the 3.3V or 5V socket of the Arduino.
The setup is pretty easy. I attached two LEDs to indicate if the sensor plate was touched.
Figuring out the communication with the device is a little bit tricky.
 I found a really good blog post from Marcus Nowotny who provides a sample code, so you don’t have to get a headache while trying to understand the datasheet.
If you hooked up everything correctly, you can enjoy capacitive sensing in your project.
For more detail: Capacitive Touch Sensor on Arduino
- How does the capacitive touch sensor work?
The sensor builds up an electrostatic field that alters when a conductive object like a finger touches it. - Can this board be used with a 5V socket?
Yes, the operating voltage range is 2.7V to 5.25V, allowing use with either 3.3V or 5V sockets. - What communication mode does the board use?
The board works in I2C mode. - Do I need pull-up resistors for this project?
Yes, the board needs pull-up resistors for the SDA and SCL pins. - Where can I find sample code for this device?
A blog post by Marcus Nowotny provides sample code to help understand the datasheet. - What are common applications for these sensors?
They are used in everyday consumer electronics like notebook trackpads, video game consoles, and touchscreens. - Is the setup process considered difficult?
The setup is described as pretty easy, though figuring out communication can be tricky without reference code.