This instructable will show you how to control your computer’s keyboard and mouse with an Android app via bluetooth to an Arduino
BACKGROUND
Ever wanted to control your computer’s mouse/keyboard functionality without having to actually sit in front of it? I do all the time. For instance, I often hook my laptop up to the TV in my living room to watch a show on Netflix. Well, roughly 20 minutes later, when the show is finished I have to get up, walk over to the laptop, click next episode, let it buffer for several seconds, click full screen mode, then walk back to the couch. This becomes a hassle when watching multiple episodes back-to-back… for several hours… burning through an entire season in one sitting. Okay, so maybe I’m just lazy and this doesn’t exactly apply to you but this has been bugging me for awhile and that’s what us makers do, we engineer solutions to our problems. (Regardless of how oddly specific those problems may be.)
I’m sure many of you will find other uses for this project, like a custom video game controller with buttons that send specific keystrokes from your phone… Or perhaps something more practical. Either way, here’s how you build it….
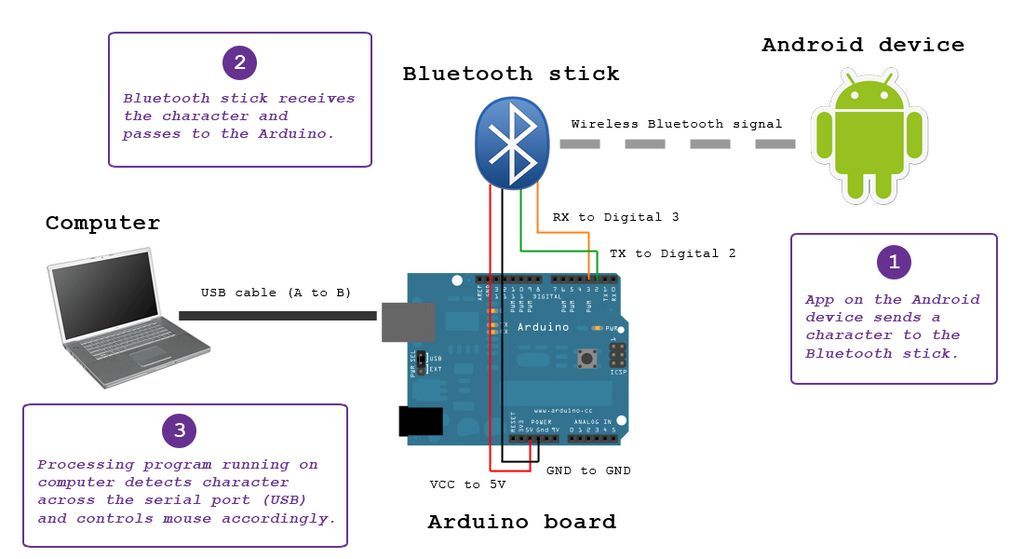
Before we start, familiarize yourself with the diagram describing the flow of communication. (I recommend clicking the “i” in the upper-left corner, then clicking the link to the original file, in order to view full size)
Step 1: Materials | Hardware and Software
HARDWARE
– 1 x Arduino board (I’m using an Arduino UNO: http://arduino.cc/en/Main/arduinoBoardUno)
– 1 x Android device (I’m using a Droid 2)
– 1 x Bluetooth stick (I’m using BlueSMiRF Gold: http://www.sparkfun.com/products/10268)
– 2 x USB cable (A to B to program Arduino; A to Micro-B to program Droid 2)
– 1 x computer
SOFTWARE
– Arduino IDE (to program your Arduino board: http://arduino.cc/en/Main/Software)
– Eclipse IDE (to write the Android app: http://www.eclipse.org/downloads/packages/eclipse-ide-java-developers/heliossr2)
– Android SDK/ADT Plug-in for Eclipse (http://developer.android.com/sdk/index.html)
– Processing IDE (to control your computer’s keyboard/mouse at runtime: http://processing.org/download/)
– Amarino and MeetAndroid Arduino library (to assist bluetooth communcation from Android to Arduino: http://www.amarino-toolkit.net/index.php/docs.html)
Step 2: Installing The Software
Installing Arduino: http://arduino.cc/en/Guide/HomePage
Installing Processing: http://processing.org/learning/gettingstarted/
Installing Android SDK: http://developer.android.com/sdk/installing.html
Installing ADT Plugin for Eclipse: http://developer.android.com/sdk/eclipse-adt.html#installing
Never wrote a simple Android app before? I recommend becoming familiar with the environment first by following this following instructable: http://www.instructables.com/id/How-to-Write-a-Hello-World-app-for-Android/
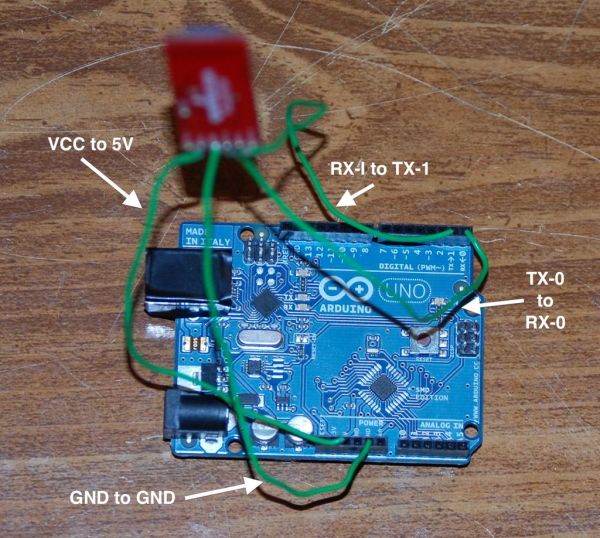
Step 3: Wiring and Pairing the BlueSMiRF
Hook up the BlueSMiRF Gold to your Arduino, directly or to a breadboard.
(From BlueSMIRF to Arduino…)
– Wire VCC to 5V.
– Wire GND to GND.
– Wire TX-0 to Digital pin 1 (RX).
– Wire RX-1 to Digital pin 2 (TX).
Once wired, hook up your Arduino to an external power source so we can set the baud rate. By external power source, I mean other than your computer. I was fortunate to have a USB wall charger adapter that came with my phone. Or there’s a power jack mounted on the board. Or hook up a 9V battery: with a battery clip, wire positive to “Vin” on the Arduino and negative to ground (GND) on the Arduino.
Once powered externally, you should see a blinking red LED on your BlueSMiRF. (This means it is powered but not yet connected to another bluetooth device.)
Pair your BlueSMiRF device to your computer
On Mac OS X…
1. Open Applications > System Preferences. Click on Bluetooth under “Internet and Wireless”.
2. Make sure “On” and “Discoverable” are checked so that BlueSMiRF can find your computer.
3. Click the + sign to setup a new device. This will open Bluetooth Setup Assistant.
4. Bluetooth Setup Assistant will search for bluetooth devices nearby. You should see “FireFly” in the list. This is your BlueSMiRF. Select it and click Continue.
5. On the next screen click Passcode Options. It will pop a dialog box. Choose “Use a specific passcode” and enter 1234. Click OK.
Click Continue. You device should now be paired. Click quit.
For more detail: Control Keyboard & Mouse Android app via Arduino