Summary of Augmented Water using arduino
This article details the "Augmented Water" project, a water-saving device built by @tamberg during a hackathon. It uses an Arduino, flow sensor, and Neopixel LEDs to turn red after one liter of water usage. The guide covers sourcing materials, soldering components, testing individual parts with specific libraries, and integrating hardware for final operation.
Parts used in the Augmented Water:
- Arduino
- 7 Neopixels
- Flow sensor
- LiPo battery
- LiPo charger
- Jumper wires M-M
- Tube fitting the sensor
- Plastic test tube
- Zip ties
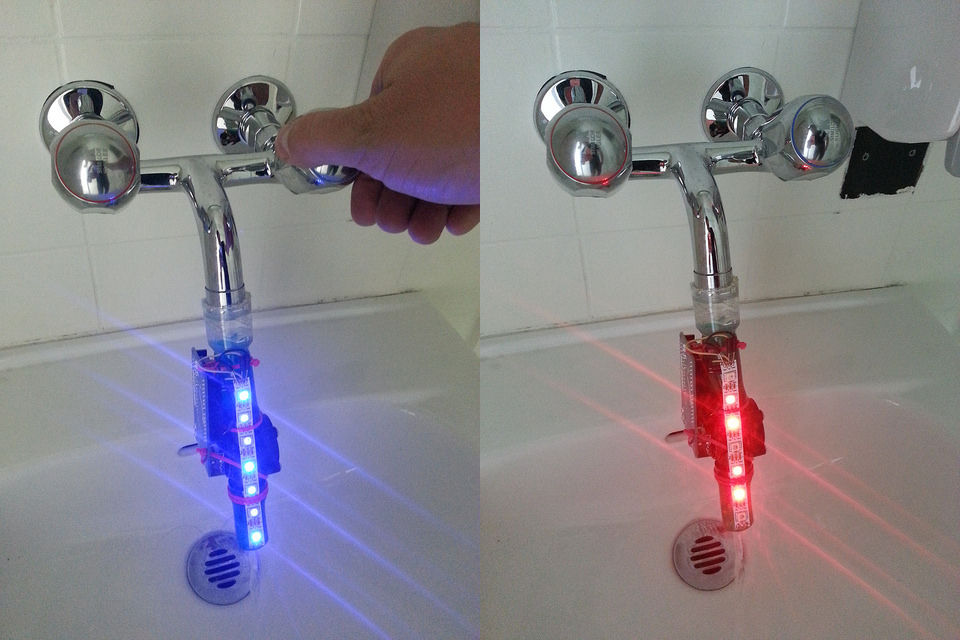
The Augmented Water device helps you save water by turning red after one Liter. The device, built by @tamberg during a water hackathon, is made from an Arduino, a flow sensor and coloured LED pixels.
Video
https://www.flickr.com/photos/tamberg/14346321456/ (thanks kiilo)
In case you want to build your own, read on…
Material
- Arduino, e.g. http://www.adafruit.com/products/50
- Ca. 7 Neopixels, http://www.adafruit.com/category/168
- Flow sensor, http://www.adafruit.com/products/828
- LiPo battery, e.g. http://www.adafruit.com/products/1578
- LiPo charger, e.g. http://www.adafruit.com/products/1304
- Jumper wires M-M, e.g. http://www.adafruit.com/products/153
- Tube fitting the sensor
- Plastic test tube
- Some zip ties
Tools
- Soldering iron
- Hot-glue gun
- Saw
Step 1: Preparing and testing the Neopixel LEDs
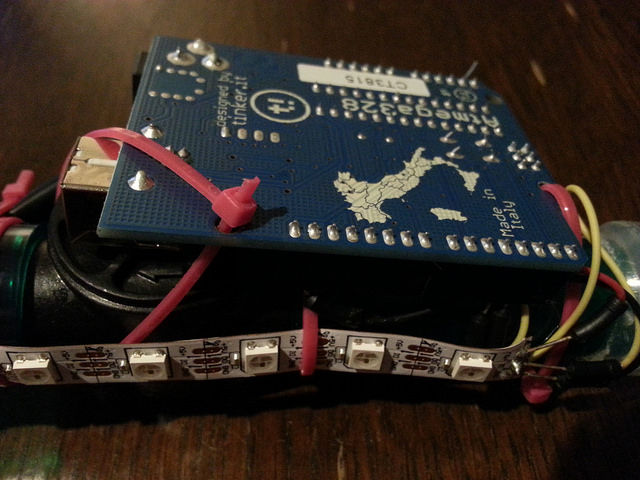
If you use Neopixels by the meter, cut off a piece of ~7 pixels and solder jumper wires as follows:
- Black wire to GND
- Yellow wire to DI
- Red wire to +5V
Take care to solder them to the right end of the strip. Compare the little arrows printed on the strip with the picture.
Read Adafruit’s Neopixel best practices before connecting the pixels.
Download and install Adafruit’s Neopixel Arduino library from
https://github.com/adafruit/Adafruit_NeoPixel
Open File > Examples > Adafruit_NeopPixel > strandtest
Change the number of pixels to fit your short strip.
Upload the code to make sure the pixels work.
(This code was the starting point of the hack.)
Step 2: Testing the flow sensor
(Image by Adafruit, CC BY-NC-SA)
Download the flow meter example code from
https://github.com/adafruit/Adafruit-Flow-Meter
Connect the flow meter as indicated in the source code.
Rename .pde to .ino, open it and upload the code to the Arduino.
Testing works fine without water by blowing some air through the sensor.
Step 3: Connecting and testing the hardware
Download the Augmented Water source code from https://bitbucket.org/tamberg/waterhack/raw/tip/20…
(Re-)connect the hardware as indicated in the source code:
- Red flow sensor wire to +5V
- Red Neopixel wire to +3.3V
- Black wires to common ground
- Yellow flow sensor wire to pin #3
- Yellow Neopixel wire to pin #2
Upload the code to the Arduino and test it.
Your lung volume is hopefully larger than 1 Liter.
Use the serial monitor of the Arduino IDE to see numbers.
(Note that the code is a simple mash-up of the previous examples.)
For more detail: Augmented Water using arduino
- How do I connect the black wire on the Neopixel strip?
The black wire connects to GND. - Can I test the flow sensor without water?
Yes, testing works fine by blowing air through the sensor. - What is the best way to install the Neopixel library?
Download and install Adafruit's Neopixel Arduino library from GitHub. - Does the device indicate when one liter is reached?
Yes, the device turns red after one Liter. - Which pin connects the yellow Neopixel wire?
The yellow Neopixel wire connects to pin #2. - What tools are required for this project?
You need a soldering iron, hot-glue gun, and saw. - How do you verify the Neopixel code before full integration?
Upload the strandtest example code and change the pixel count to fit your strip. - Where can I find the source code for the Augmented Water project?
The source code is available at bitbucket.org/tamberg/waterhack.