Summary of Wireless Weather Monitoring: Arduino NRF-Based System
Summary: This project builds an Arduino-based weather monitoring system that measures ambient temperature and humidity using a DHT11 sensor. Data is sent wirelessly between a transmitter and receiver via NRF24L01 modules; the transmitter reads the DHT11 and forwards values, while the receiver Arduino displays the received readings on a 16x2 LCD. The design uses SPI for NRF communication and includes example Arduino sketches for both transmitter and receiver.
Parts used in the Arduino weather monitoring system:
- Arduino Uno
- DHT11 Sensor
- NRF Module (NRF24L01)
- 16x2 LCD Display
- Jumper Wires
Hello tech fans! We’re thrilled to present our newest project created to help in a range of environments such as households, workplaces, and beyond. Introducing our weather monitoring system that utilizes Arduino as the main controller to carry out commands. This system accurately monitors ambient temperature and humidity levels.

Our weather monitoring station uses an NRF transceiver to send and receive data efficiently. This weather station, which is based on Arduino, is especially handy for keeping track of temperature in remote areas that are hard to reach or difficult to stay in.
For example, consider tracking temperature and humidity levels in a mountainous area; this system can be highly advantageous in these situations.
Introduction
The Arduino weather monitoring system is a simple project using Arduino that allows for tracking temperature and humidity using just one sensor. The DHT11 sensor, selected for its ability to measure both temperature and humidity, is employed in this configuration. Moreover, the Arduino Uno assists in processing and exhibiting the collected data on the screen.
The DHT11 sensor contains elements specifically designed for detecting temperature and humidity. The project includes two separate systems: one for transmitting and one for receiving, both featuring NRF modules for communication.
The NRF module was chosen for communication in this setup because of its strong data transmission capabilities. The DHT11 sensor in the transmitter section sends its output to the transmitter microcontroller, which then relays the data to the receiver using the NRF transmitter. Afterwards, the NRF receiver gets the same information and passes it on to the Arduino microcontroller located at the receiver’s side. Ultimately, the data is shown on the display by the Arduino in the weather station.
Construction of weather monitoring system
Components required
Utilize the following components for this project:
– Arduino Uno
– DHT11 Sensor
– NRF Module
– 16×2 LCD Display
– Jumper Wires
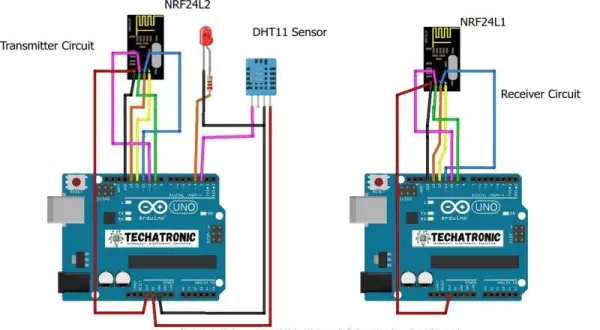
To put together the Transmitter configuration, connect the DHT11 sensor and NRF module to the Arduino following the circuit diagram provided. Afterwards, transfer the code to the identical Arduino device.
Connect the LCD and NRF module to the Arduino based on the given weather monitoring circuit diagram for the Receiver setup. Next, upload the code to the specific Arduino for the receiver configuration.
Weather monitoring station circuit diagram
Weather monitoring station Arduino Code
Transmitter Code
#include “DHT.h”
#include
#include “RF24.h”
#include
#define DHTPIN 2
#define DHTTYPE DHT11
RF24 radio (9, 10); // CE, CSN
const byte address[6] = “00001”;
//const int led_pin = 13;
struct package
{
float temperature ;
float humidity ;
};
typedef struct package Package;
Package data;
DHT dht(DHTPIN, DHTTYPE);
void setup()
{
Serial.begin(9600);
// pinMode(led_pin, OUTPUT);
dht.begin();
radio.begin(); //Starting the Wireless communication
radio.openWritingPipe(address); //Setting the address where we will send the data
radio.setPALevel(RF24_PA_MIN); //You can set it as minimum or maximum depending on the distance between the transmitter and receiver.
radio.stopListening();
}
void loop()
{
// digitalWrite(led_pin, HIGH); // Flash a light to show transmitting
readSensor();
Serial.print(“HUmidity “);
Serial.print(data.humidity);
Serial.print(” Temperature “);
Serial.println(data.temperature);
radio.write(&data, sizeof(data));
// digitalWrite(led_pin, LOW);
delay(1000);
}
void readSensor()
{
data.humidity = dht.readHumidity();
data.temperature = dht.readTemperature();
}
Receiver code
#include
#include
#include
RF24 radio(9, 10); // CE, CSN
const byte address[6] = “00001”;
struct package
{
float temperature ;
float humidity ;
};
typedef struct package Package;
Package data;
void setup() {
Serial.begin(9600);
radio.begin();
radio.openReadingPipe(0, address);
radio.setPALevel(RF24_PA_MIN);
radio.startListening();
}
void loop() {
if (radio.available()) {
// char text[32] = “”;
radio.read(&data, sizeof(data));
Serial.print(“Humidity “);
Serial.print(data.humidity);
Serial.print(” Temperature “);
Serial.println(data.temperature);
}
}
Weather monitoring station working
The DHT11 sensor of the weather monitoring system is created for measuring temperature and humidity with its integrated sensors. This sensor system includes two sensors, with one specifically for measuring temperature and the other exclusively for measuring humidity. The DHT11 features an IC that multiplexes data to link the sensor and Arduino for transmitting information.
After getting the data, the Arduino performs certain tasks using the given code and the sensor library. In order to maintain precise operation, the Arduino adjusts the sensor with the code that has been uploaded. This procedure is essential for developing an IoT weather station.
After distinguishing between the two separate values, the Arduino sends this data to the NRF module in the transmitter using the SPI protocol. The usage of the MOSI, MISO, SCK, and RST pins from both the Arduino and the NRF module is part of the SPI protocol. Constructing an Arduino weather station requires careful consideration of these fine points, but adhering to the given instructions enables its assembly.
In addition, the NRF module on the sender’s side will create a link with the NRF module on the receiver’s side by utilizing predetermined addresses in both NRF modules to ensure smooth communication.
- What does this weather monitoring system measure?
It measures ambient temperature and humidity using a DHT11 sensor. - What is the main controller used in the project?
The main controller used is the Arduino Uno. - How is data transmitted between transmitter and receiver?
Data is transmitted wirelessly using NRF modules (NRF24L01) with predefined addresses. - Which sensor is used to detect temperature and humidity?
The DHT11 sensor is used to detect both temperature and humidity. - How are the NRF modules connected to the Arduino for communication?
The NRF modules use the SPI protocol with MOSI, MISO, SCK, and RST pins connected between Arduino and NRF. - What displays the received data on the receiver side?
A 16x2 LCD display is connected to the receiver Arduino to show the data. - Is code provided for both transmitter and receiver?
Yes, Arduino sketches for both transmitter and receiver are provided in the article. - How often does the transmitter send data?
The transmitter code sends data once every second using delay(1000).