Summary of Using Processing to Send Values using the Serial Port to Arduino
This article demonstrates how to control LED brightness levels (0-255) from a Processing application by sending data via the serial port to an Arduino board. The system uses Pulse Width Modulation (PWM) to adjust individual Red, Green, and Blue LEDs as well as a combined RGB LED. Two user interfaces are described: a slider-based mixing desk and a color-triangle drag interface. The guide details the necessary circuit connections and explains the specific code adjustments required for the RGB LED logic.
Parts used in the Processing and Arduino LED Control Project:
- Arduino Deumilanova w/ ATMEGA328
- Breadboard or Prototyping board
- Jumper or Connector wires
- 3x LEDs (Red, Green, Blue)
- 1x RGB LED
- 6x 270 Ohm resistors
In this write-up, I’ll show how to create a value in Processing and then send this value over the serial port to the Arduino. In the example I’m setting values of LEDs making them brighter or dimmed but this example can be extended to control other items – which I plan to do later!
Basically I’m going to set a value between 0 and 255 and then send this value to Arduino which will then use the analogWrite() function to alter the brightness of the LED using PWM (Pulse Width Modulation). I’ve already done a bit of work with LEDs and PWM.

For the communication between Processing and Arduino I’ll be using the serial port – in other work previously I’ve sent information from Arduino to Processing so this is how to do it the other way around. There are a couple of things to note though. Firstly when using Arduino to read a string from the serial port we have to look at it at a byte level, in my example it’s just easier to ignore using strings and send 1 character at a time and then store it in an array. Secondly when debugging your code you can’t read the serial values in Arduinos serial monitor as you’ll already be using the port in Processing so sometimes this can be trial and error although you can at least preview the values your sending in Processing.
Of course you can also extend this code to write values from Arduino back to Processing. There are already plenty of examples online of how to do serial port communication between Arduino and Processing and vice versa and setting an LED to on or off but I’ve done a few extra things to show some basic work with interaction and user interfaces to set the LEDs.
We’re going to set 3 LED’s – Red, Green and Blue and rather than just on or off we’ll be setting the PWM/ levels of brightness. Also the sketches deal with setting an RGB LED (RGBL) with the combined values.
I’ve written 2 visualisations to achive the above.
The first is a set of sliders like a mixing desk – when sliding a slider it will set the value of the LED it’s assigned to and the combined value will set the RGB LED. The second is a triangle shape that you can move around to create the colours, so where ever you drag each point of the triangle it will set the brightness of the LED accordingly.
The Arduino circuit and sketch is very simple and remains the same no matter which visualisation is used. So starting with the circuit…
Arduino Serial Parts
Arduino Deumilanova w/ ATMEGA328
Breadboard/ Prototyping board
Jumper/ Connector wires
3x LED (Red, Green, Blue)
1x RGB LED
6x 270 Ohm resistors
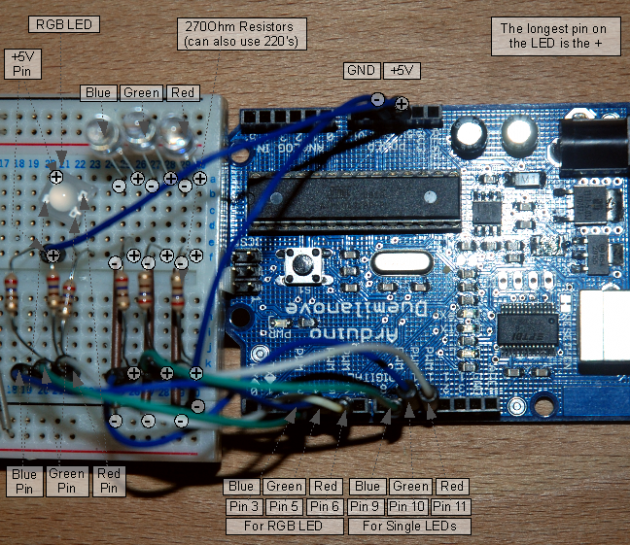
Arduino Serial Circuit
Very simple: 3 LEDs each with a common ground back to the Arduino board, the positive pins (the longer pin) has a 270 Ohm resistor between it and a connection to a digital pin. The RGB LED has 4 pins – 1 is for the power supply – some RGB LEDs instead may connect to GND so check before doing so. The other 3 pins each connect to a digital pin on the Arduino board.
Arduino Serial Code – Receiving Values from Processing
The Arduino code is very simple as well – we set the the digital pins all as outputs, we setup the serial port we wish to use and then we read the values from the serial port and store them in an array, each item in the array corresponds to a value for an LED. There is a small catch however – it seems my RGB LED sees the value 255 as off and 0 as on so I have had to write some code to take this into account.
Read more: Using Processing to Send Values using the Serial Port to Arduino
- How does the system adjust LED brightness?
The system sends values between 0 and 255 from Processing to Arduino, which uses the analogWrite function with PWM to alter brightness. - Can I use this method to control items other than LEDs?
Yes, while the example focuses on LEDs, the article states this method can be extended to control other items. - Why should I avoid using the Arduino Serial Monitor during debugging?
You cannot read serial values in the monitor because the port is already being used by the Processing application. - What are the two visualizations provided for setting LED values?
The first is a set of sliders like a mixing desk, and the second is a triangle shape where dragging points sets brightness. - How are the physical LEDs connected to the Arduino board?
Each LED has a common ground, and the positive pin connects through a 270 Ohm resistor to a digital pin. - Does the RGB LED behave differently regarding on/off states?
Yes, in this specific setup, the RGB LED sees the value 255 as off and 0 as on. - Can values be written from Arduino back to Processing?
Yes, the article notes that you can extend the code to write values from Arduino back to Processing. - How many characters are sent at a time in the example?
The example sends one character at a time and stores it in an array instead of reading strings.