Summary of Upright Laser Harp
Summary (under 100 words): A horizontal stacked-beam laser harp uses 12 lasers and photoresistors reflected by mirrors into square beam paths with fret-like landing spots for easy blocking. Built around an Arduino Mega and Adafruit Music Maker shield (VS1053b), it plays audio directly via onboard speakers or an audio jack, supports selectable MIDI instruments via a rotary/stepper-driven wheel, and offers volume and power controls. The project includes wiring, transistor drivers, and sensors for reliable note detection and standalone sound output.
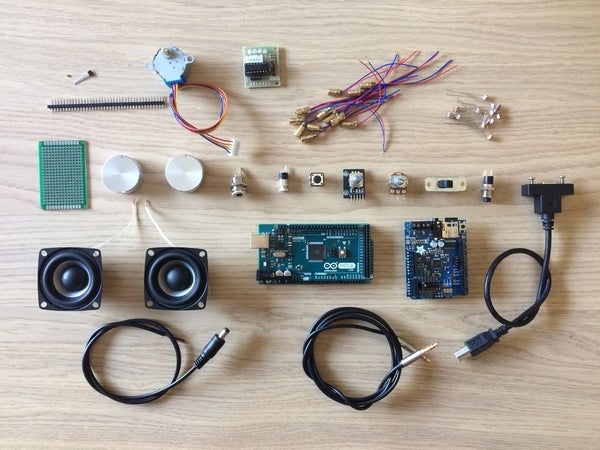
Parts used in the Upright Laser Harp:
- Arduino Mega
- Adafruit Music Maker Shield (VS1053b)
- 3mm thick plywood
- Black acrylic
- Clear acrylic
- 12 laser diode modules (650nm, 5mW)
- 12 photoresistors
- 12 1kOhm resistors
- 12 30kOhm resistors
- 12 NPN transistors
- 28BYJ-48 stepper motor + ULN2003 driver board
- Rotary encoder
- Latched pushbutton for speaker on/off
- Power switch
- 5kOhm potentiometer
- Audio jack
- Power jack and cable
- 12V power supply
- Momentary pushbutton for reset
- Hall effect sensor
- 2mm diameter magnet
- 8 ohm speakers
- 1/8 inch audio cable
- USB extension cable and panel mount
- Header pins
- Wire wrap wire
- Electrical tape
- Super glue
- Metric hardware
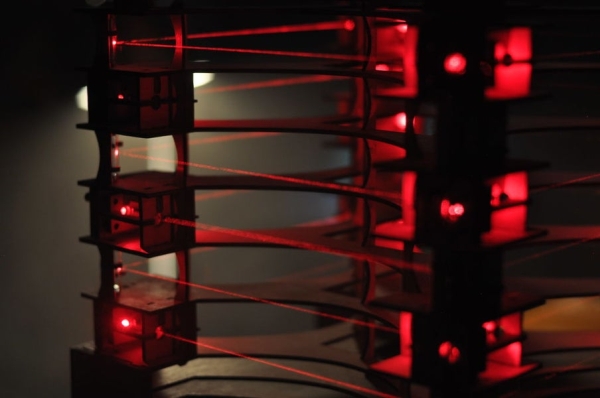
Laser harps are musical devices with laser beam “strings.” When the beam is blocked, a note is played by the instrument. Usually laser harps have the beams travel vertically in the shape of a fan or vertical lines.
In this project, I built a laser harp with stacked laser beams that propagate horizontally. The beams reflect off mirrors to form square-shaped beam paths. With this design, the lasers land on “frets,” which makes it much simpler to block notes with a single finger. Instead of a MIDI output like my previous laser harp, this device has a built-in MIDI player so the output is an audio signal. This means the device does not have to be connected to a computer or MIDI player (e.g. keyboard) to play sound. Both built-in speakers and audio output jack are available for playing music.
In this instructable, I will go over the construction and how to play the instrument.
Supplies:
See below.
Step 1: Supply List
Supplies:
- Arduino Mega
- Adafruit Music Maker Shield
- 3mm thick plywood
- Black acrylic
- Clear acrylic
- 12 laser diode modules (650nm, 5mW)
- 12 photoresistors
- 12 1kOhm resistors and 12 30kOhm resistors
- 12 npn transistors
- 28BYJ-48 ULN2003 5V Stepper Motor + ULN2003 Driver Board
- Rotary encoder
- Latch pushbutton for speaker on/off
- Power switch
- 5kOhm potentiometer
- Audio jack
- Power jack and cable
- 12V Power supply – with this supply I had to solder a 5.5 x 2.5 mm cable to match the jack (this could be better planned)
- Momentary pushbutton for reset
- Hall effect sensor
- 2mm diameter magnet
- 8 ohm speakers
- 1/8″ audio cable
- USB extension cable and panel mount
- Header pins
- Wire wrap wire
- Electrical tape
- Super glue
- Metric hardware
Tools:
- Laser cutter
- Soldering iron
- 3D printer
- Wire cutters
- Allen wrenches
- Small hammer
Step 2: System Overview
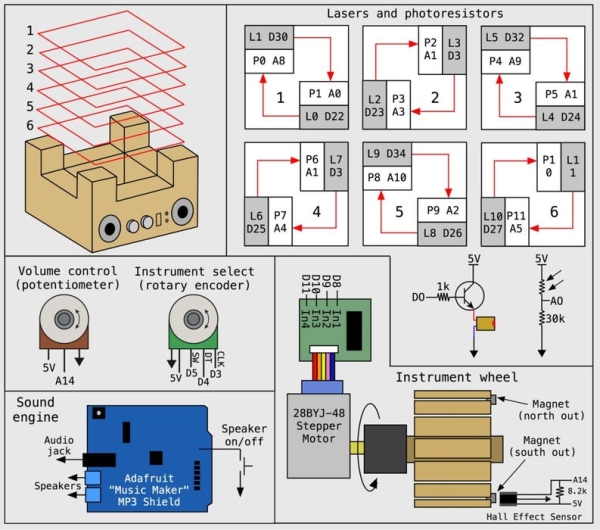
The upright laser harp consists of 12 lasers and photoresistors arranged in six layers. Two mirrors per layer reflect the laser beams to the photoresistors. In the figure, the red arrow indicates how the laser is reflected to the photoresistor and the corresponding pins the laser and photoresistor is connected to. The pins are scrambled up due to the way the wiring feeds down the tower to the Arduino Mega. The lasers can be triggered on and off using digital pins, and the voltage drop across the photoresistors is measured using analog input pins. When the laser is blocked, the resistance of the photoresistor increases and the voltage output drops.
The instrument produces audio output using the incredible Adafruit Music Maker shield. I was so happy to discover this shield, because I can now easily produce audio signals from the device without connecting a MIDI player. Check the link for all the info on how to set up this shield. The shield is run in MIDI mode with the audio output being run to audio jack and speakers. A latched pushbutton turns the speakers on and off. Here is a link to the chip (VS1053b) at the heart of the music maker shield. Page 33 has all the instruments.
The volume of the device is controlled using a potentiometer connected to the Arduino Mega. The output is read and software updates the volume of the MIDI signal. Finally, the device can also switch between different MIDI instruments. A rotary switch is read and the output is used to update the instrument. I chose to have 16 preloaded instrument selections on the device. The number of instruments is not limited by the Arduino and music shield. There are over 100 options for instruments on the VS1053 chip. I think there is probably enough memory on the mega to store all those instrument codes if you wanted. The selected instrument is displayed on a wheel with 16 spokes. The wheel is turned using a stepper motor, which is controlled with 4 digital pins.
Read more: Upright Laser Harp
- How are notes detected in the laser harp?
Notes are detected by measuring voltage across photoresistors; when a laser is blocked the photoresistor resistance increases and the voltage output drops. - Does the harp require a computer or external MIDI player to produce sound?
No, the harp uses an Adafruit Music Maker shield to produce audio directly, so it does not need a computer or external MIDI player. - What component generates the audio output?
The Adafruit Music Maker shield using the VS1053b chip generates the audio output. - How many lasers and photoresistors are used?
The project uses 12 laser diode modules and 12 photoresistors arranged in six layers. - How is instrument selection handled on the device?
A rotary selection is read by the Arduino and a stepper motor turns a 16-spoke wheel to display the selected instrument; 16 preloaded instrument selections are provided. - How is volume controlled?
A 5kOhm potentiometer is read by the Arduino and the software updates the volume of the MIDI signal. - How are the laser beams arranged for easier fingering?
The lasers are stacked and reflected by mirrors into square-shaped beam paths that land on fret-like spots so notes can be blocked with a single finger. - What powers the stepper motor that turns the instrument wheel?
The 28BYJ-48 stepper motor is driven by a ULN2003 driver board and controlled using 4 digital pins from the Arduino.