
Summary of Unicorn Horn With NeoPixel LEDs & Arduino Lilypad
This article guides users through creating a 3D-printed Unicorn Horn with embedded NeoPixel LEDs using an Arduino Lilypad. The project is ideal for parties and evening events, featuring customizable lighting effects. It details the assembly process, including uploading code via a USB Serial Converter, soldering NeoPixel connections, and integrating them into a hat.
Parts used in the 3D Printed Unicorn Horn:
- NeoPixel Stick (x2)
- Lilypad (x1)
- USB Serial Converter (x1)
- Lipo Battery (x1)
- Lipo Battery Connector (x1)
- Micro USB Cable (x1)
- Female Female Jumper Cable (x6)
- Hat
- Cotton
- Unicorn Horn
- Needle-rope
Today I’m gonna make 3D Printed Unicorn Horn. I saw and did the project in Adafruit’s website about a year ago but I could not find an opportunity to share it. It looks great when going out to the party and especially in the evenings. 🙂
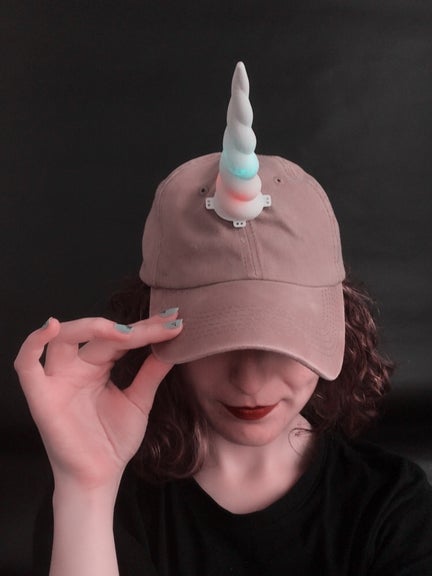
I got the horn out of the 3D printer on the project. If you do not have a 3D printer, you can make the horn yourself with the materials what you want.
Let’s start !
Step 1: Materials:
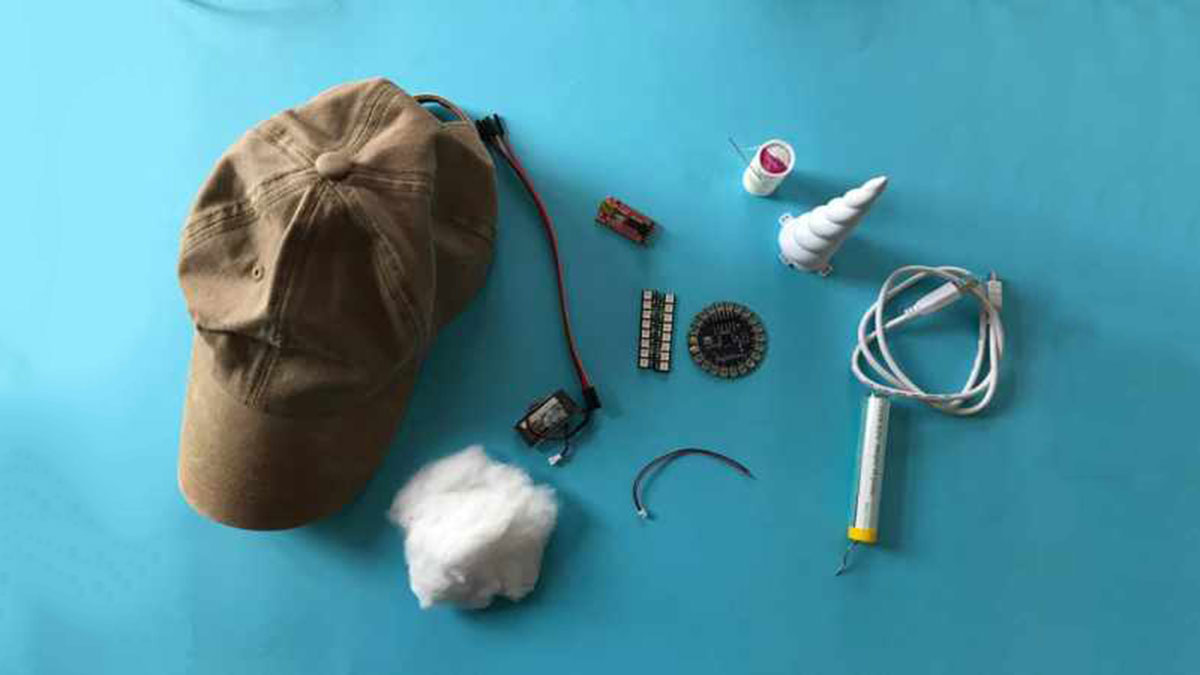
- NeoPixel Stick (x2)
- Lilypad (x1)
- USB Serial Converter (x1)
- Lipo Battery (x1)
- Lipo Battery Connector (x1)
- Micro USB Cable (x1)
- Female Female Jumper Cable (x6)
- Hat
- Some Cotton
- Unicorn Horn
- Needle-rope
Step 2: Upload Code to Arduino Lilypad
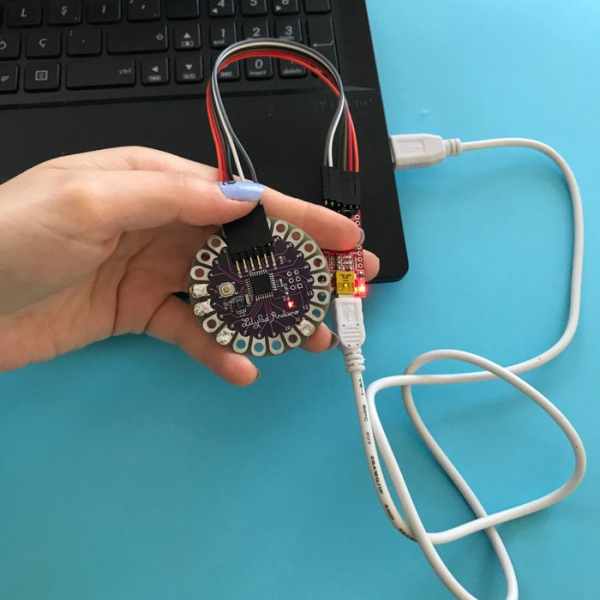
- First we start by uploading the code to Lilypad. Let’s do the connection of USB Serial Converter – Lilypad as in the image.
- Plug one end of the Micro USB into your computer and the other into the USB Serial Converter input.
- Open the Arduino IDE. In the Cards section, select your Lilypad and port number and load the code Arduino.
You can find the code at Github or from here. Link: https://bit.ly/2MD5nSu
After we upload the code to Lilypad, we are done with FTDI and micro USB.
Step 3: Connection of NeoPixels
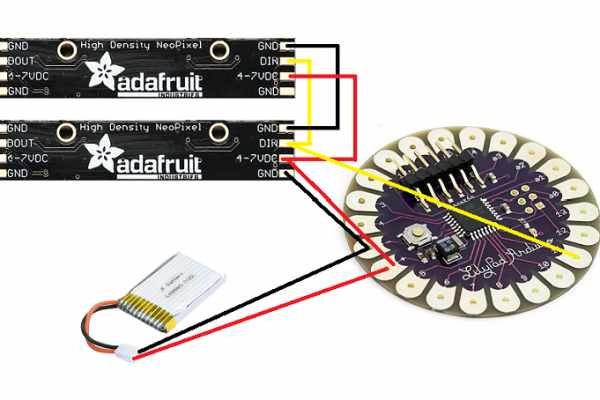
- First we connect NeoPixels with each other.
* What we need to pay attention in this section is to solder the short cables while connecting the NeoPixels.
* While doing NeoPixel and Lilypad connection, the cable is soldered a little long so that this can easily placed in the hat.
- Solder the GND, DIN, 5V pins of the first NeoPixel to GND, DIN and 5V of the second NeoPixel respectively.
Step 4: NeoPixel-LilyPad Connection
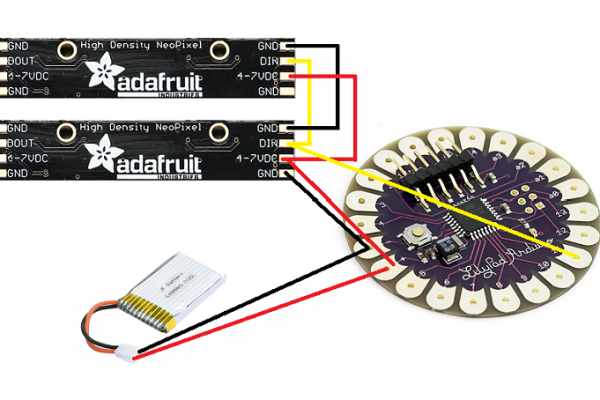
- Solder the GND of the first NeoPixel to the (-) pin (minus pin) of the Lilypad.
- Solder the second NeoPixel 5V to the (+) pin (plus pin) of the Lilypad.
- Solder the DIN of the second NeoPixel to pin 11 of the Lilypad.
Our links are ready!
Source: Unicorn Horn With NeoPixel LEDs & Arduino Lilypad
- How do I upload code to the Arduino Lilypad?
Connect the USB Serial Converter to the Lilypad and computer, open Arduino IDE, select the correct card and port, then load the code. - What materials are needed if I do not have a 3D printer?
You can make the horn yourself using whatever materials you want instead of printing it. - How should I connect the NeoPixels to each other?
Solder the GND, DIN, and 5V pins of the first NeoPixel directly to the corresponding pins of the second NeoPixel. - What is the best way to handle cables during NeoPixel connection?
Solder short cables between NeoPixels but keep the cable connecting to the Lilypad slightly longer to fit easily inside the hat. - Which Lilypad pin connects to the NeoPixel GND?
The GND of the first NeoPixel connects to the negative minus pin of the Lilypad. - How do I connect the NeoPixel 5V to the Lilypad?
Solder the 5V pin of the second NeoPixel to the positive plus pin of the Lilypad. - Which pin on the Lilypad receives the NeoPixel data input?
Solder the DIN of the second NeoPixel to pin 11 of the Lilypad. - Where can I find the source code for this project?
The code is available on Github or via the provided link at bit.ly/2MD5nSu.
