Summary of Ultrasound Sensor: 2D Tracking With Arduino
This article details a project using two HC-SR04 ultrasound sensors with an Arduino to determine the precise 2D coordinates of a target. Unlike single-sensor distance measurement, this setup uses triangulation based on the intersection of two sensor cones. The system measures distances from both sensors to form a triangle, applying the cosine rule to calculate exact Cartesian or polar coordinates. The project emphasizes calibrating sensors for accuracy and adjusting separation distances to optimize the intersection area for better resolution.
Parts used in the Ultrasound Sensor 2D Tracking Project:
- Arduino
- HC-SR04 Ultrasound Sensors (Two units)
- Breadboard
- Ruler Scale
Ultrasound ranging is a complicated task that made easy by the readily available module for Arduino. To detect or measure the distance it transmits the signal to the target and target reflects that back. Arduino measure time is taken for complete travel. As the speed of sound is known the distance in between module and target can be calculated easily.
Typically this sensor is used to just measure the distance from target here I am trying you get exact location/coordinate of the target.
I have used HC-SR04 for the purpose. Two of this sensor would be required for the purpose.
I tried to explain similar thing on below video.
Step 1: Calibrating the Sensor
To check the accuracy of this sensor I placed a target in front of it and measured the distance by using the ultrasound sensor and also by ruler scale. Measurement by ultrasound sensor is strength forward. Follow this article if for details if required.
from the above plot, it is very clear that output from the sensor is fairly linear. Slop is also almost one (as expected) and standard deviation of the error is around 9mm. which is a mostly static error. As I was measuring all distances from the extreme end of the sensor, while Arduino measures it from the transmitting and sensing element.
Step 2: Measurement for 2D Coordinate: Concept
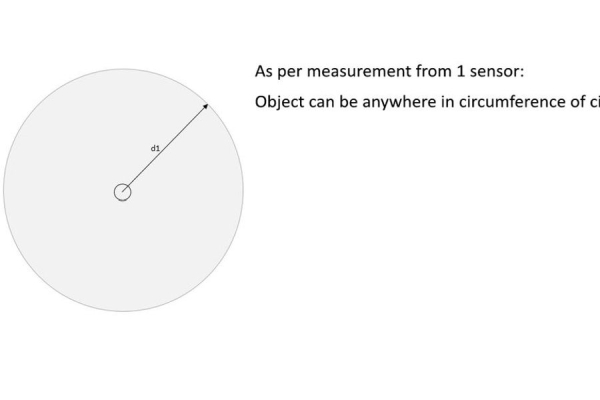
In the previous case, we were measuring only one distance from the target that gives a circle of that measured radius. the object can be anywhere on the circumference of the circle. But the sensor operates only on the cone shape area so the possibility is reduced to an arc (from a circle).
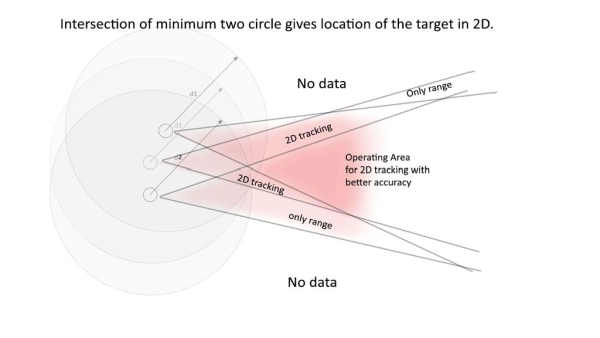
If we add one more sensor aside the first sensor, the intersection of both of these sensors will give the exact location of the target.
As shown in the 4th figure, both sensor has an operating cone, the area where both of the cones intersects, the exact location can be calculated.
if the object is in the area which covered by only one cone than only range can be calculated. and obviously, we will get no idea about an object if it is outside of these cones.
Step 3: Measurement for 2D Coordinate: Calculation
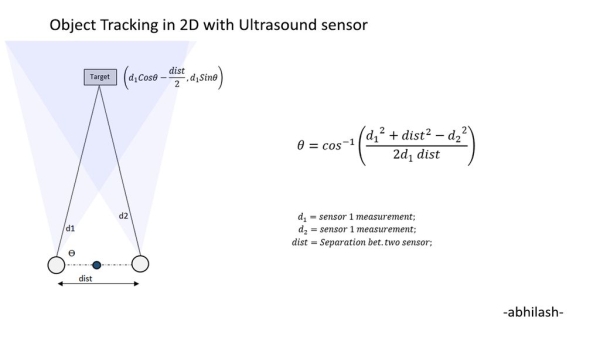
By measuring distance by two sensors a triangle will be created. in which one angle is the target and rests two angles are sensors. length of all sides of this triangle is known.
Triangle is completely constrained and any required data can be calculated by applying basic geometry. to measure coordinate od the target cosine rule is applied from which angle from one of the sensor can be calculated which further can be converted to Cartesian coordinate (or polar coordinate with a required reference point).
Attached Image shows formula to calculate location.
Step 4: Measurement for 2D Coordinate: Setup
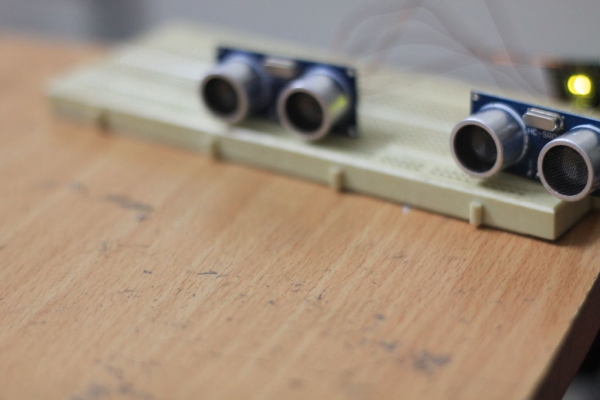
Setup is very simple, as discussed before it required at least two of these ultrasound sensors. I have attached it on the breadboard. That distance between these modules needs to be measured. this distance needs to measure from left extream of one sensor to left of another sensor or vice versa. below point need to be considered while selecting separation distance between the sensor.
- -If the target is closer then both of these sensors need to be slightly closer, such that the cone of these sensor intersects at close distance.
- The lower separation will lead to lower accuracy (especially at the high range) and higher separation distance will lead to better accuracy.
- An angle of sensor facing can be changed as per requirement to intersect cones of the sensor.
Woking of Code:
working of code will follow below steps:
- Measure range of sensor 1,
- Measure range of sensor 2,
- solve the coordinate.
Code is available at below link:
Once the system is set up it can be tested for the various target for accuracy. refer video from 2:28 onward:
Step 5: Summary and Possiblity:
As shown in the previous video this sensor is having relatively poor resolution in the lateral direction. which can be enhanced by-
- Taking multiple samples and averaging the results and/or
- multiple sensors for measurement such that a higher number of distance details are available to get the exact location.
This method can be extended to 3D by adding the third sensor out of the plan.
Source: Ultrasound Sensor: 2D Tracking With Arduino
- How does the system measure distance?
The system transmits a signal that reflects off the target; the Arduino measures the travel time and calculates distance using the known speed of sound. - Can a single sensor determine the exact location?
No, a single sensor only provides a distance creating a circle of possibilities, whereas two sensors are needed to find the exact coordinate via intersection. - What geometric method is used to calculate coordinates?
The system creates a triangle between the two sensors and the target, applying the cosine rule to derive the angle and convert it to Cartesian or polar coordinates. - How should the distance between the two sensors be selected?
Closer separation aids closer targets but reduces high-range accuracy, while higher separation improves accuracy at long ranges. - Where must the separation distance be measured?
The distance must be measured from the left extreme of one sensor to the left extreme of the other sensor. - What happens if the target is outside the sensor cones?
If the object is outside the cones covered by the sensors, the system will not provide any information about the object. - How can lateral resolution be improved?
Resolution can be enhanced by taking multiple samples and averaging results or by using multiple sensors for more distance details. - Is it possible to extend this method to 3D tracking?
Yes, the method can be extended to 3D by adding a third sensor out of the current plane.