Summary of Scanner Turret and Cannon
This article details the construction of a functional Arduino-based turret prototype capable of scanning, detecting objects via an ultrasonic sensor, and firing airsoft bullets. The system utilizes three servo motors for movement and shooting mechanisms, controlled by an Arduino Nano and visualized through a custom Processing radar interface. The build involves laser-cut wood and methacrylate components, assembled with various adhesives and mechanical linkages like elastic bands and strings to operate the firing mechanism.
Parts used in the Scanner Turret and Cannon:
- DIN A4 methacrylate 0,4mm sheet
- Wooden 0,3mm sheet (600mm x 300mm)
- Hinge
- Hot glue
- Epoxy bicomponent glue
- Superglue
- Wooden block
- Elastic band
- Pen tube
- Small string
- Servo motor MMSV001 (3 units)
- Ultrasonic proximity sensor HC-SR04
- Arduino Nano
- Connection wire (red, black, white)
- Tin
- Welder
- Airsoft regular ammo
We were meant to make a functional prototype using some different arduino sensors so our choice has been to develop a turret with a cannon that fires a bullet to an object that the scanner has detected.
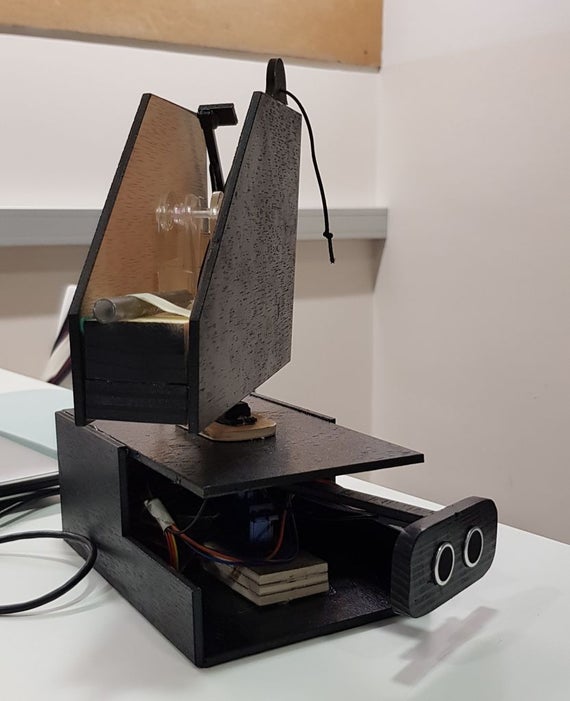
The functioning of the turret starts with the constant movement of the scanner doing a 180 degree sweep, when it detects something, the cannon moves pointing directly to the direction which the scanner is pointing to and using two buttons, one for the loading and another for shooting, a bullet gets fired.
It also will show on screen the detected objects via a radar interface.
Project by Jaume Guardiola and Damià Cusí
Step 1: Materials Needed.
CONSTRUCTION MATERIALS:
– 1x DIN A4 methacrylate 0,4mm sheet.
– 1x Wooden 0,3mm sheet. Dimensions: 600mm x 300mm.
– 1x Hinge.
– Hot glue.
– Epoxy bicomponent glue.
– Superglue.
– Wooden block.
– Elastic band.
– Pen tube.
– Small string.
ELECTRONIC MATERIALS:
– 3x servo motor MMSV001. (https://www.ondaradio.es/Catalogo-Detalle/3034/rob…
– 1x ultrasonic proximity sensor HC-SR04. (https://www.amazon.es/ELEGOO-Ultrasonidos-Distanci…
– 1x arduino nano.
– Connection wire (red, black and white if possible).
– Tin.
– Welder.
Step 2: Design
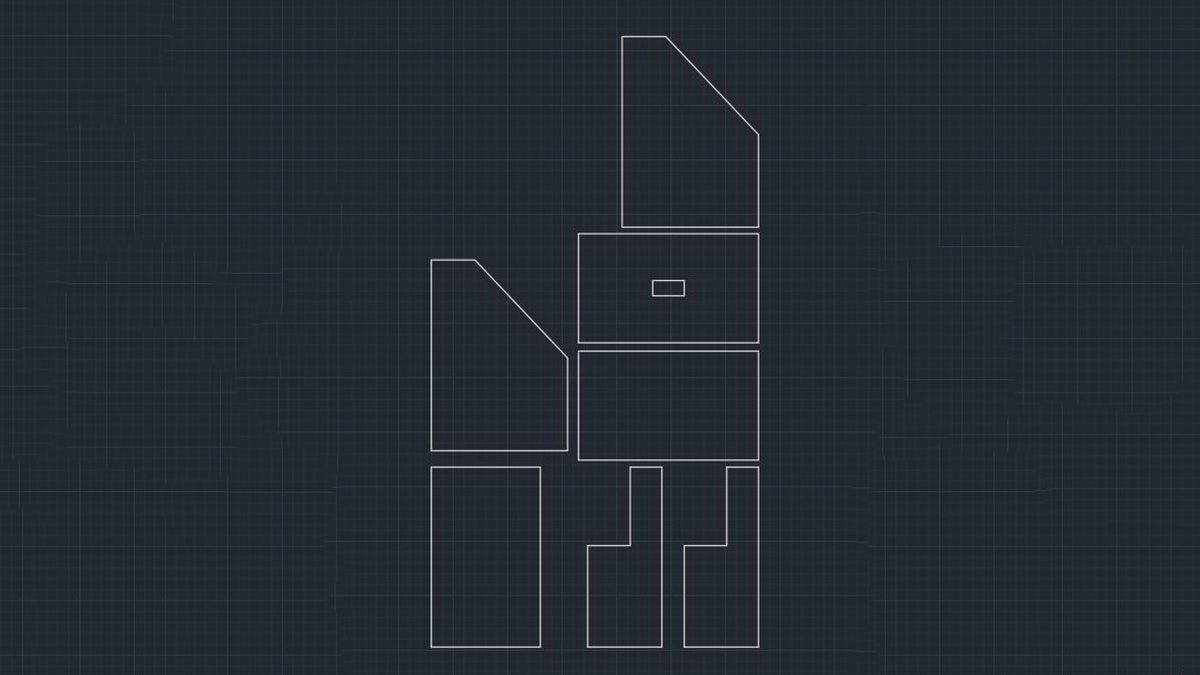
The turret exterior design drawings were made on Autocad. This file shows all the parts needed for the external assembly that will cover the cannon and radar mechanism.
Step 3: Laser Cut Wooden Sheet.
With the Autocad file we are able to laser cut the shapes for better accuracy and better look overall but they can also be handmade extracting the measurements from the file.
Step 4: Assembly Introduction
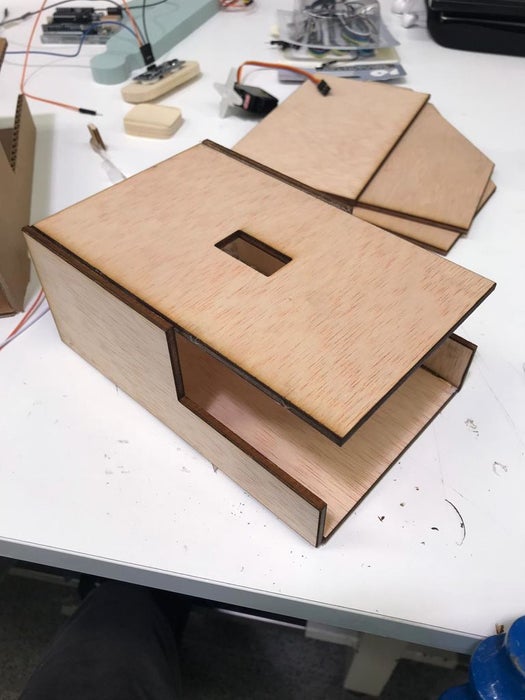
Our cannon will be divided in two main structures. There will be a base holding inside all the servo-motors, connections, as well as the arduino Nano board; then there’s the moving cannon on top, holding another servo-motor inside and the shooting mechanism.
In this step we proceed to assemble the base as shown in the photo, hot glue or epoxy glue can be used. The hole in the center is designed to keep the servo that will move the cannon (it can be inserted from the upper side) and beneath it (ideally coaxially) we will mount the servo that will move the ultrasonic sensor.
Step 5: Cannon Design
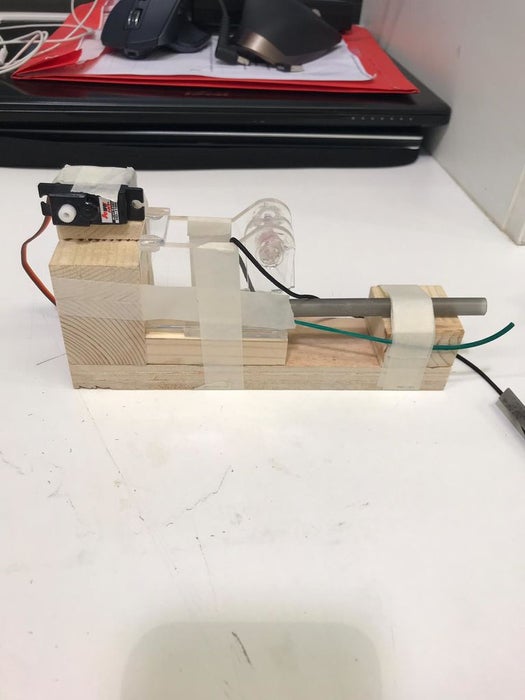
For the cannon design we used some squared wood chunks and a couple of methacrylate laser-cut parts. You can also find the Autocad drawing here.
To assemble it we used hot glue and reinforcements of masking tape, but it can be glued together any way you want.
The cannon tube is a regular pen tube and the ammo will be airsoft regular ammo. Also an elastic band will be used to keep the required tension for the mechanism to shoot and a string to pull the shooter up when reloading needs to be done.
All measurements in the drawing are in millimeters; the cannon tip is raised 3mm because this way the bullet will always remain at the end of it and can be shot from behind. Also a little glue has been added at the end to keep the bullet inside but at the same time let the shooter hit it.
The servo on the upper part of the cannon is the shooter release and reload mechanism, attached to the servo there’s a lever that in horizontal position will interfere with the shooter path and keep it half way into hitting the bullet and, when raised, it will add a bit of tension to the shooting mechanism and loose contact with it at aproximately 30 degrees, letting it follow its path and shoot (see picture above). To reload you’ll have to pull the mechanism back up past the 30 degree point using the string attached and then press the reload button, which will take the servo back to the initial horizontal position and will keep the shooter in place until it needs to be shot again.
Note: mounting and constructing the cannon without precise tools is kind of a trial and error task, it can take a while to figure out how to make everything interact the way it needs to, a fine tuning process is required while assemblying it. We strongly advice to build the cannon and radar structures when everything is connected and working to properly align all positions.
Step 6: Arduino Connections
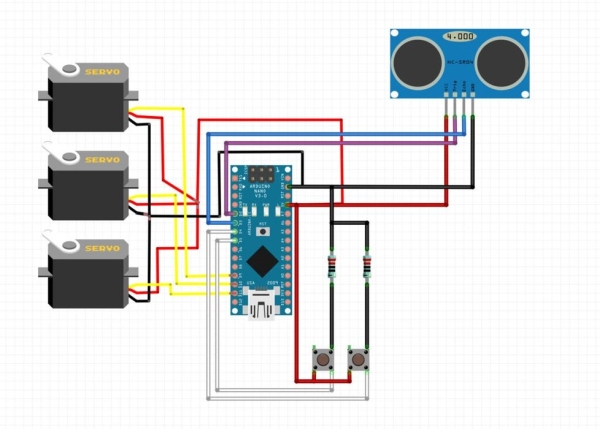
This is the arduino connection scheme. Basically there’s 3 servos each one connected to ground, 5V and pins 9,10 and 11 accordingly (9 moves the radar, 10 moves the cannon, 11 moves the reload lever), and then the proximity sensor tied to pins 2 and 3. On top of that there’s two buttons tied to pins 4 and 5; those will reload and fire. This (picture above) is the connection schematic used.
Step 7: The Code
Most of the code regarding the radar interface, either on Processing and Arduino, is referenced and extracted from external sources, our work was to adapt the code to move all the parts of the cannon accordingly to aim a certain object on a designed range. All code is included in the arduino and Processing files above, here are some things to take into consideration:
Arduino Code:
– Into the aimobject() function there’s a line: if (objectin > 10) { where the value of 10 defines the “range” of detection. If the value is lowered the cannon will aim at smaller objects but will be also easily affected by noise, if the value is larger it will only detect bigger objects but aim will be more accurate for those bigger.
– Into the aimobject() function there’s another line:
if (lastdistance < 5) {
….
if (lastdistance < 45) {
this defines the aiming active distance, you can define minimum and maximum distance (in centimeters) in which the cannon will aim to an object. We consider objects further than 45cm to be almost undetectable by the ultrasonic sensor with accuracy, but it’s up to the build quality of your own system.
Processing Code:
– We don’t recommend to change the resolution code of Processing, it will mess up the whole interface and will be difficult to fix.
– In processing’s setup there’s a parameter that needs to be replaced. (around line 68).
myPort = new Serial(this, “COM9”, 9600);
COM9 has to be replaced with the number of your arduino port. example (“COM13”). If Arduino is not running or the port is not correct processing won’t start.
– We changed some parameters on Processing to fit the distances and range we needed, and around line 176:
if(distance<240 || distance>300){
this is an exception that clears some noise produced by our ultrasonic sensor, it can be erased depending on the clarity of the signal of your particular unit or changed to clear another range.
Source: Scanner Turret and Cannon
- How does the turret detect objects?
The scanner performs a constant 180-degree sweep using an ultrasonic proximity sensor, and when it detects something, the cannon points directly to that direction. - Can I adjust the detection range of the cannon?
Yes, you can modify the value in the aimobject function; lowering it detects smaller objects but increases noise sensitivity, while raising it improves accuracy for larger objects. - What defines the active aiming distance for the cannon?
The code sets minimum and maximum distances, with the authors noting that objects further than 45cm are considered almost undetectable by their specific sensor setup. - How is the bullet fired from the pen tube?
An elastic band provides tension, and a servo-driven lever releases the shooter at approximately 30 degrees to let the bullet follow its path. - What role does the small string play in the mechanism?
The string is attached to the shooter mechanism to pull it back past the 30-degree point manually during the reloading process. - Which pins on the Arduino control the servos?
Servo 1 (radar) connects to pin 9, Servo 2 (cannon) to pin 10, and Servo 3 (reload lever) to pin 11. - How do I configure the serial port in the Processing code?
You must replace the default COM9 reference in the setup line with the specific port number assigned to your Arduino board. - Is it possible to change the resolution settings in Processing?
No, changing the resolution code in Processing is not recommended as it will disrupt the interface and be difficult to fix. - What materials are used for the cannon tube and ammo?
The cannon tube is made from a regular pen tube, and the ammunition consists of standard airsoft ammo.