Vehicle Tracking System becomes very important now days, especially in case of stolen vehicles. If you have GPS system installed in your vehicle, you can track you Vehicle Location, and its helps police to track the Stolen Vehicles. Previously we have built similar project in which Location coordinates of Vehicle are sent on Cell Phone, check here ‘Arduino based Vehicle Tracker using GPS and GSM.
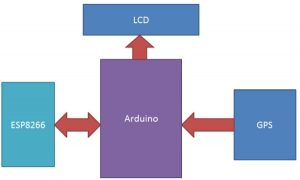
Here we are building more advanced version of Vehicle Tracking System in which you can Track your Vehicle on Google Maps. In this project, we will send the location coordinates to the Local Server and you just need to open a ‘webpage’ on your computer or mobile, where you will find a Link to Google Maps with your Vehicles Location Coordinates. When you click on that link, it takes you on Google Maps, showing your vehicles location. In this Vehicle Tracking System using Google Maps, GPS Module is used for getting the Location Coordinates, Wi-Fi module to keep send data to computer or mobile over Wi-Fi and Arduino is used to make GPS and Wi-Fi talk to each other.![]()
How it Works:
To track the vehicle, we need to find the Coordinates of Vehicle by using GPS module. GPS module communicates continuously with the satellite for getting coordinates. Then we need to send these coordinates from GPS to our Arduino by using UART. And then Arduino extract the required data from received data by GPS.
Before this, Arduino sends command to Wi-Fi Module ESP8266 for configuring & connecting to the router and getting the IP address. After it Arduino initialize GPS for getting coordinates and the LCD shows a ‘Page Refresh message’. That means, user needs to refresh webpage. When user refreshes the webpage Arduino gets the GPS coordinates and sends the same to webpage (local server) over Wi-Fi, with some additional information and a Google maps link in it. Now by clicking this link user redirects to Google Maps with the coordinate and then he/she will get the Vehicle Current Location at the Red spot on the Google Maps. The whole process is properly shown in the Video at the end.
Components Required:
- Arduino UNO
- Wi-Fi Module ESP8266
- GPS module
- USB Cable
- Connecting wires
- Laptop
- Power supply
- 16×2 LCD
- Bread Board
- Wi-Fi router
Circuit Explanation:
Circuit for this ‘Vehicle Tracking using Google Maps project’ is very simple and we mainly need an Arduino UNO, GPS Module and ESP8266 Wi-Fi module. There is a 16×2 LCD optionally connected for displaying the status. This LCD is connected at 14-19 (A0-A5) Pins of Arduino.
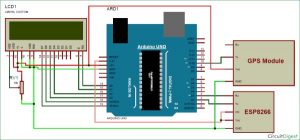
Here Tx pin of GPS module is directly connected to digital pin number 10 of Arduino. By using Software Serial Library here, we have allowed serial communication on pin 10 and 11, and made them Rx and Tx respectively and left the Rx pin of GPS Module open. By default Pin 0 and 1 of Arduino are used for serial communication but by using SoftwareSerial library, we can allow serial communication on other digital pins of the Arduino. 12 Volt adaptor is used to power the GPS Module. Go through here to learn “How to Use GPS with Arduino” and get the coordinates.
Wi-Fi module ESP8266’s Vcc and GND pins are directly connected to 3.3V and GND of Arduino and CH_PD is also connected with 3.3V. Tx and Rx pins of ESP8266 are directly connected to pin 2 and 3 of Arduino. Software Serial Library is also used here to allow serial communication on pin 2 and 3 of Arduino. We have already covered the Interfacing of ESP8266 Wi-Fi module to Arduino in detail, also please go through “How to Send Data from Arduino to Webpage using WiFi” before doing this project. Below is the picture of ESP8266:
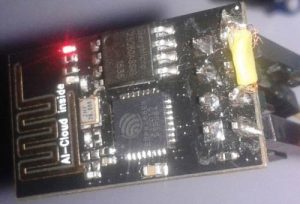
ESP8266 has two LEDs, one is Red, for indicating Power and second is Blue that is Data Communication LED. Blue LED blinks when ESP sends some data via its Tx pin. Also, do not connect ESP to +5 volt supply otherwise your device may damage. Here in this project, we have selected 9600 baud rate for all the UART communications.
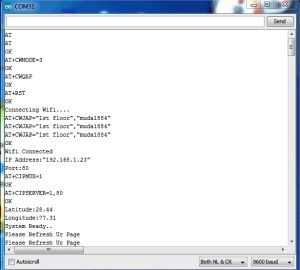
User can also see the communication between Wi-Fi module ESP8266 and Arduino, on the Serial Monitor, at the baud rate of 9600:
Also check the Video at the end of this project, for detailed working process.
GPS Degree Minute to Decimal Degree Converison of Coordinates:
GPS Module receives coordinates from satellite in Degree Minute format (ddmm.mmmm) and here we need Decimal Degree format for search the location on Google Maps. So first we need to convert coordinates from Degree Minute Format to Decimal Degree Format by using given formula.
Suppose 2856.3465 (ddmm.mmmm) is the Latitude that we receive form the GPS Module. Now first two numbers are Degrees and remaining are Minutes.
So 28 is degree and 56.3465 is minute.
Now here, no need to convert Degree part (28), but only need to convert Minute part into Decimal Degree by dividing 60:
Decimal Degree Coordinate = Degree + Minute/60
Decimal Degree Coordinate = 28 + 56.3465/60
Decimal Degree Coordinate = 28 + 0.94
Decimal Degree Coordinate = 28.94
Same process will be done for Longitude Data. We have converted coordinates from Degree Minute to Decimal Degree by using above formulae in Arduino Sketch:
float minut= lat_minut.toFloat();
minut=minut/60;
float degree=lat_degree.toFloat();
latitude=degree+minut;

minut= long_minut.toFloat();
minut=minut/60;
degree=long_degree.toFloat();
logitude=degree+minut;
Programming Explanation:
In this code, we have used SerialSoftware library to interface ESP8266 and GPS module with Arduino. Then we have defined different pins for both and initialize UART with 9600 baud rate. Also included LiquidCrystal Library for interface LCD with Arduino.
#include<SoftwareSerial.h>
SoftwareSerial Serial1(2,3); //make RX arduino line is pin 2, make TX arduino line is pin 3.
SoftwareSerial gps(10,11);

#include<LiquidCrystal.h>
LiquidCrystal lcd(14,15,16,17,18,19);
After it, we need to define or declare variable and string for different purpose.
String webpage="";
int i=0,k=0;
int  gps_status=0;
String name="<p>1. Name: Your Name </p>";   //22
String dob="<p>2. DOB: 12 feb 1993</p>";     //21
String number="<p>4. Vehicle No.: RJ05 XY 4201</p>";//29
String cordinat="<p>Coordinates:</p>";          //17
String latitude="";
String logitude="";
String gpsString="";
char *test="$GPGGA";
Then we have made some functions for different purposes like:
Function for getting GPS data with coordinates:
void gpsEvent()
{
  gpsString="";
  while(1)
  {
   while (gps.available()>0)
   {
    char inChar = (char)gps.read();
     gpsString+= inChar;
     if (i < 7)
     {
      if(gpsString[i-1] != test[i-1])
      {
        i=0;
        ..... ....
        ..... .....
Function for extracting data from GPS string and convert that data to decimal degree format from the decimal minute format, as explained earliar.
void coordinate2dec()
{

    String lat_degree="";
    for(i=18;i<20;i++)
      lat_degree+=gpsString[i];

    String lat_minut="";
    for(i=20;i<28;i++)
      lat_minut+=gpsString[i];
        ..... ....
        ..... .....
Function for sending commands to ESP8266 for configuring and connecting it with WIFI.
void connect_wifi(String cmd, int t)
{
  int temp=0,i=0;
  while(1)
  {
    Serial.println(cmd);
    Serial1.println(cmd);
    while(Serial1.available()>0)
    ..... ....
    ..... .....
void show_coordinate() function for showing coordinate on the LCD and Serial Monitor and void get_ip() function for getting IP address.
Void Send() function for creating a String of information that is to be sent to webpage using ESP8266 and void sendwebdata() Function for sending information string to webpage using UART.
In void loop function Arduino continuously wait for request form webpage (Refreshing web page).
void loop()
{
  k=0;
  Serial.println("Please Refresh Ur Page");
  lcd.setCursor(0,0);
  lcd.print("Please Refresh  ");
  lcd.setCursor(0,1);
  lcd.print("Your Web Page..  ");
  while(k<1000)
  ..... ....
  ..... .....
Check the Full Code Below.
#include<SoftwareSerial.h>
SoftwareSerial Serial1(2,3); //make RX arduino line is pin 2, make TX arduino line is pin 3.
SoftwareSerial gps(10,11);
#include<LiquidCrystal.h>
LiquidCrystal lcd(14,15,16,17,18,19);
boolean No_IP=false;
String IP=””;
String webpage=””;
int i=0,k=0;
int gps_status=0;
String name=”<p>1. Name: Your Name </p>”; //22
String dob=”<p>2. DOB: 12 feb 1993</p>”; //21
String number=”<p>4. Vehicle No.: RJ05 XY 4201</p>”;//29
String cordinat=”<p>Coordinates:</p>”; //17
String latitude=””;
String logitude=””;
String gpsString=””;
char *test=”$GPGGA”;
void check4IP(int t1)
{
int t2=millis();
while(t2+t1>millis())
{
while(Serial1.available()>0)
{
if(Serial1.find(“WIFI GOT IP”))
{
No_IP=true;
}
}
}
}
void get_ip()
{
IP=””;
char ch=0;
while(1)
{
Serial1.println(“AT+CIFSR”);
while(Serial1.available()>0)
{
if(Serial1.find(“STAIP,”))
{
delay(1000);
Serial.print(“IP Address:”);
while(Serial1.available()>0)
{
ch=Serial1.read();
if(ch==’+’)
break;
IP+=ch;
}
}
if(ch==’+’)
break;
}
if(ch==’+’)
break;
delay(1000);
}
lcd.clear();
lcd.print(IP);
lcd.setCursor(0,1);
lcd.print(“Port: 80”);
Serial.print(IP);
Serial.print(“Port:”);
Serial.println(80);
delay(1000);
}
void connect_wifi(String cmd, int t)
{
int temp=0,i=0;
while(1)
{
Serial.println(cmd);
Serial1.println(cmd);
while(Serial1.available()>0)
{
if(Serial1.find(“OK”))
{
i=8;
}
}
delay(t);
if(i>5)
break;
i++;
}
if(i==8)
{
Serial.println(“OK”);
}
else
{
Serial.println(“Error”);
}
delay(1000);
}
void setup()
{
Serial1.begin(9600);
Serial.begin(9600);
lcd.begin(16,2);
lcd.print(“Vehicle Tracking”);
lcd.setCursor(0,1);
lcd.print(” System “);
delay(2000);
lcd.clear();
lcd.print(“WIFI Connecting..”);
// lcd.setCursor(0,1);
// lcd.print(“Please Wait…”);
delay(1000);
connect_wifi(“AT”,1000);
connect_wifi(“AT+CWMODE=3”,1000);
connect_wifi(“AT+CWQAP”,1000);
connect_wifi(“AT+RST”,5000);
check4IP(5000);
if(!No_IP)
{
Serial.println(“Connecting Wifi….”);
connect_wifi(“AT+CWJAP=\”1st floor\”,\”muda1884\””,7000); //AT+CWJAP=”wifi_username”,”wifi_password”
}
else
{
}
Serial.println(“Wifi Connected”);
lcd.clear();
lcd.print(“WIFI Connected”);
delay(2000);
lcd.clear();
lcd.print(“Getting IP”);
get_ip();
delay(2000);
connect_wifi(“AT+CIPMUX=1”,100);
connect_wifi(“AT+CIPSERVER=1,80”,100);
Serial1.end();
lcd.clear();
lcd.print(“Waiting For GPS”);
lcd.setCursor(0,1);
lcd.print(” Signal “);
delay(2000);
gps.begin(9600);
get_gps();
show_coordinate();
gps.end();
Serial1.begin(9600);
delay(2000);
lcd.clear();
lcd.print(“GPS is Ready”);
delay(1000);
lcd.clear();
lcd.print(“System Ready”);
Serial.println(“System Ready..”);
}
void loop()
{
k=0;
Serial.println(“Please Refresh Ur Page”);
lcd.setCursor(0,0);
lcd.print(“Please Refresh “);
lcd.setCursor(0,1);
lcd.print(“Your Web Page.. “);
while(k<1000)
{
k++;
while(Serial1.available())
{
if(Serial1.find(“0,CONNECT”))
{
Serial1.end();
gps.begin(9600);
get_gps();
gps.end();
Serial1.begin(9600);
Serial1.flush();
/* lcd.clear();
lcd.print(“Sending Data to “);
lcd.setCursor(0,1);
lcd.print(” Web Page “);*/
Serial.println(“Start Printing”);
Send();
show_coordinate();
Serial.println(“Done Printing”);
delay(5000);
lcd.clear();
lcd.print(“System Ready”);
delay(1000);
k=1200;
break;
}
}
delay(1);
}
}
void gpsEvent()
{
gpsString=””;
while(1)
{
while (gps.available()>0) //Serial incoming data from GPS
{
char inChar = (char)gps.read();
gpsString+= inChar; //store incoming data from GPS to temporary string str[]
i++;
if (i < 7)
{
if(gpsString[i-1] != test[i-1]) //check for right string
{
i=0;
gpsString=””;
}
}
if(inChar==’\r’)
{
if(i>65)
{
gps_status=1;
break;
}
else
{
i=0;
}
}
}
if(gps_status)
break;
}
}
void get_gps()
{
gps_status=0;
int x=0;
while(gps_status==0)
{
gpsEvent();
int str_lenth=i;
latitude=””;
logitude=””;
coordinate2dec();
i=0;x=0;
str_lenth=0;
}
}
void show_coordinate()
{
lcd.clear();
lcd.print(“Latitide:”);
lcd.print(latitude);
lcd.setCursor(0,1);
lcd.print(“Longitude:”);
lcd.print(logitude);
Serial.print(“Latitude:”);
Serial.println(latitude);
Serial.print(“Longitude:”);
Serial.println(logitude);
}
void coordinate2dec()
{
//j=0;
String lat_degree=””;
for(i=18;i<20;i++) //extract latitude from string
lat_degree+=gpsString[i];
String lat_minut=””;
for(i=20;i<28;i++)
lat_minut+=gpsString[i];
String long_degree=””;
for(i=30;i<33;i++) //extract longitude from string
long_degree+=gpsString[i];
String long_minut=””;
for(i=33;i<41;i++)
long_minut+=gpsString[i];
float minut= lat_minut.toFloat();
minut=minut/60;
float degree=lat_degree.toFloat();
latitude=degree+minut;
minut= long_minut.toFloat();
minut=minut/60;
degree=long_degree.toFloat();
logitude=degree+minut;
}
void Send()
{
webpage = “<h1>Welcome to Saddam Khan’s Page</h1><body bgcolor=f0f0f0>”;
webpage+=name;
webpage+=dob;
webpage+=number;
webpage+=cordinat;
webpage+=”<p>Latitude:”;
webpage+=latitude;
webpage+=”</p>”;
webpage+=”<p>Longitude:”;
webpage+=logitude;
webpage+=”</p>”;
webpage+= “<a href=\”http://maps.google.com/maps?&z=15&mrt=yp&t=k&q=“;
webpage+=latitude;
webpage+=’+’; //28.612953, 77.231545 //28.612953,77.2293563
webpage+=logitude;
webpage+=”\”>Click Here for google map</a>”;
sendwebdata();
webpage=””;
while(1)
{
Serial.println(“AT+CIPCLOSE=0”);
Serial1.println(“AT+CIPCLOSE=0”);
while(Serial1.available())
{
//Serial.print(Serial1.read());
if(Serial1.find(“0,CLOSE”))
{
return;
}
}
delay(500);
i++;
if(i>5)
{
i=0;
}
if(i==0)
break;
}
}
void sendwebdata()
{
i=0;
while(1)
{
unsigned int l=webpage.length();
Serial1.print(“AT+CIPSEND=0,”);
Serial1.println(l+2);
Serial.println(l+2);
Serial.println(webpage);
Serial1.println(webpage);
while(Serial1.available())
{
if(Serial1.find(“OK”))
{
return;
}
}
i++;
if(i>5)
i=0;
if(i==0)
break;
delay(200);
}
}
Video
Read More: Track A Vehicle on Google Maps using Arduino, ESP8266 & GPS