Simple digital cameras can produce remarkably good quality photos and are now cheap enough that it doesn’t hurt the wallet too much to buy one with the intention of modifying it for use in a project. You may even already have an old digital camera that you don’t mind sacrificing for a good cause!
Modifying a camera to control it from an Arduino opens up a world of possibilities. This project lets your Arduino take control of the camera to take photos at regular intervals so they can be reconstructed as a time-lapse movie. Set your frame interval to suit your subject and you could make a movie of grass growing, or a house being painted, or a house being built, or flowers opening. Time lapse movies can be spectacular and this project will give you the tools to let your imagination run wild.
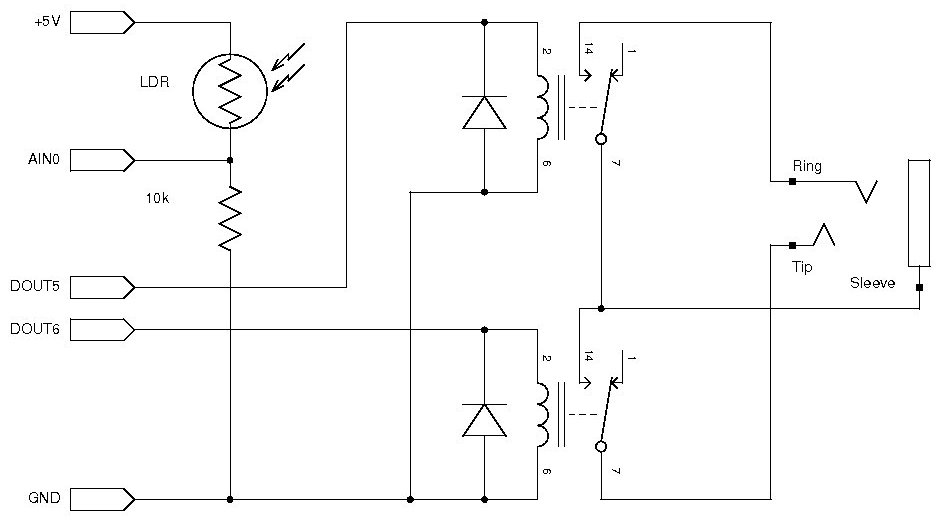
Time-Lapse Controller Schematic
| Qty | Description |
| General Parts | |
| 1 | Arduino Duemilanove, Arduino Pro, Seeeduino, or equivalent |
| 1 | Prototyping shield |
| 2 | 5V reed relays |
| 2 | 1N4001 power diodes or equivalent |
| 1 | 3.5mm stereo socket |
| 1 | Light dependent resistor (optional) |
| 1 | 10K resistor (optional) 1%: brown-black-black-red-brown 5%: brown-black-orange-gold |
| Camera connection for Canon | |
| 2 | 3.5mm stereo line plugs |
| 50cm | Shielded stereo cable |
| Camera connection for Panasonic | |
| 1 | 3.5mm stereo line socket |
| 1 | 2.5mm 4-connection line plug |
| 1 | 1K8 resistor 1%: brown-gray-black-brown-brown 5%: brown-gray-red-gold |
| 1 | 27K resistor 1%: red-violet-black-red-brown 5%: red-violet-orange-gold |
| 1 | 33K resistor 1%: orange-orange-black-red-brown 5%: orange-orange-orange-gold |
| 50cm | Shielded mono cable |
| Camera connection via infra-red | |
| 1 | IR LED |
For more detail: Time-Lapse Camera Controller using Arduino


