Summary of Tide and Weather Clock
Summary: The author built a low-power tide-and-weather clock using a TTGO T5 ESP32 board with a 2.13" e-paper display and an Adafruit TPL5110 timer to wake the device periodically. It downloads NOAA tide data and OpenWeatherMap weather once daily, displays results, then powers down to preserve battery. A 220 µF capacitor and a 1200 mAh Li-Po battery enable reliable startup and long runtime.
Parts used in the Tide and Weather Clock:
- TTGO T5 board (ESP32 with 2.13" e-paper display)
- Adafruit TPL5110 board (low-power timer)
- Adafruit Perma-Proto Quarter-size board (optional)
- Li-Poly battery 1200 mAh
- JST PH 2-Pin Cable – Male Header
- 220 uF capacitor
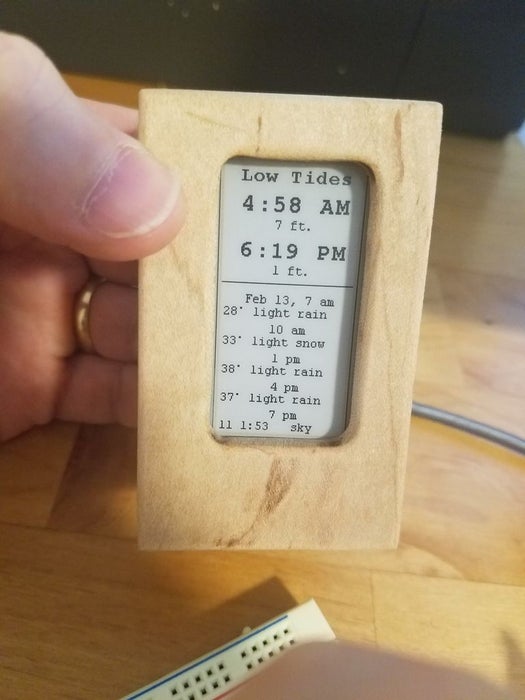
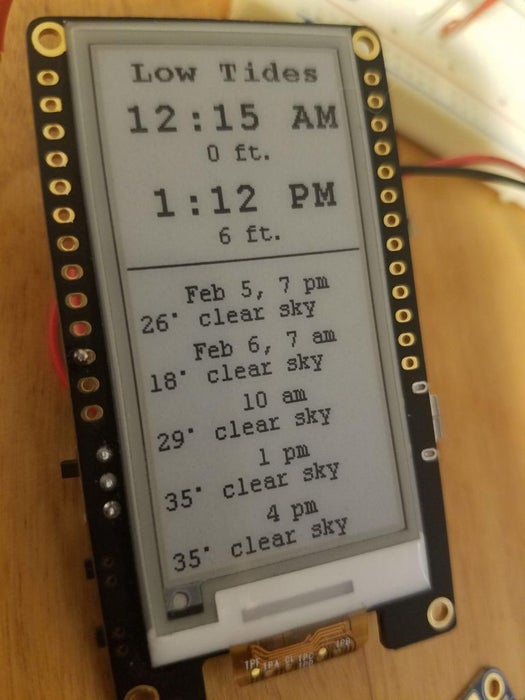
Although you can buy analog tide clocks that have a single hand indicating whether the tide is high or low or somewhere in between, what I wanted was something that would tell me at what time low tide will be. I wanted something I could glance at quickly without having to turn it on, or push any buttons, or wait. And I wanted something with long battery life. So I used a TTGO T5 board, which is an ESP32-based board with a 2.13″ e-paper display, connected to a TTL5110 chip. The TPL5110 turns on the T5 every 2.5 hours, and once a day the T5 downloads tide data from NOAA and weather data from OpenWeatherMap, displays the data on the e-paper, then tells the TPL5110 to turn the T5 off.
UPDATE (Feb 25, 2020) The Tide Clock has been running for one year now, and the battery is at 4.00 volts, so the clock could conceivably run for many years.
Step 1: Hardware List
TTGO T5 board $17
Adafruit Perma-Proto Quarter-size board (optional) $0.71 (minimum order $8.50)
Li-Poly battery 1200 mAh $10 (or other appropriate power source)
JST PH 2-Pin Cable – Male Header $0.75
220 uF capacitor
Step 2: Tools
Soldering iron
Wire strippers
Li-Po battery charger, such as this.
Step 3: Assemble Hardware
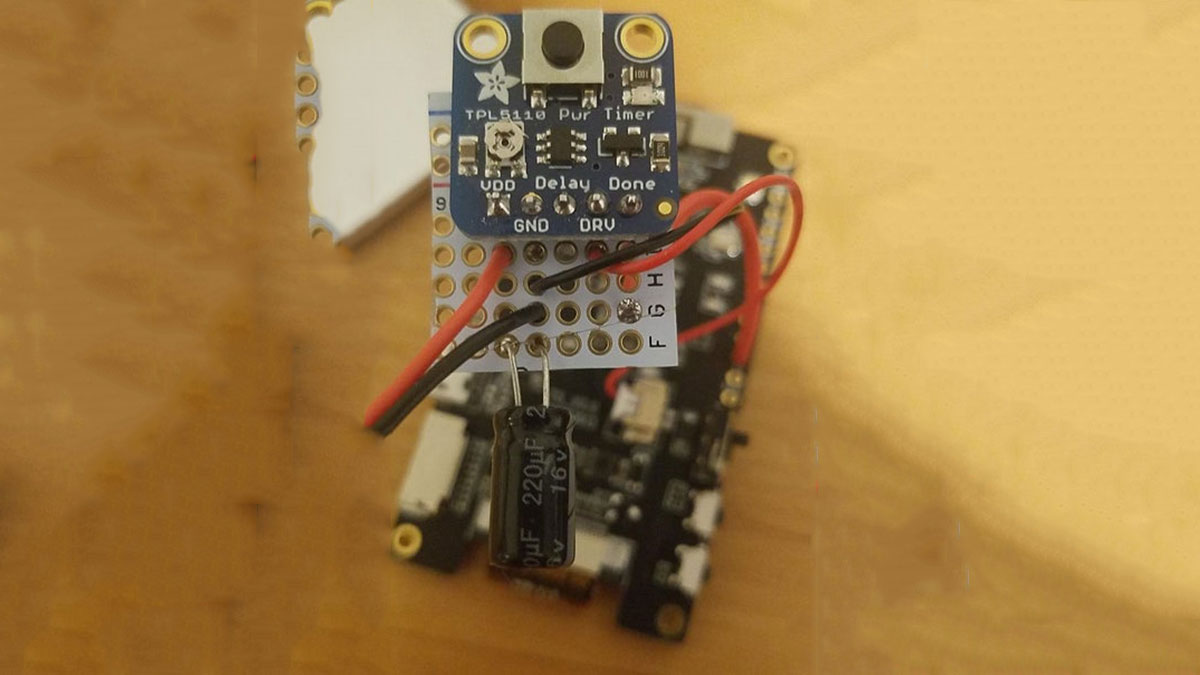
Assembling the hardware is pretty simple as the schematic shows. I used an Adafruit Perma-proto board which is like a normal protoboard except it is laid out like a breadboard, with the same electrical connections as a breadboard, which is nice. Since I only needed a few connections, and wanted to fit the whole assembly into a small box, I cut one of the boards into fourths with a Dremel cutoff wheel.
The 220 uF capacitor is very important. Without it, the TPL5110 will never turn on the T5. It’s a little unclear why, but other people using the TPL5110 have had the same problem. Maybe the ESP32 draws more current at startup than the TTL5110 can supply?
Don’t hardwire the battery. Use the JST-PH cable so you can disconnect the battery to charge it. There may be a way to charge the battery from the T5 back through the TPL5110 if the TPL5110 is “on”, but I can’t vouch for that technique.
I made a wooden box as an enclosure, but anything with minimum interior dimensions of 1.5″ x 2.75″ x 1″ would work.
Step 4: Tune the Timing
The TPL5110 board has a trim potentiometer that sets the time interval at which the TPL5110 wakes up. Use a tiny screwdriver to turn this all the way counterclockwise. On my board, this set the interval to 145 minutes, which is actually more than the spec’ed maximum of 120 minutes, but it works and was consistent and will save even more power than waking every 120 minutes, so I used it. You don’t need to know the interval precisely, since the goal is just to download data roughly once a day roughly around 4am. You can specify the interval (e.g., 145 minutes) and the wakeup time (e.g., 4am) in env_config.h.
(If you want better control of the timing for some other project, the TPL5110 board has a trace on the back you can cut to disable the potentiometer. Then you attach a resistor to the Delay pin, and the resistance determines the interval, according to this chart.)
Step 5: The Software
You will need the Arduino IDE with the ESP32 package. In the IDE, set your board to “ESP32 Dev Module”.
The sketch is available at https://github.com/jasonful/Tides and requires 3 libraries:
- “ESP8266 Weather Station”, available from the Arduino Library Manager (or here). You will only need these 6 files: ESPHTTPClient.h, ESPWiFi.h, OpenWeatherMapCurrent.cpp, OpenWeatherMapCurrent.h, OpenWeatherMapForecast.cpp, OpenWeatherMapForecast.h and can delete the rest.
- “Json Streaming Parser” available from the Arduino Library Manager (or here)
- https://github.com/LilyGO/TTGO-Epape-T5-V1.8/tree/master/epa2in13-demo Even though the code is not packaged as a true library, you can just copy it under your libraries directory and include it.
Step 6: Configure the Software
There are several parameters you will have to set (and a few you may want to set) in the env_config.h file, including:
- WiFi SSID and password
- NOAA station id (in other words, where are you)
- OpenWeatherMap AppID, which you will need to register for (it’s easy and free)
- OpenWeatherMap LocationID (again, where are you)
- CONFIG_USE_TPL5110, which allows you to use a T5 without a TPL5110. Instead, the software will enter deep sleep mode. The T5 board draws about 8 ma in deep sleep, so I’d only expect the battery to last a few days.
Step 7: How the Software Works
(You can skip this part if you don’t care.)
The goal is to wake up once a day, but since the maximum interval of the TPL5110 is only 2 hours or so, the T5 has to wake up more often. So after it downloads tide and weather data, it calculates how many of these 2 hour intervals there are between now and 4:00 am tomorrow morning. This is slightly complicated by the fact that the TPL5110 totally cuts power to the T5, which is good for the battery, but it means we lose RAM and the real-time clock. It’s like waking up every morning with amnesia. So to figure out what time it is now, it extracts it from NOAA’s HTTP header. And to remember how many 2-hour intervals there are remaining, it writes that counter to non-volatile storage (flash). Every time it wakes up, it checks that counter, decrements it, stores it, and if it greater than zero, it immediately sends a signal to the TPL51110 (“Done”) telling it to put it to sleep. When the counter hits zero, the code downloads new data, and recalculates and resets the counter.
Step 8: Run It
Make sure the switch on the left side of the T5 is in the up (on) position, upload the sketch to the T5, and within a few seconds the screen should update with tide and weather info.
If you need to debug the software, change the “#define DEBUG 0” at the top of Tides.ino to “#define DEBUG 1”. This will turn on serial debug output, and also display at the bottom of the e-paper the number of restarts remaining before it downloads new data, and the time it last downloaded data.
Step 9: Future Directions
- The use of the TPL5110 combined with an e-paper display is a great way to display any data that does not change often, with excellent battery life.
- When I was designing this, I considered using the TrigBoard, which is an ESP8266 board with a TPL5111 on board. It would have required getting a separate e-paper display and e-paper driver board like this or this. Or a driver+board combo like this or this. To port the code to ESP8266, I think the SSL code will have to use fingerprints instead of certificates, and the non-volatile storage code will need to use EEPROM or RTC memory.
- I recently heard that the Lolin32 board is pretty decent in deep sleep mode : about 100uA. Not as good as the TPL51110 board (20uA according to Adafruit) but good enough.
- OpenWeatherMap returns a lot more weather data than I am displaying. Including icon ids, which would require finding monochrome icons somewhere.
Source: Tide and Weather Clock
- How often does the TPL5110 wake the TTGO T5?
The TPL5110 is set to wake the T5 about every 2.5 hours (trimmed to ~145 minutes on the author's board). - Can the device download data less frequently than the wake interval?
Yes; the T5 wakes multiple times but counts intervals and downloads data roughly once per day, around a specified time such as 4am. - What data sources does the project use for tides and weather?
Tide data is downloaded from NOAA and weather data from OpenWeatherMap. - Do I need a capacitor for reliable operation?
Yes; a 220 uF capacitor is important because without it the TPL5110 will not reliably turn on the T5. - How is the battery connected for charging?
Use a JST-PH cable so the battery can be disconnected for charging rather than hardwiring it. - What software and libraries are required?
The sketch from https://github.com/jasonful/Tides requires the ESP8266 Weather Station files, Json Streaming Parser, and the TTGO e-paper demo files. - How do I set WiFi and location parameters?
Configure WiFi SSID and password, NOAA station id, OpenWeatherMap AppID, and OpenWeatherMap LocationID in env_config.h. - Can this run without the TPL5110?
Yes; setting CONFIG_USE_TPL5110 makes the software use deep sleep instead, but deep sleep draws about 8 mA so battery life will be much shorter. - How does the T5 keep track of time across power cuts?
It extracts the current time from NOAA's HTTP header and stores the remaining wake-interval counter in non-volatile flash. - What is the demonstrated battery life?
After one year the battery measured 4.00 volts, indicating the clock could conceivably run for many years.