Summary of The Self-Balancing Robot using Arduino
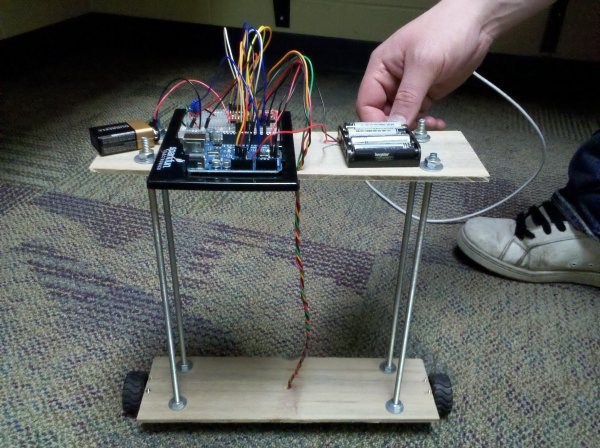
This project details the design and construction of "Theobald," a self-balancing two-wheeled robot inspired by Segway technology. The system uses an Arduino Uno microcontroller paired with an IMU (accelerometer and gyroscope) to sense tilt angles. Based on this input, motor drivers control two wheels to maintain balance without human intervention. The physical frame consists of two platforms held by threaded rods, with weight concentrated at the top for stability.
Parts used in The Self-Balancing Robot:
- Arduino Uno
- ATMega328 Microcontroller
- IMU (SEN-10121 Accelerometer/Gyroscope)
- Two Motors
- Motor Driver
- Top Platform
- Bottom Platform
- Four Threaded Rods
- Power Jack
- USB Connection
Introduction
The idea of this project was to design and construct a robot that consists of a body and two wheels that would be able to balance on its own. This behavior is similar how a segway (a new mode of transportation) works. Our goal was to have a working finished product – a robot that, without human interaction, could balance on two wheels.
High Level – Physical Design
The design of this project is relatively simple at first glance. Physically we planned to have a body, which would be made of two platforms separated and held in place by four threaded rods. The bottom platform would simply be for holding the wheels in place. The top would hold the microcontroller and supporting hardware (which will be addressed next). The weight near the top helps keep the robot more stable, so the wheels can correct for tipping more gradually.
High Level – Microcontroller Interfacing Design
In order to make Theobald balance, we need the two most basic things in computing aside from the microcontroller itself – input and output. Our input consists of something that can sense what angle the robot is at in relation to the ground. A few things can do this: we could find distances from a side of the robot to the ground using infrared distance sensors or supersonic range finders, or we could use a combination of and accelerometer and gyroscopes to get the angle in relation to the earth and correct that way. Then we also need output. This comes in the form of our two motors which will attempt to right the falling robot. To control two motors without creating our own h-bridge motor controllers we need a motor driver with the following capabilities: interface with our microcontroller, output to two motors, and be able to go clockwise and counter-clockwise.
Member Task Distribution
This project was done in a very collaborative manner. The main construction of Theobald (as far as the frame) was completed by Ethan since he was actually in the process of building a doghouse and had all the equipment and materials at hand. After the frame was complete all members collaboratively assembled pieces, soldered, researched, developed, implemented, tested and reimplemented. After finishing, the bulk of this webpage was completed by Ethan while Zech and Tony worked on our presentation.
Hardware – Microcontroller (Arduino Uno)
The microcontroller we used is the Arduino Uno which is built on the ATMega328 microcontroller. Arduino builds the board that uses this microcontroller and gives it useful interfaces like a power jack, built in 16MHz clock, USB connection, and convenient spots for hooking up wires. Visit the link to get all the specifics with the Arduino Uno.
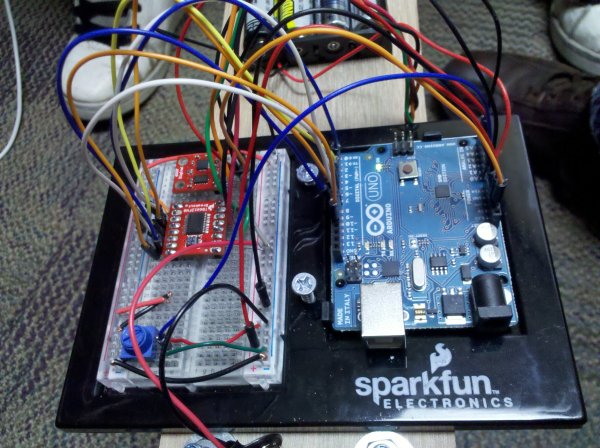
Hardware – IMU (SEN-10121)
This accelerometer/Gyroscope combination (often called an Inertial Measurement Unit or IMU) is very convenient in that it combines two nice devices and uses a serial interface for output when requested. If the output instead was analog, it would be up to the ATMega328′s analog to digital converter to get a digital value which has only 10 bits of precision.
For more detail: The Self-Balancing Robot using Arduino
-
What is the primary goal of the project?
The goal was to create a working finished product—a robot that could balance on two wheels without human interaction. -
How does the physical design contribute to stability?
The design places weight near the top using two platforms separated by threaded rods, allowing the wheels to correct for tipping more gradually. -
What components are used for input sensing?
The robot uses an accelerometer and gyroscopes combined in an IMU to determine the angle in relation to the earth. -
What hardware serves as the output mechanism?
The output consists of two motors that attempt to right the falling robot based on sensor data. -
Why was the Arduino Uno selected for this project?
The Arduino Uno was chosen because it is built on the ATMega328 and provides useful interfaces like a power jack, 16MHz clock, and USB connection. -
How does the IMU improve data precision compared to analog outputs?
The IMU uses a serial interface for output, avoiding the need for the ATMega328's analog to digital converter which has only 10 bits of precision. -
Who was responsible for constructing the main frame?
Ethan completed the main construction of the frame since he had the necessary equipment and materials from building a doghouse. -
What capabilities must the motor driver have?
The motor driver must interface with the microcontroller, output to two motors, and be able to rotate both clockwise and counter-clockwise.